• Skip to main content
  • Skip to primary sidebar
  • Skip to footer
  • Blog
  • About
  • Contact
  • FAQ
  • Sponsor

see kate sew

sewing, crafts, tutorials, DIY

  • Patterns
    • Free Patterns
    • Pattern of the Month
  • Tutorials
    • Accessories
    • Bags and Pouches
    • Clothing
    • Costumes
    • Crafts
    • Cricut Projects
    • Holiday
    • Household
    • Kids
    • Maternity
    • Quilting
  • Topics
    • Baby
    • Boy
    • Christmas
    • dog
    • Dolls
    • Easter
    • Girl
    • Halloween
    • Lookbook
    • Party
    • pet
    • Printables
    • Training
    • women
  • No Sew
  • Sewing 101
  • Sew4Good
  • Pet
  • Sewing Room
    • DreamBox
  • Reviews
Home
  • Patterns
    • Free Patterns
    • Pattern of the Month
  • Tutorials
    • Accessories
    • Bags and Pouches
    • Clothing
    • Costumes
    • Crafts
    • Cricut Projects
    • Holiday
    • Household
    • Kids
    • Maternity
    • Quilting
  • Topics
    • Baby
    • Boy
    • Christmas
    • dog
    • Dolls
    • Easter
    • Girl
    • Halloween
    • Lookbook
    • Party
    • pet
    • Printables
    • Training
    • women
  • No Sew
  • Sewing 101
  • Sew4Good
  • Pet
  • Sewing Room
    • DreamBox
  • Reviews

11.11

flowerburst bangle

Welcome to See Kate Sew! If you’re new here, sign up for my email newsletter for access to free patterns, tutorials and all the latest sewing news! Tour my sewing room HERE!

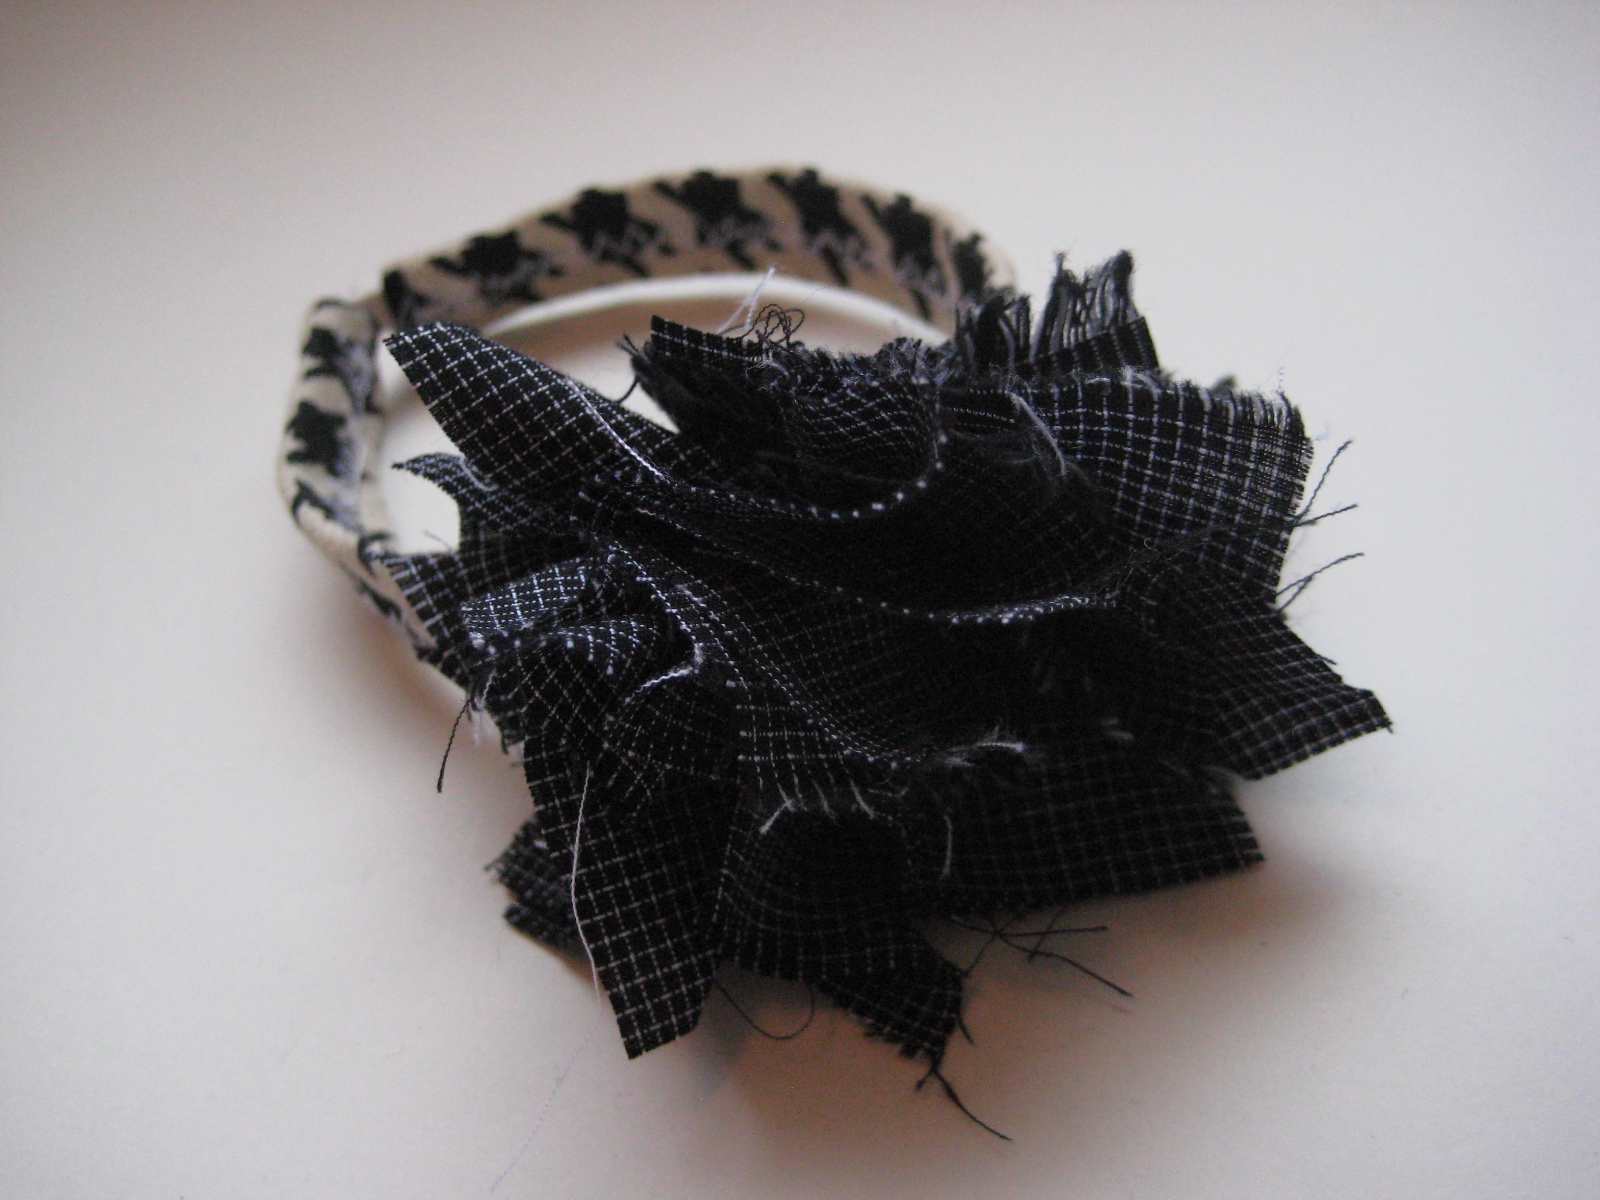
Flowerburst Bangle Tutorial

Frayed edges and exposed stitching gives these cute bangles a deconstructed look. Layer them up or wear them alone. I love wearing “flowers” on my wrist, like a corsage. These bangles are made with sturdy fabric and just a little elastic to make them easy to get around your wrist. 


Materials:
2″ by 8.5″ rectangle of fabric, home decor weight works best, for the bangle
6″ by 6″ piece of quilting weight cotton for the flowers
1.5″ of elastic


1. Press edges of bracelet fabric until they meet in the middle, wrong sides together.
2. Turn in short edges 1/4″ and press.

3. Repeat step 1 so no fabric edges are shown. Press.
4. Insert elastic into one edge and pin. Keep pinning all the way down until your bracelet looks like a caterpiller. 

5. Then wrap the bracelet into a circle and insert the other elastic end into the other edge. 
6. Use a zigzag stitch to close the inside seam and secure elastic in place. It is a little tricky putting the bangle under your presser foot, but just look at the photo and do that. Then stitch slowly to make sure you are staying in the middle of the bangle.
7. Stitch over again using a zigzag stitch to add to the deconstructed look.

8. Cut piece of quilter’s cotton into 2″ squares. You should have nine pieces.
9. Fold each square in half lengthwise. Fold again until you have a square. Then fold it into a triangle, pin and stitch layers in place.
10. Open the triangles layers slightly and sew to the bangle by hand. 

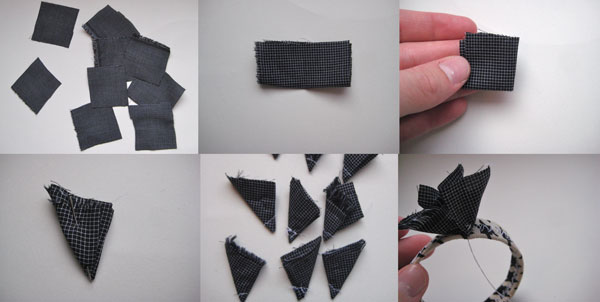
11.Continue sewing each one onto the bangle. Position them in a cluster to get the flowerburst effect. The edges will fray as you wear it. It just gets better with age!

7 Comments | Accessories

Exclusive Free PatternRuffled Apron

Sign up for my email newsletter and receive my ruffled apron pattern totally FREE!

We take your privacy seriously. See our privacy policy here. Unsubscribe at any time.

You may also like these posts...

Why I never throw away fabric scraps with this viral Pinterest hack!Lanyard PatternFace Mask Holder Strap DIY – Lanyard with clipsEasy Leopard Costume DIY | Cat Ears TutorialDIY Leopard Costume and Easy Homemade Cat Earsacorn garland + guy gift scarf + a sale!

Reader Interactions

7 Comments

  1. LBT

    11/11 at 6:41 PM

    Fantastic! I love this so much!!! The fabric/color choices are gr8 and I love the deconstructed look. Nicely done!

    Found you from Theme Party Thursday (Ain’t She Crazy). Now following. Come check out LBT and maybe follow back when you get a chance. Thx!

    P.S. Love your smashed ruffle clutch, 2 btw. Didn’t get a chance to leave a comment last week. :/

    Angelene
    LBT
    http://littlebuggietutu.blogspot.com

  2. Anna @ Blissful Whimsy

    11/11 at 7:38 PM

    very cute :o)

  3. apumpkinandaprincess

    11/13 at 5:16 AM

    What a cute headband, thanks for sharing!

  4. Cha Cha

    11/13 at 2:33 PM

    So very sassy, I love this. You did a great job, thanks for sharing.

    Cha Cha

  5. Danielle

    11/13 at 2:34 PM

    Found you on weekend wrap-up. I love this!

  6. Nichelle

    11/16 at 10:54 PM

    I LOVE THIS! This is so fabulous! I found your link through tatertotsandjello! I posted a link of some of my stuff! I’d love for you to check it out! I’m also doing a giveaway soon for a FREE UNIQUE BAG!!!

    I’d LOVE for you to stop by!
    http://vintagewannabee.blogspot.com/
    Mucho love. Nichelle.

  7. WobiSobi

    12/23 at 12:38 PM

    Such a great idea. Love this.

Primary Sidebar

  • Facebook
  • Twitter
  • Instagram
  • Pinterest
  • Email

Exclusive Free PatternRuffled Apron

Sign up for my email newsletter and receive my ruffled apron pattern totally FREE!

We take your privacy seriously. See our privacy policy here. You can unsubscribe at any time.

Don’t miss these popular posts!

easy baby dress pattern for the summertime

easy baby dress pattern for the summertime

modern ombre + b/w triangle quilt tutorial + pattern

modern ombre + b/w triangle quilt tutorial + pattern

Fabric

Quilted Cosmetic Case Kiss Me KateKiss Me, Kate FabricOne Hour Granny Square Quilt Tutorial | See Kate SewModern Granny Square Quilt Whole Cloth

Pattern Hacks

Easy Baby Summer Dressthe EMMA pattern | See Kate SewThe EMMA Dress

Footer

Hello friends!

My name is Kate, a twenty something fashion lover and mother of two. When I’m not chasing kids you can find me at my sewing table or daydreaming up new designs. You can read more about me here. Thank you for visiting!

8a918f8da8e0e69102dc0f33a718de85a99c31a57283e0e3e2

FOLLOW ME HERE

  • Facebook
  • Twitter
  • Instagram
  • Pinterest
  • Email
  • Blog
  • About
  • Contact
  • FAQ
  • Sponsor

Copyright © 2025 See Kate Sew  •  All Rights Reserved  •  Privacy Policy  •  Site Design by Emily White Designs