• Skip to main content
  • Skip to primary sidebar
  • Skip to footer
  • Blog
  • About
  • Contact
  • FAQ
  • Sponsor

see kate sew

sewing, crafts, tutorials, DIY

  • Patterns
    • Free Patterns
    • Pattern of the Month
  • Tutorials
    • Accessories
    • Bags and Pouches
    • Clothing
    • Costumes
    • Crafts
    • Cricut Projects
    • Holiday
    • Household
    • Kids
    • Maternity
    • Quilting
  • Topics
    • Baby
    • Boy
    • Christmas
    • dog
    • Dolls
    • Easter
    • Girl
    • Halloween
    • Lookbook
    • Party
    • pet
    • Printables
    • Training
    • women
  • No Sew
  • Sewing 101
  • Sew4Good
  • Pet
  • Sewing Room
    • DreamBox
  • Reviews
Home
  • Patterns
    • Free Patterns
    • Pattern of the Month
  • Tutorials
    • Accessories
    • Bags and Pouches
    • Clothing
    • Costumes
    • Crafts
    • Cricut Projects
    • Holiday
    • Household
    • Kids
    • Maternity
    • Quilting
  • Topics
    • Baby
    • Boy
    • Christmas
    • dog
    • Dolls
    • Easter
    • Girl
    • Halloween
    • Lookbook
    • Party
    • pet
    • Printables
    • Training
    • women
  • No Sew
  • Sewing 101
  • Sew4Good
  • Pet
  • Sewing Room
    • DreamBox
  • Reviews

08.18

pleat week guest! – amy from positively splendid

Welcome to See Kate Sew! If you’re new here, sign up for my email newsletter for access to free patterns, tutorials and all the latest sewing news! Tour my sewing room HERE!

Today’s pleat guest is Amy from Positively Splendid! Her blog is the perfect mix of crafts, sewing and DIY home decor. Check out her massive tutorials page!  I love this printable alphabet art for a kid’s room! Another kid’s room idea and one of my favorite of Amy’s projects is this nursery wall art! And if all those don’t keep you busy enough today she’s sharing a cute pleated accessory!

……………….
Hello, everyone! 
My name is Amy, and my blogging home is Positively Splendid, a little creative haven where you’ll find everything from simple craft ideas to sewing projects, and just about everything in between. 

My goal is for my blog to be a haven of sewing, crafting and DIY inspiration, and a place where creative people of all skill levels can come and feel right at home. Because I feel strongly that everyone should be equipped to create something beautiful on their own, each and every project at Positively Splendid is explained to the last detail with step-by-step photo tutorials. I like to think of each tutorial as sitting down with friends to learn something new together! I would love for you to stop in for a visit!

I am so excited to be taking part in Kate’s Pleat Week! There have been so many fabulous ideas shared so far.

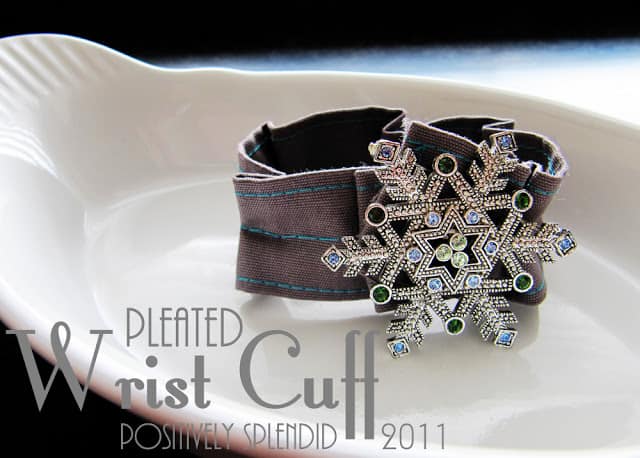
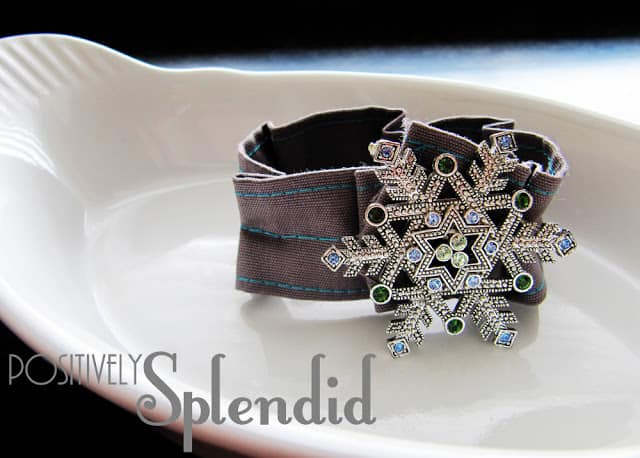
Today I’m going to share a super quick, super easy tutorial for creating a pleated wrist cuff. You can wear it on its own to make a simple statement, or you can gussy it up a bit by using it as a vehicle to showcase your favorite brooch or pin! (Even a snowflake brooch in the middle of August, if you feel so inclined. ;)

For this project, you will need…
(1) 3″x20″ length of fabric (you might need to add a couple of inches to the length here, depending on the size of your wrist)
Thread
1 set of prong snaps and snap-setting tool
Basic sewing supplies: machine, shears, etc.
Brooch or decorative pin (optional)
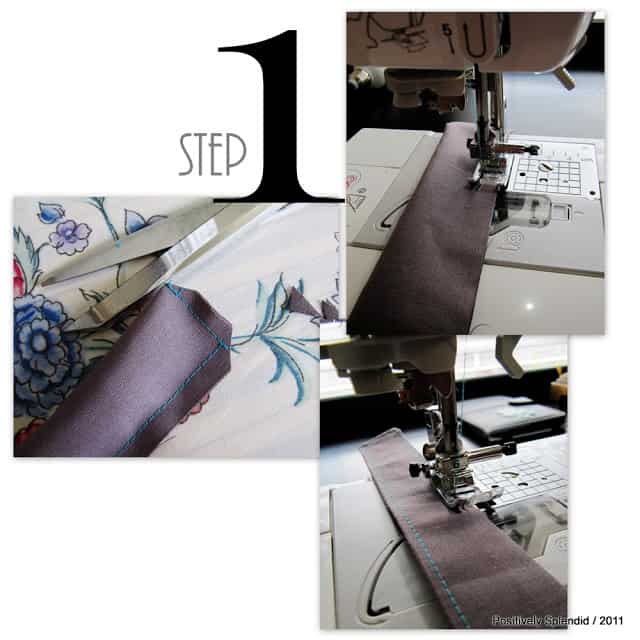
step 1 / Fold your fabric piece in half lengthwise, wrong sides facing. Using a 1/4″ seam, stitch across one short side and down the open long side of your strip. Snip the corners at the closed end of your piece, and press the seams open. Turn your tube right-side out, paying particular attention to the corners. Press. Edgestitch along all edges except the open (unsewn) end of your piece. (You’ll leave that unstitched, since that is the end we’ll be trimming off when we customize the fit of our cuff.)
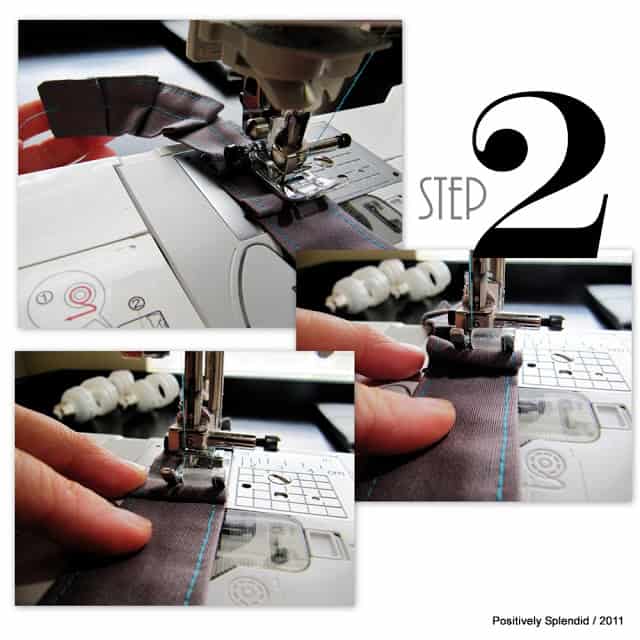
step 2 / Now, the pleating fun begins! Form pleats in your piece, either by pinning each one into place and then stitching down the center, or by using my pleater-cheater method: Starting at the finished end of your piece, stitch down the center of your piece for 3/4″. With your needle down, lift your presser foot, and push the strip of fabric back toward the needle to ease a small S-shaped fold of fabric up and under the foot to form your pleat. Lower the presser foot, and stitch over the center of your pleat to secure. Repeat until you reach the end of the strip.
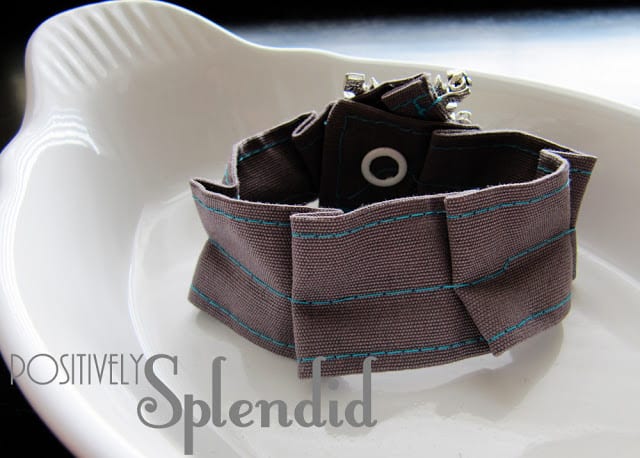
step 3 / Wrap your pleated piece around your wrist, and determine the best fit to the nearest pleat. This is where you will trim your cuff to shorten it, so make sure that this pleat is closest to the end of your cuff that has yet to be stitched, and not the finished end of your cuff. Edgestitch along the fold of this pleat to finish it, and then trim away any excess fabric from your strip so you have a nice, clean edge, as shown. Apply a set of snaps to the ends of your cuff to form a closure. (If you need, you can refer to this snap-setting tutorial on my blog.)
You are finished! 
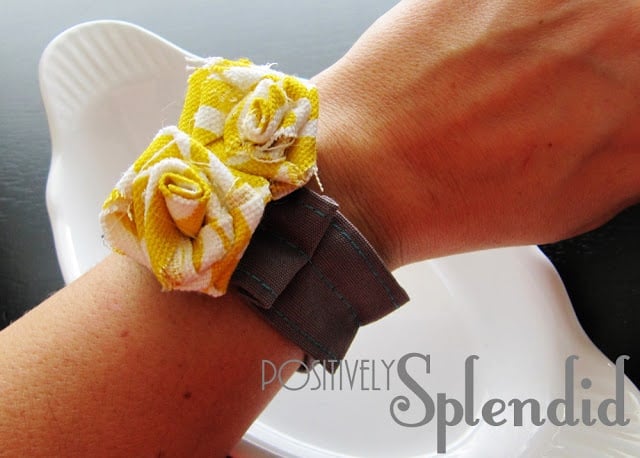
On her own, she is fashionably understated…
…but paired with a brooch…
…or a handmade rosette pin, she really shines!
Thanks so much to Kate for letting me share this little project today. Y’all are welcome at Positively Splendid any time! You can also find me hanging out on Facebook, Twitter, and Pinterest!


Photobucket 

………………..

 Thanks Amy! Find more of Amy here:

Facebook

 Twitter

 Pinterest

Leave a Comment | Accessories

Exclusive Free PatternRuffled Apron

Sign up for my email newsletter and receive my ruffled apron pattern totally FREE!

We take your privacy seriously. See our privacy policy here. Unsubscribe at any time.

You may also like these posts...

18" Doll Sewing Pattern | See Kate SewManhattan DOLL pattern now available!DIY DOLL TENT TUTORIALDIY Doll Tent for LOL surprise dollsmen’s skinny + square tie PATTERN!DIY flower hair clip

Primary Sidebar

  • Facebook
  • Twitter
  • Instagram
  • Pinterest
  • Email

Exclusive Free PatternRuffled Apron

Sign up for my email newsletter and receive my ruffled apron pattern totally FREE!

We take your privacy seriously. See our privacy policy here. You can unsubscribe at any time.

Don’t miss these popular posts!

easy baby dress pattern for the summertime

easy baby dress pattern for the summertime

modern ombre + b/w triangle quilt tutorial + pattern

modern ombre + b/w triangle quilt tutorial + pattern

Fabric

Quilted Cosmetic Case Kiss Me KateKiss Me, Kate FabricOne Hour Granny Square Quilt Tutorial | See Kate SewModern Granny Square Quilt Whole Cloth

Pattern Hacks

Easy Baby Summer Dressthe EMMA pattern | See Kate SewThe EMMA Dress

Footer

Hello friends!

My name is Kate, a twenty something fashion lover and mother of two. When I’m not chasing kids you can find me at my sewing table or daydreaming up new designs. You can read more about me here. Thank you for visiting!

8a918f8da8e0e69102dc0f33a718de85a99c31a57283e0e3e2

FOLLOW ME HERE

  • Facebook
  • Twitter
  • Instagram
  • Pinterest
  • Email
  • Blog
  • About
  • Contact
  • FAQ
  • Sponsor

Copyright © 2023 See Kate Sew  •  All Rights Reserved  •  Privacy Policy  •  Site Design by Emily White Designs