• Skip to main content
  • Skip to primary sidebar
  • Skip to footer
  • Blog
  • About
  • Contact
  • FAQ
  • Sponsor

see kate sew

sewing, crafts, tutorials, DIY

  • Patterns
    • Free Patterns
    • Pattern of the Month
  • Tutorials
    • Accessories
    • Bags and Pouches
    • Clothing
    • Costumes
    • Crafts
    • Cricut Projects
    • Holiday
    • Household
    • Kids
    • Maternity
    • Quilting
  • Topics
    • Baby
    • Boy
    • Christmas
    • dog
    • Dolls
    • Easter
    • Girl
    • Halloween
    • Lookbook
    • Party
    • pet
    • Printables
    • Training
    • women
  • No Sew
  • Sewing 101
  • Sew4Good
  • Pet
  • Sewing Room
    • DreamBox
  • Reviews
Home
  • Patterns
    • Free Patterns
    • Pattern of the Month
  • Tutorials
    • Accessories
    • Bags and Pouches
    • Clothing
    • Costumes
    • Crafts
    • Cricut Projects
    • Holiday
    • Household
    • Kids
    • Maternity
    • Quilting
  • Topics
    • Baby
    • Boy
    • Christmas
    • dog
    • Dolls
    • Easter
    • Girl
    • Halloween
    • Lookbook
    • Party
    • pet
    • Printables
    • Training
    • women
  • No Sew
  • Sewing 101
  • Sew4Good
  • Pet
  • Sewing Room
    • DreamBox
  • Reviews

03.21

sewing 101: the pintuck foot

Welcome to See Kate Sew! If you’re new here, sign up for my email newsletter for access to free patterns, tutorials and all the latest sewing news! Tour my sewing room HERE!

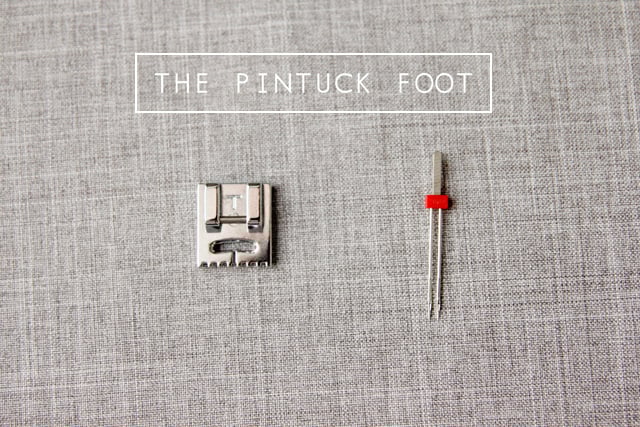
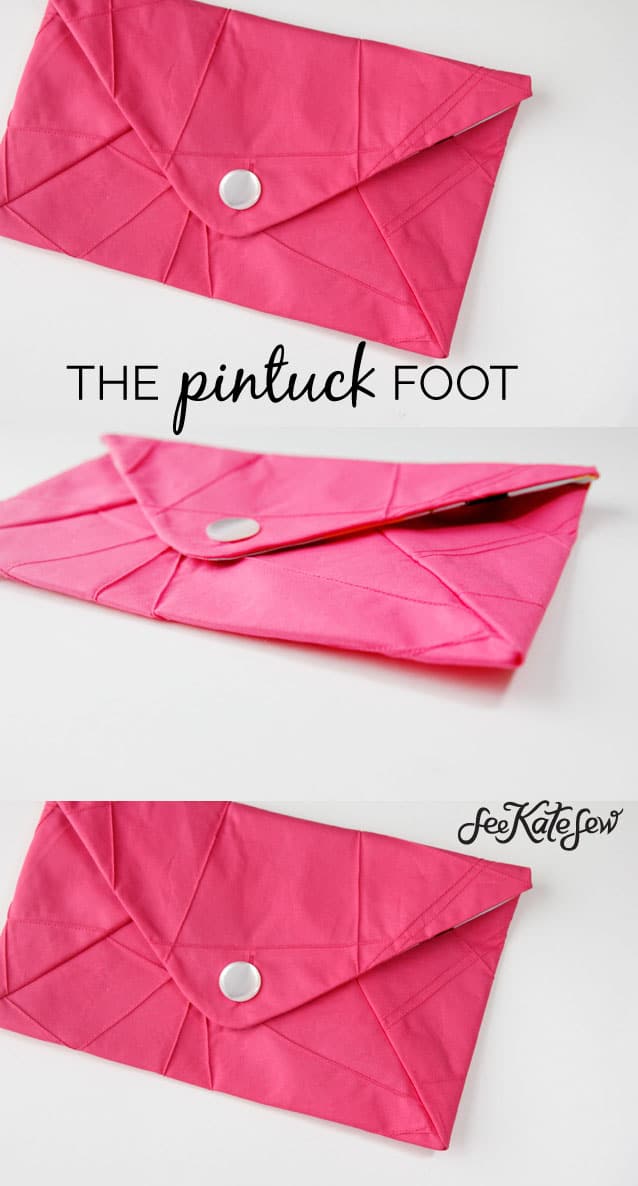
This foot blew my mind, it’s called the pintuck foot! I love pintucks, but I hate making them. This foot makes the pintucks for you! Amazing. It’s pretty simple, all you need is the foot and a twin needle.

Insert your pintuck foot and twin needle. Adjust your tension to the highest setting. This is really important. A high tension will make the pintuck stick up from the fabric, if it is too loose, the pintuck will not form and it will make two lines of thread.

If you look closely, the pintuck foot has a series of grooves on the bottom. The grooves are there so you can space your pintucks perfectly if you’re making more than one, say on the front of a blouse. They will be parallel and evenly spaced.

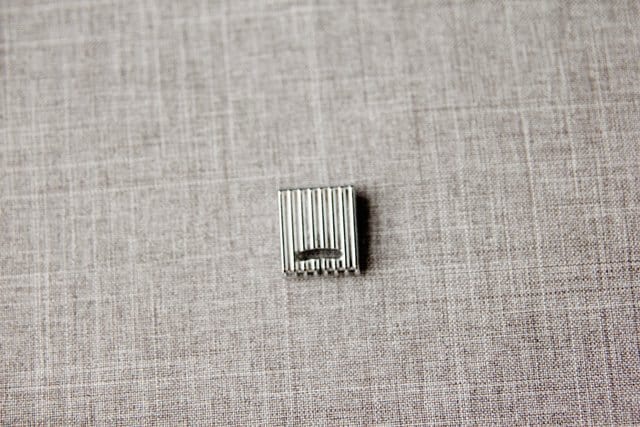
They help you line up your pintucks so they are perfectly straight, just align your first pintuck into one of the grooves and use that as a guide for your next one.

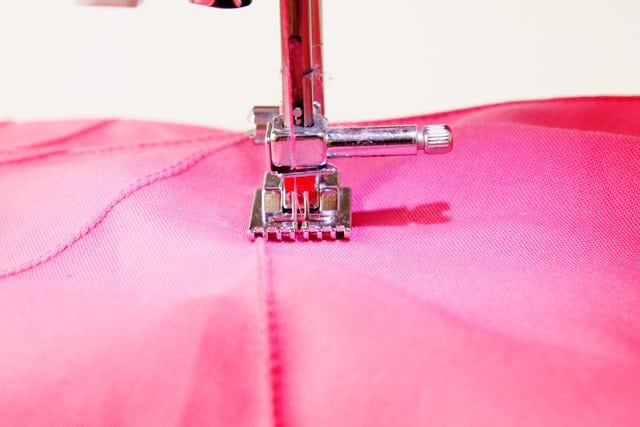
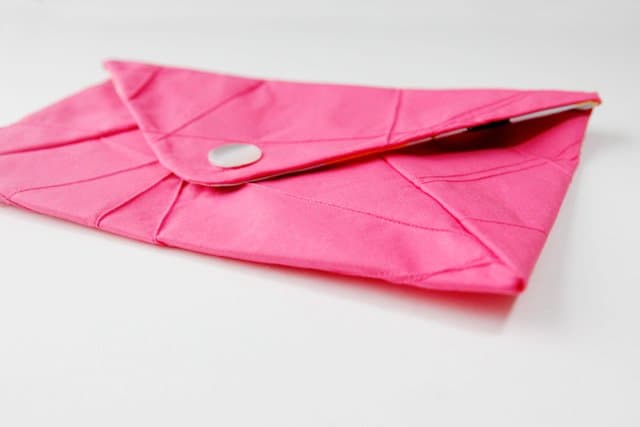
I did an abstract design on this piece of pink fabric that became a clutch for the clutch-a-long. So easy, and a really fun way to customize fabric. I cut my piece larger than the pattern piece and did the pintucks before cutting the fabric out from the pattern piece. That way you don’t have to do any patternwork!

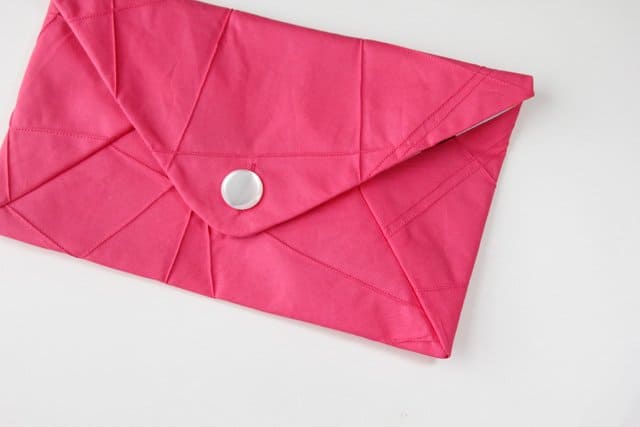
I really love the texture it added to my pink clutch. Turns a solid into something a little more interesting! I wish you could touch the fabric, it’s so cool now!

Once I figured out the tension thing, this foot became so user friendly! Stick it on, add a twin needle, crank up the tension and GO! New favorite? Possibly! I’m excited to make a fancy blouse with this foot!

Fabrics + patterns used in this post:
Envelope clutch tutorial
pink: Robert Kaufman solid
lining: girlfriends Surf by ann kelle

The Pintuck Foot | See Kate Sew

13 Comments | Sewing 101

Exclusive Free PatternRuffled Apron

Sign up for my email newsletter and receive my ruffled apron pattern totally FREE!

We take your privacy seriously. See our privacy policy here. Unsubscribe at any time.

You may also like these posts...

how to bind a quilt – quilt binding tutorialsewing 101: handmade piping with the welting footHP streamHOW TO DO IT ALL + make time for sewing with HPRecess Raglan Front Pocket Add-on | See Kate SewSewing 101: Simple Front Pocket Tutorial

Reader Interactions

13 Comments

  1. firstmute

    03/21 at 1:13 PM

    Oh my goodness, I never even knew such a thing existed! Pintucks are so pretty and feminine, but, yes, a pain to make. This is definitely going on my wishlist.

  2. Deborah Karen Fillmer

    03/21 at 2:05 PM

    Great tutorial on using this foot. I also use this foot to make piping. Use a single needle and 1″ strips of bias fabric folded over a thick crochet thread and Voilà, custom piping.

    • Carolyn

      03/21 at 6:55 PM

      very clever…as if the pintucks weren’t enough…now I KNOW I need this foot!

  3. Kristin

    03/21 at 2:10 PM

    Thanks for the post, I have been wanting to make a shirt for my daughter with pintucks, but putting it off because, well, I don’t want to spend the time to make the pintucks. I’m buying this foot on amazon now! I want you to know that I love when you feature new presser feet, they are all new to me!

  4. Alician

    03/21 at 2:21 PM

    I never would have thought about my tension. I think I tried pintucks a few years back and it turned out awful. I’m not even sure if I used a twin needle :/ Thanks for the tips!

  5. Mandy @ Sugar Bee Crafts

    03/21 at 2:32 PM

    You are the GURU of all sewing feet – – now I NEED this!

  6. Carolyn

    03/21 at 6:56 PM

    Thanks for this post…the pintuck foot is officially added to my wish list!

  7. delia

    03/21 at 7:08 PM

    You are the queen for showcasing cool sewing feet. Love this one and the way you used it! I am a sucker for pin-tucks.

  8. Luu

    03/21 at 9:25 PM

    I really like this abstract design!

  9. Louise Boyce

    03/22 at 11:40 AM

    Wow that is awesome! I am definitely going to purchase that foot, what size needle would you recommend? I have gone on Amazon to find one and there are quite a few different sizes, I would like to create pintucks like yours. :)

  10. Eva

    03/23 at 2:33 PM

    I like it very much!!! I’ll try it soon :P

  11. Kat

    03/23 at 6:25 PM

    Girrrrrrl you are a bad influence…. I know what I want in my easter basket now!!!!! Vivre la pintuck!

  12. Nancy Nelson

    04/09 at 11:05 PM

    I have a pintuck foot but really haven’t taken the time to try it out. Thanks for sharing the pointers and having such great pictures. It was a really cool idea to pintuck the fabric all over before cutting out the pattern pieces. I am always looking and learning new things.

Primary Sidebar

  • Facebook
  • Twitter
  • Instagram
  • Pinterest
  • Email

Exclusive Free PatternRuffled Apron

Sign up for my email newsletter and receive my ruffled apron pattern totally FREE!

We take your privacy seriously. See our privacy policy here. You can unsubscribe at any time.

Don’t miss these popular posts!

easy baby dress pattern for the summertime

easy baby dress pattern for the summertime

modern ombre + b/w triangle quilt tutorial + pattern

modern ombre + b/w triangle quilt tutorial + pattern

Fabric

Quilted Cosmetic Case Kiss Me KateKiss Me, Kate FabricOne Hour Granny Square Quilt Tutorial | See Kate SewModern Granny Square Quilt Whole Cloth

Pattern Hacks

Easy Baby Summer Dressthe EMMA pattern | See Kate SewThe EMMA Dress

Footer

Hello friends!

My name is Kate, a twenty something fashion lover and mother of two. When I’m not chasing kids you can find me at my sewing table or daydreaming up new designs. You can read more about me here. Thank you for visiting!

8a918f8da8e0e69102dc0f33a718de85a99c31a57283e0e3e2

FOLLOW ME HERE

  • Facebook
  • Twitter
  • Instagram
  • Pinterest
  • Email
  • Blog
  • About
  • Contact
  • FAQ
  • Sponsor

Copyright © 2025 See Kate Sew  •  All Rights Reserved  •  Privacy Policy  •  Site Design by Emily White Designs