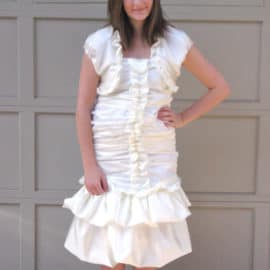
Today’s post was written by An of StraightGrain. StraightGrain is one of my favorite international blogs, written in Belgium . Her style is unique and fun! Today she’s sharing this simple ruffled dress tutorial!
Hi everyone! I’m An from StraightGrain, and I’m very excited to be showing a new tutorial here at Kate’s beautiful blog. Coming up with something ruffle-related presented a particular challenge for me, as I’m generally not a big fan of having many whistles and bells on clothing. But nothing better to spark your inspiration than a good challenge! A first plan for this series ended in a lot of frustration, which I vented here, but luckily, I soon had another idea.
In the last couple of years, I made a few shirred sundresses (based on this tutorial by Heather Ross), and lately, I developed a bit of a soft spot for dresses which start from the same principle: rectangle of fabric + straps = cute sundress. A first experiment resulted in this tutorial; a second one in the tutorial below.

This dress is made out of just 2 rectangular panels of fabric and some ribbon for the shoulder straps. So the ruffles are not cut separately – they are simply folded from the panels. The ruffles are stitched with elastic thread, so no zipper nor buttons are needed to put the dress on.
Materials
– thread (regular)
– elastic thread
– ribbon for the shoulder straps
– fabric: two rectangles, each (!) with the following measurements:
width: chest (circular) + 3/4″ (2 cm )
length: 12.5″ (31,3 cm) + desired length of the finished dress (excl. the straps, so measured from the armpit down)
Instructions
Note: to make the pictures more illustrative, I repeated each step on a small piece of solid white fabric, rather than on the striped fabric of the dress.
1. Serge or zigzag both side edges of each panel.
2. On the wrong side of each panel, draw 6 parallel lines (A, B, C, D, X, Y) as illustrated in the diagram below. On the right side of the fabric, draw lines X and Y, and also mark the position of the straps (see green O’s).
Note: for marking the position of the straps, first take an existing dress or top to decide how much the straps will ideally be apart. Next, find the middle of each panel, and mark this distance from both sides of the middle (so, the distance between O and O will be twice the desired distance between the straps on the finished dress)

3. Now, fold each panel on line A, wrong sides together, and press well with your iron. Repeat this step for lines B, C, and D, but this time putting the right sides together.
4. Put both panels with the right sides together, and stitch both side seams with a 3/8″ seam allowance. Carefully press seams open with the edge of your iron; try not to ‘erase’ the folds you made in step 3.

5. Stitch folds B, C, and D (not A) at foot width (1/4″ or 0,7 cm), all the way around.

The result will look something like this:

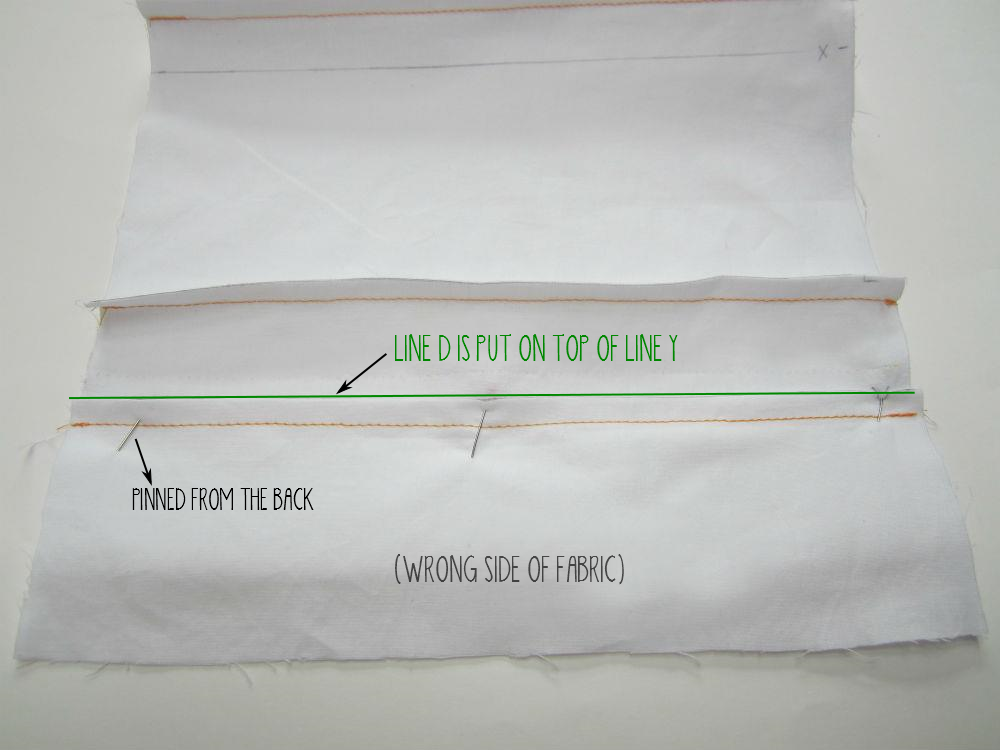
6. Pinnig time! Still on the wrong side of the fabric, pin line D onto line Y. This will create the lowest of the three ruffles. Use enough pins, and preferably insert the pins at the right side of the fabric (they’ll be easier to remove in step 8).
7. Wind elastic thread around your bobbin by hand (not with your machine), making sure not to stretch the elastic. Set your stitch length at 3.

8. Turn the dress right side out, and on the right side of the fabric, stitch the first ruffle at about 1/8″ (3 mm) from line Y, all the way around. Leave a long tail of thread at the beginning and end, and do not backstitch. Next, stitch another line at foot width (1/4″ or 7 mm) from line Y, also leaving a long tail of thread, also without backstitching.

9. Next, pin line C onto line X (wrong side of fabric), and repeat step 8. This will create the middle of the three ruffles.
10. Now, pin line B onto line A, and include the straps between both layers (refer to the marks made in step 2). This will create the top ruffle. Stitch all the way around at about 1/8″ (3 mm) from the edge, and once more at about 1/4″ (0.7 cm) from the edge, leaving long tails of thread and without backstitching.

11. At this point, your dress is probably still much too wide at the chest. You can reduce it by pulling the elastic threads (that is why we didn’t backstitch, and left long tails of thread). Always pull two elastic threads together, shifting the fabric so it is spaced evenly. Keep pulling until the chest of the dress is just a bit less wide than your child’s chest. Secure the elastic threads by tying them with at least 4 knots.
12. Set your stitch length back to regular, and finish the hem of the dress. Fold in 3/8″ (1 cm) and press, and again 3/8″ (1 cm) and press, and stitch. Your sundress is ready!

Thank you so much, dear Kate, for having me here today!
…..
Adorable, right?! If you liked this post, you’ll also love this dress with pleats and piping tutorial and this post about gathering fabric!


Lo siento, pero no he entendido nada.
No se si antes de este tutorial deberia de ver otro.
That’s so adorable!
such a cute dress, An!! thanks for the tute. :)
Darling! I love this dress An!
Thank you so much for your sweet comments, Sarah, Kristin and Delia! :-)
Oh my gosh, I LOVE THIS. You’re brilliant, I would’ve never thought to just use 2 panels of fabric that way and create such an adorable dress. Now I’ve got to do this for my girls. Seriously, amazing!