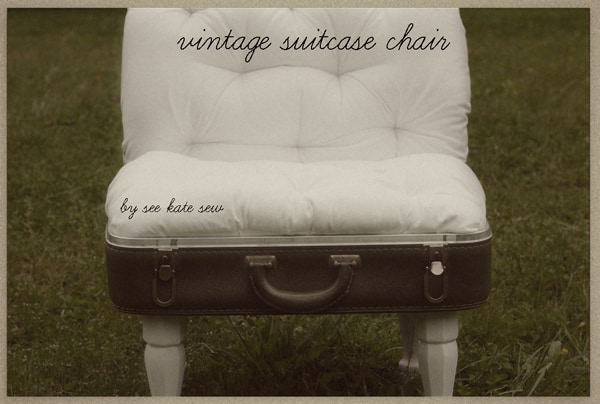
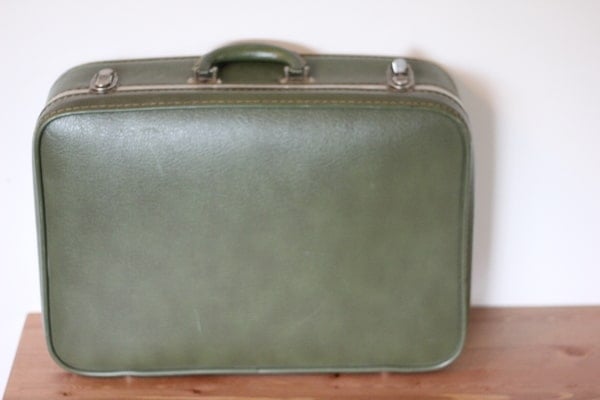
I love vintage luggage! It’s so nostalgic to me, I always am reminded of my grandfather’s travel journal that he wrote in the 40s. As a bonus, this suitcase smelled like my grandpa’s house when I bought it! Talk about nostalgia.
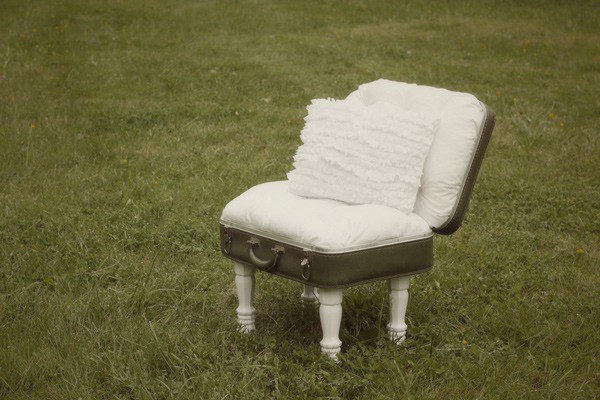
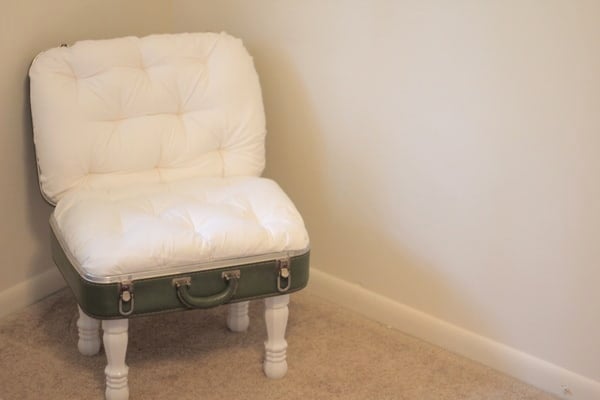
When I think of upcycling, I think of turning something into something completely different. So I picked up this old suitcase for under $3 and upcycled it into a chair. I even used some extra sheets for a double upcycled. I whipped out the power tools for this one; added some legs, tufted cushions and a few other details. And you’ve got yourself a statement piece. As a bonus, it’s sooo comfy to sit on.
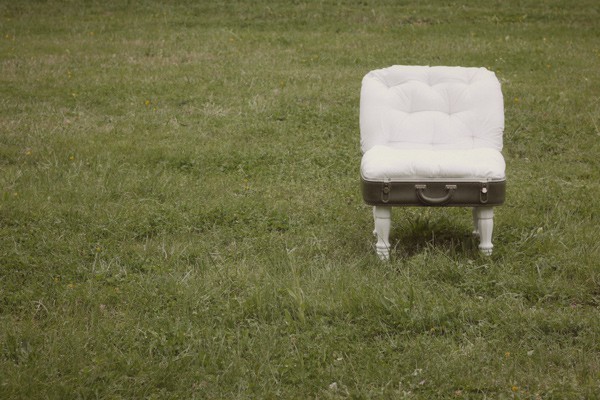
I love that it still looks like a suitcase, it has an old world appeal. So kick up your heels and take a seat in this vintage suitcase chair.
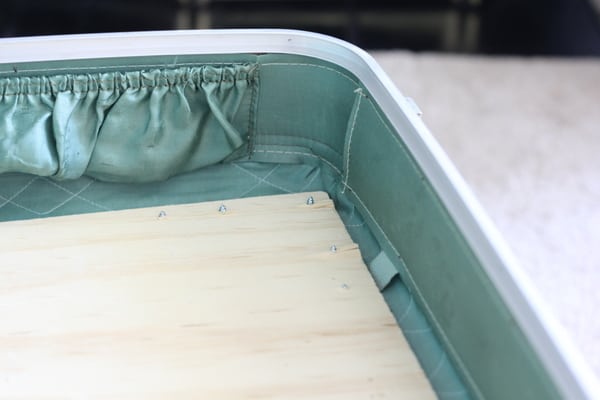
Suitcase sizes vary so you’ll have to figure out how much pillow or foam you want to make your cushions how you want them.
Start with a suitcase:
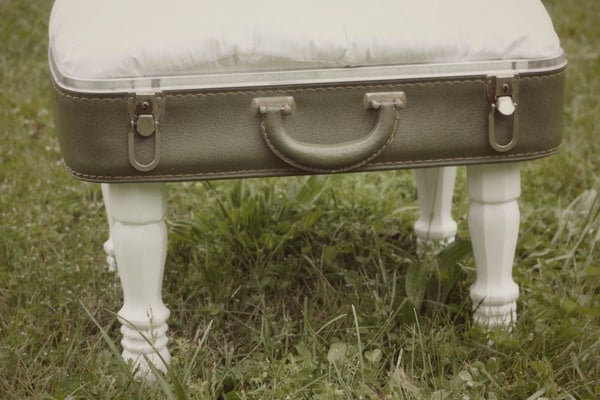
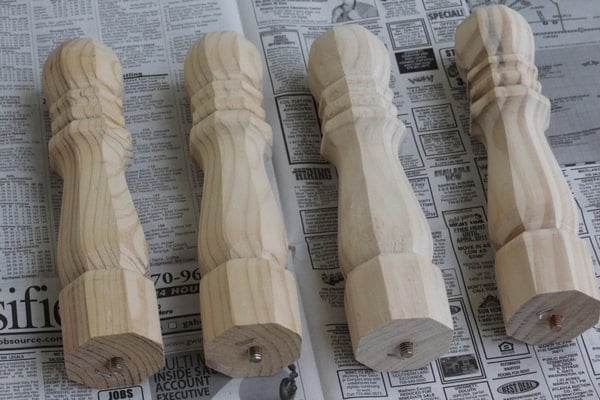
step 1: spray paint legs
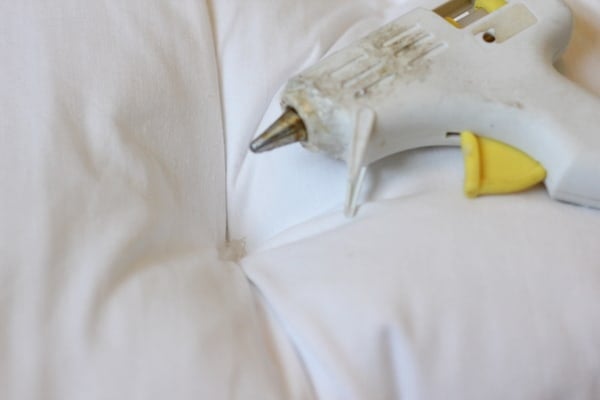
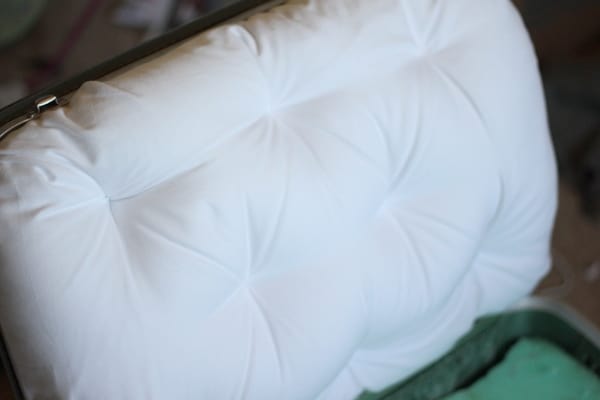
step 2: cover the pillows/foam with your fabric and tuft them. To tuft a pillow use a needle and thick thread. Tie it in a knot and sew through the pillow and back until you have a nice “tuft.” Just push the whole needle through your pillow and tie a knot. It’s a little tricky to get the needle through the pillow, but it is easier if you hold the pillow down with one hand (or a knee) while you sew. Or if you have a handy helper around, have them hold the plushness of the pillow down to make it easier. Make sure you don’t poke yourself though! You may consider using a thimble.
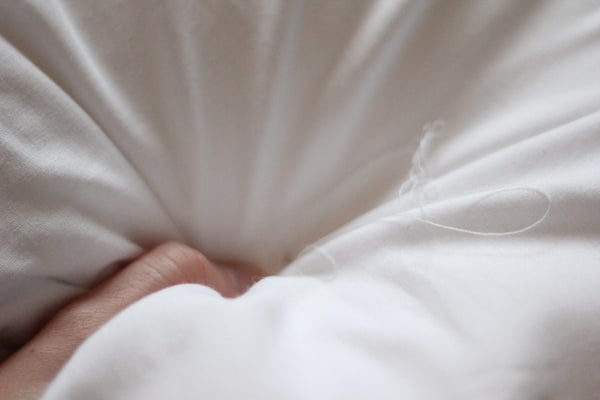
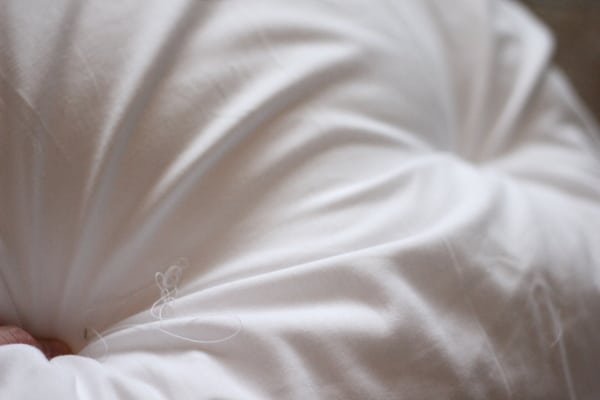
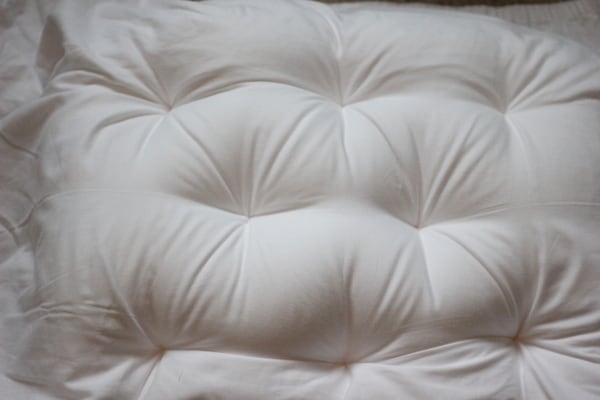
Then pull the fabric around the back of the pillow and baste it on with a needle and thread.

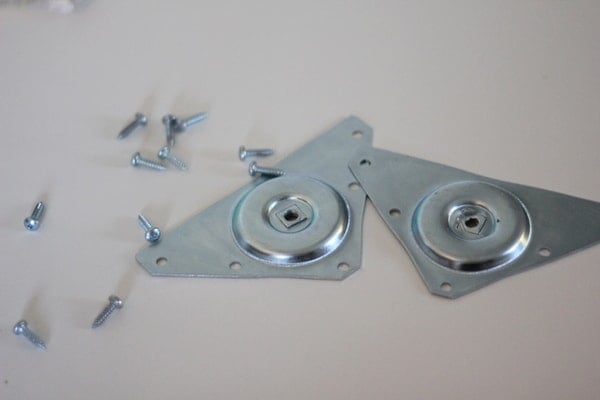
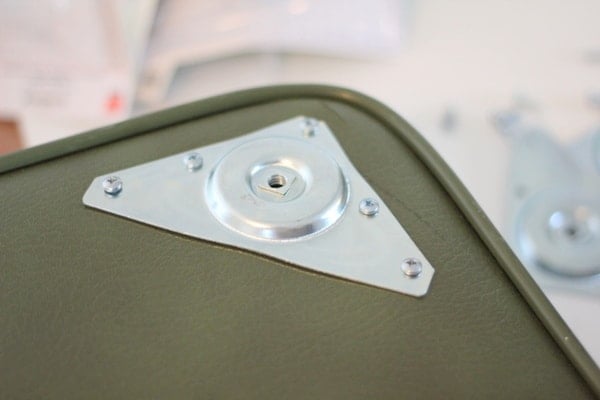
Once your holders are all set, screw in your (dried) legs.
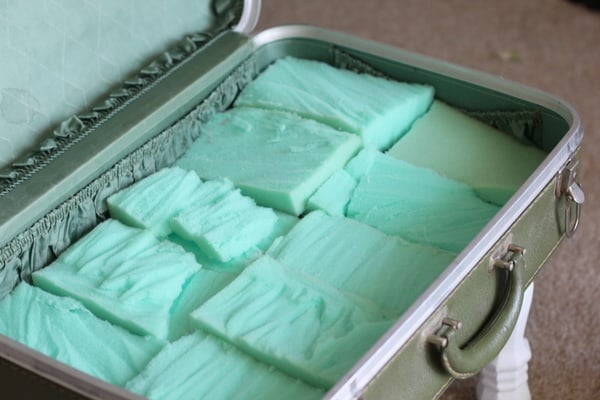
Step 4: Put a layer of foam in the bottom of the suitcase to raise the cushion just a little. I glued them all in place. Since the bottom of my suitcase, which will be the bottom of my chair, is a little deeper than the top, I wanted the pillow to stand up more. The foam just raises it up a little.
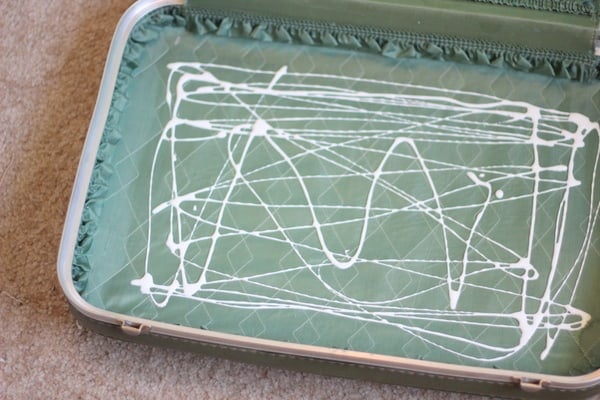
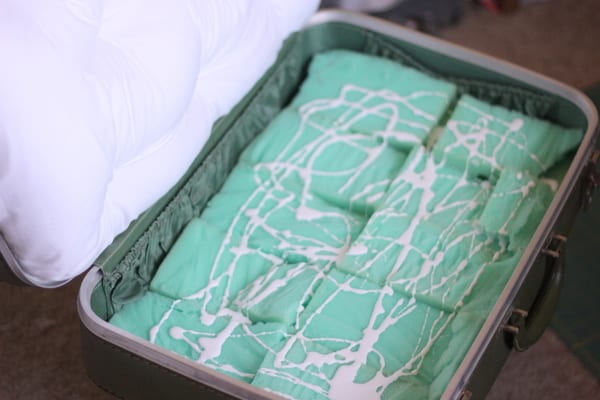
Step 5: Put a layer of good glue in the top of your suitcase and push your top cushion down.
Push it down firmly with your hands and let it dry for an hour or so with weights on top. I’m a wimp and had 3-pounders handy. (which are plenty with the 30 day shred. Ugg. I’m not that wimpy, really!)
We love it.


SO adorable! I love it!
Oh my gosh!! This is the cutest thing ever!! Where did you get the legs?! I am moving at the end of June and this would be super cute in the new place!
Ps. I’m a new fan of yours! I read tons of your posts this weekend! Love your style and ideas!
http://Www.maycontainnutz.blosppt.con
Xo meaghan
WOW!!! I can’t believe how creative and awesome this is! Fabulous job!
This is fabulous!! Great work!
I have a vintage-y couch that I don’t really like, but it’s what we have so I’m trying to work with it. This chair would be amazing to pull together the vintage/modern look I’m trying to pull off. Now off to find the right suitcase, thank you for the idea!!
Love this! Such a great idea. :)
How does that back support your weight. Can you actually sit bak and lean on it?
What a WONDERFUL idea. It looks fluffy coz. I picked up an almost identical suitcase last week. I am going to give it to my son for his third birthday filled with play clothes. I am always so sad when gals in other states post their prices for items I also picked up. Cali is sooo expensive, even the thrift stores, my suitcase was $6.
so so cute!
How sturdy is it?
I seriously love this! I just love all the stuff you post on your blog! You’re so creative!
I knew this had to be yours when I saw it over at sytyc! I LOVE it (and totally voted for it). I have been wanting to try this for a long time. I think it would work well as a child’s chair too since it is probably low to the ground. Thanks for sharing.
Kyle LOVES this idea and totally wants to make it for our home.
This is so amazing! I love, love, love it! How do you think of these things?? Fabulous!
I’m sharing it on my blog tomorrow! ;)
Very interesting~ who would’ve thought to do this!
Just yesterday at a nearby thrift store, I saw a (potentially) beautiful vintage suitcase that would make a perfect upcycled chair. Alas, I passed on buying it. Great job! Very creative. http://altered-artworks.blogpost.com
You know what would make this better? NOTHING! You hit the ball out of the park! jules
YOu’ve done it again. YOu are AMAZING! This is incredibly creative and adorable. I am highlighting this tonight at somedaycrafts.blgospot.com.
Very creative! I like when people think outside the box or should I say suitcase! I am your newest follower! Come visit sometime!
dreaming-n-color.blogspot.com
Very very creative! Thanks for the tutorial. I might have to try something like this some day!
I love this! I have a collection of vintage cases that are just begging to be made into stools. Thank you!!
WOW! I am visiting from Tatertots and Jello and I feel humbled by your creativity. Great work.
:) crafty texas girls
craftytexasgirls.blogspot.com
kate this is so, SO cool. How do you come up with these crazy good ideas???
That is so adprable. What a clever ideal:) Have a great weekend!
Wow! Amazing! This has me speechless!
I saw one just like this on Pinterest and thought how cool it would be to make one…so glad you did a tutorial…amazing..xo
Lucy
Along with Rebekah E I would like to know how you keep the top part of the suitcase up to support your back. Or is this just a decoration and not really meant to be a chair?
This is awesome!!!
This is amazing! My grandmother keeps a bunch of vintage suitcases in the closet under the stairs. All I could think of was rushing over to nab one to make! Thanks for the tutorial! <3
this is genius!
i have 6 vintage suit cases taking up residence as storage in my house. wouldn’t one of them love to be revamped into this!?!
Did you add anything to support the back or does it just stay like that?
I love this idea!
I really love this and want to make it ! but how have you supported the back ?? y suitcase just flops open :(
I have the same question as Roisin…how did you keep the back upwards instead of falling back?
Thanks.
You are amazing! (dont blush!) you have such talent, your blog is a dream x thanks for sharing x Leigh x
I absolutely love this idea and once we move and get situated I’ll be following your tute…I already have the suitcase!!!
http://dbugdesigns.blogspot.com/
That is just amazing!
awesome! i was always scared of having to tuft the seat, but this is such an easy solution now!
I’d add a metal strip or chain (like you see with toy boxes and trunks) to help support the back. Very simple add on. I love the idea!
I love the idea, and adding a strap (metal/leather/vinyl) or chain to support the back would add sturdiness. Look at toy boxes and steamer trunks and you’ll see what I mean.
I’ve got a vintage suitcase and I was going to sell it. But now, I’m going to create a chair :) Thank you for inspiration!
Sigh. I just love these cool chairs. I’ve been seeing them around the internet for a little while, but have never seen a tutorial before. Love. Thanks for sharing!
Hi ! I put a link towards your article on my blog, because I like very much this idea.
http://bienvenuechezcoline.wordpress.com/2011/10/13/decouvertes-et-paillettes/
Kiss.
nice stuff.
Wow it looks fab. iv been looking though all your tutorials and they are all so great i love your blog. new follower here xxx
This awesome tutorial and featured on my blog http://jolynnshobbyshop.blogspot.com/2011/11/pinteresting-sundaylink-party.html
I love the idea of this chair! One question, where did you find the chair legs? Would they have them at lowes or home depot?
First of all, love this idea! Second, where did you find the chair leg kits? Could I get them at Lowes or Home Depot?
Love this idea…Seen on Pinterest…took me forever to find your tutorial..i have tons of suitcases in my basement and looks as though one will become my new chair….I had been using them to paint my handpainted roses on and recovering the inside and recently made a suitcase shelf with one for an art show…awesome job…These legs can be bought at home depot and lowes for those asking…
just wondering on how the back support would work? or is this chair mainly just for decoration… i love the idea and want to make one..
I’m wondering the same thing as many others here – did you support the lid in any way so it’s possible to use it as a real chair….or is the lid simply supported by the wall behind it?
Yep, like many others, I love this idea. And like many others, I am very curious how/if the back is supported. Hope to hear some feedback soon! Thanks!
Like many others, I wonder how the back is supported? Thanks!
She did say to put it in the corner of your bedroom, so I’m thinking the walls support the back because as good a tutorial as she did, she would have said something about a back support had she put one in. ;o)
In answer to the questions above^^
No, I did not support the back. The chair sits fairly low to the ground, when you sit on it you naturally sit as you would sit in a stool. And yes, I have it up against a wall! It looks nice and supports the back :)
The hinges of the suitcase are very strong, but the chair itself probably wouldn’t balance if you leaned back since it is pretty lightweight. Total conversation piece though!!
Good luck if you plan to try it!
Wow! I’m a new fan of yours. :)
There’s nothing I didn’t love.
This is awesome! I saw it on pinterest a while ago and wondered how to do it!
http://www.elementalcarbon.blogspot.com
This comment has been removed by a blog administrator.
Wow! It’s fantastic! I invite you to my artistic blog. :)
My husband and I came up with a solution to the back of the chair. My idea was to put hinges on the inside to counter the hinges on the outside. This gave my husband the idea of getting L shaped brackets and screwing them in on the outside. You can get ones that bend a bit if you need to make adjustments. I plan on finishing the top part tmrw so I don’t know if it’ll support much weight but at least it gives you more options than just putting it in the corner or against a wall
I am going to fill an old suitcase with foam and put on legs for an ottoman, as one of the pictures looks like one. I may even have it be opened to make a large one, with durable fabric on top. I am eager to try it.
This is great!! I follow you now! :D
LOVE….now im on the lookout for vintage suitcases
That is a stunning piece!
I was wondering where you got the green foam from? I can’t seem to find any like anywhere.. Thanks!