• Skip to main content
  • Skip to primary sidebar
  • Skip to footer
  • Blog
  • About
  • Contact
  • FAQ
  • Sponsor

see kate sew

sewing, crafts, tutorials, DIY

  • Patterns
    • Free Patterns
    • Pattern of the Month
  • Tutorials
    • Accessories
    • Bags and Pouches
    • Clothing
    • Costumes
    • Crafts
    • Cricut Projects
    • Holiday
    • Household
    • Kids
    • Maternity
    • Quilting
  • Topics
    • Baby
    • Boy
    • Christmas
    • dog
    • Dolls
    • Easter
    • Girl
    • Halloween
    • Lookbook
    • Party
    • pet
    • Printables
    • Training
    • women
  • No Sew
  • Sewing 101
  • Sew4Good
  • Pet
  • Sewing Room
    • DreamBox
  • Reviews
Home
  • Patterns
    • Free Patterns
    • Pattern of the Month
  • Tutorials
    • Accessories
    • Bags and Pouches
    • Clothing
    • Costumes
    • Crafts
    • Cricut Projects
    • Holiday
    • Household
    • Kids
    • Maternity
    • Quilting
  • Topics
    • Baby
    • Boy
    • Christmas
    • dog
    • Dolls
    • Easter
    • Girl
    • Halloween
    • Lookbook
    • Party
    • pet
    • Printables
    • Training
    • women
  • No Sew
  • Sewing 101
  • Sew4Good
  • Pet
  • Sewing Room
    • DreamBox
  • Reviews

05.14

neon banded cardigan refashion

Welcome to See Kate Sew! If you’re new here, sign up for my email newsletter for access to free patterns, tutorials and all the latest sewing news! Tour my sewing room HERE!


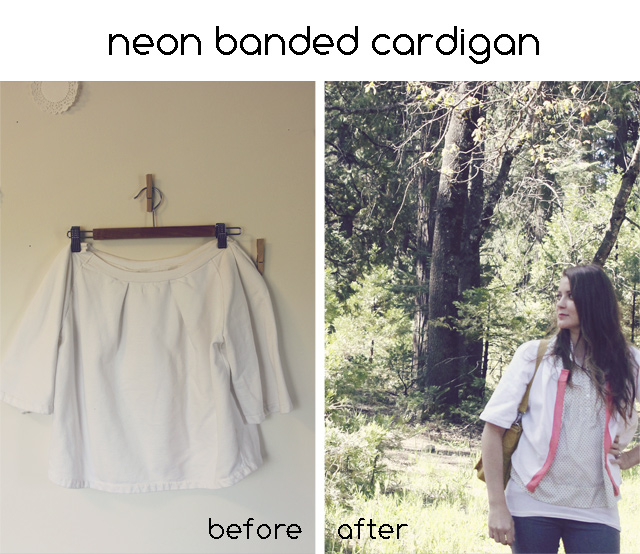
I’ve been going through my whole closet deciding what stays and what goes. It’s a purging that is very much needed! I have this crop top shirt that is way too short to wear alone, and just a strange shape, boxy and short. I love it though, for some reason, so I decided to let it stay. I cut it into a cardigan and banded the new edges with a bright pink fabric. I love it!


Materials:
1 crop top shirt
about 1/2 yard bright fabric
rotary cutter/ruler


Use your ruler to help you cut right down the middle of your shirt.


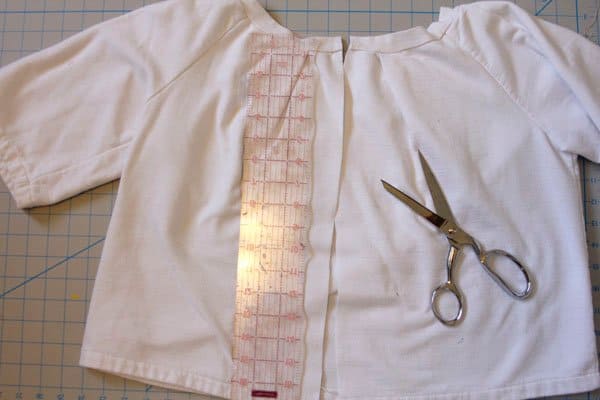
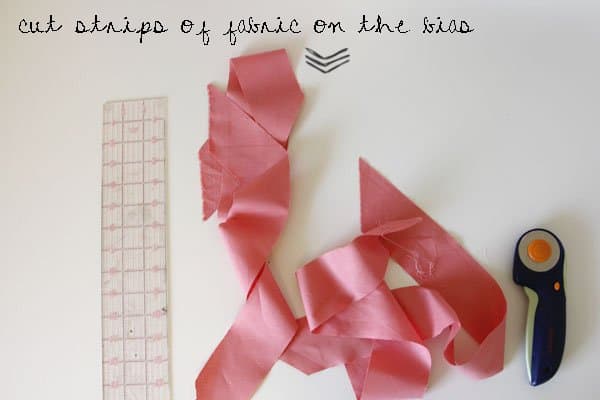
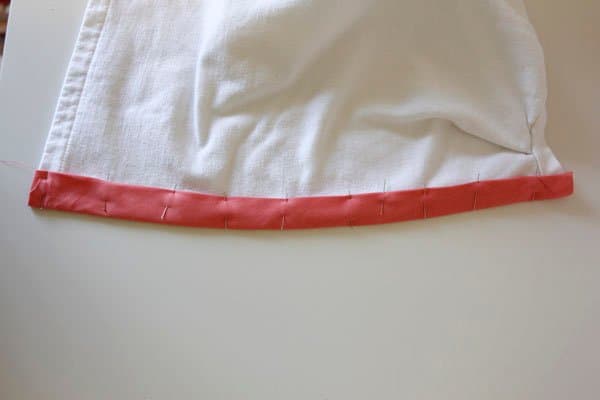
Make some binding. Cut out 2.5″ strips of fabric on the bias. Sew them together if you need to. Then press one of the long edges over 1/4″. Press over the bottom edge 1/2″ twice.

 Now, pin the unpressed edge of your bias binding to the inside of your shirt.
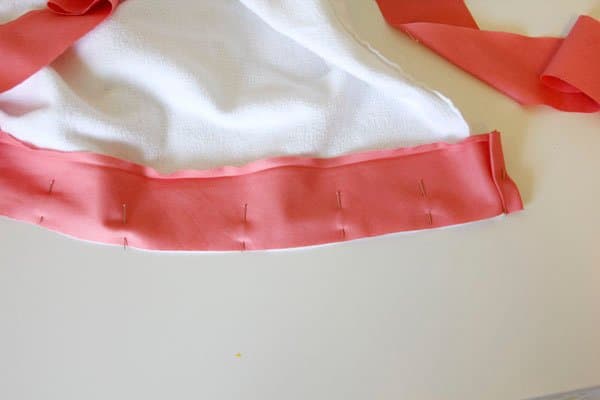
 Sew it on at 1/2″.

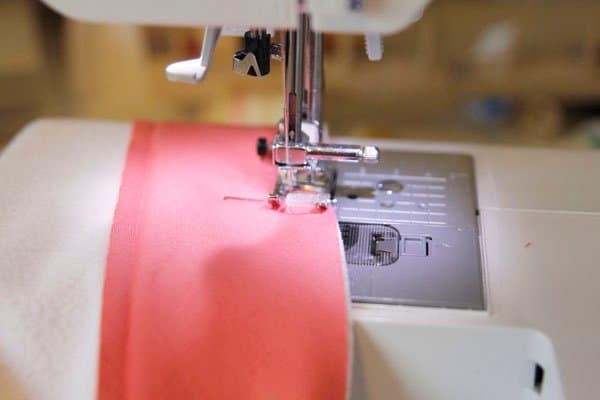
 Then fold the pressed edge over to the front of your cardigan. Sew it on by topstitching about 1/8″ from the edge.

Done! Enjoy your new cardigan!


12 Comments | Clothing

Exclusive Free PatternRuffled Apron

Sign up for my email newsletter and receive my ruffled apron pattern totally FREE!

We take your privacy seriously. See our privacy policy here. Unsubscribe at any time.

You may also like these posts...

resewlution: sew through all my thrifted treasuresresewlution: sew through all my thrifted treasuresDIY cat stamp teeDIY Cat Stamped TeeEasy Summer Girls Dress Sewing PatternStrawberry Girls Summer Dresseshow to print pdf patternsPenelope Peplum Sew-a-long Day 2: Printing PDF Patterns

Reader Interactions

12 Comments

  1. Gwen @ The Bold Abode

    05/14 at 1:11 PM

    So cute, Kate! You always make the best refashions!

  2. Jessica at Me Sew Crazy

    05/14 at 1:37 PM

    love the pop of color Kate!!!

  3. Ashlee :)

    05/14 at 1:43 PM

    cute & simple! love it!

  4. Suki

    05/14 at 4:24 PM

    Love it! I am thinking of turning all my plain sweaters into cardigans in this way – so much better for layering, and less of a big block of one colour on top :)

  5. Madalynne

    05/14 at 4:28 PM

    That pop of color is awesome and really adds a detail that makes it super special.

  6. Emily

    05/14 at 5:38 PM

    Darling! I like the pink. :) Was that a Shade top?

    • kate

      05/14 at 7:17 PM

      Yes, it totally was a Shade top! I got it at a $5 sale a long time ago. So soft!

  7. Joe

    05/15 at 1:17 PM

    Fantastic idea! Will be going threw my stuff to do the same today.

  8. ohbygolly

    05/15 at 4:46 PM

    I sorted through my giveaway clothes last night and went to town cutting and sewing. And now THIS cardigan has to be on my “to do” list. Woohoo, I love refashioning!

  9. Vanessa Barker

    05/19 at 12:09 AM

    Oh My Gosh, this is so cute! You are so creative and talented! I don’t know when you have the time to do all of this. You’re such a busy gal. I’d love if you’d link up at my Tutorial Tuesday Linky Party http://www.ourthriftyideas.com/2012/05/tutorial-tuesday-6.html

  10. Amanda @ Ninth Street Notions

    05/25 at 1:22 AM

    Super cute! I need to go find myself an awkward shirt now…. :)

  11. Life With Lucy

    05/29 at 11:50 AM

    LOVE this shirt kate! such a great idea! thanks for sharing!

Primary Sidebar

  • Facebook
  • Twitter
  • Instagram
  • Pinterest
  • Email

Exclusive Free PatternRuffled Apron

Sign up for my email newsletter and receive my ruffled apron pattern totally FREE!

We take your privacy seriously. See our privacy policy here. You can unsubscribe at any time.

Don’t miss these popular posts!

easy baby dress pattern for the summertime

easy baby dress pattern for the summertime

modern ombre + b/w triangle quilt tutorial + pattern

modern ombre + b/w triangle quilt tutorial + pattern

Fabric

Quilted Cosmetic Case Kiss Me KateKiss Me, Kate FabricOne Hour Granny Square Quilt Tutorial | See Kate SewModern Granny Square Quilt Whole Cloth

Pattern Hacks

Easy Baby Summer Dressthe EMMA pattern | See Kate SewThe EMMA Dress

Footer

Hello friends!

My name is Kate, a twenty something fashion lover and mother of two. When I’m not chasing kids you can find me at my sewing table or daydreaming up new designs. You can read more about me here. Thank you for visiting!

8a918f8da8e0e69102dc0f33a718de85a99c31a57283e0e3e2

FOLLOW ME HERE

  • Facebook
  • Twitter
  • Instagram
  • Pinterest
  • Email
  • Blog
  • About
  • Contact
  • FAQ
  • Sponsor

Copyright © 2025 See Kate Sew  •  All Rights Reserved  •  Privacy Policy  •  Site Design by Emily White Designs