
…………

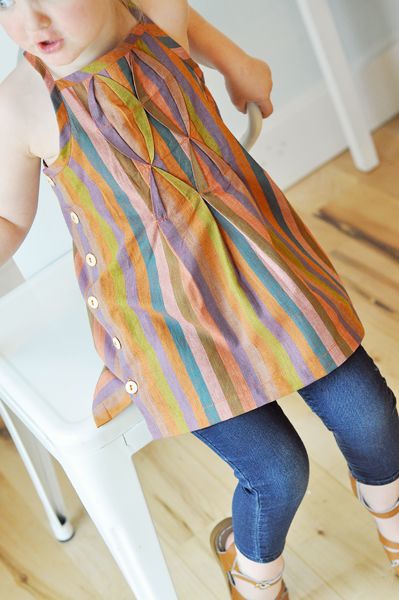
I made a simple top, but you could use this same technique for lots of other things. Since I just made mine based on measurements of my daughter, I’ll give you the basic steps and you can adapt it to suit your needs.
Start by squaring off your fabric. I try to do this whenever I sew, but it will be especially important in this project. This is easily done by ripping across the fabric at the top to get a nice straight edge that you know will be perpendicular to the selvage.
(For reference, I used a 40″ x 20″ rectangular piece of this Kaffe Fassett Stripe fabric to start with)

Next, mark lines with a disappearing fabric pen at 1/2″, 3″, 5 1/2″, and 8″ from the top of your fabric as shown above. I didn’t do this, so you can trust me when I tell you that it will make things much easier.

Next, based on the measurements of the person you are sewing for, locate the center front of the garment (make sure and account for the side seam allowance and the fact that you will lose fabric as you make your pleats. If you are unsure…just roughly pin up your pleats and check.) It may take some trial and error.
You can make as many pleats as you want but I made 4. Just make sure you do an even number for this technique to work. Pinch the fabric together, aligning the lines carefully as shown above and below. It may help to press them if you are having difficulty getting things to line up properly.

Pin the pleats in place down to the 8″ mark.

Stitch each pleat together carefully, using the stripe line as a guide, until you reach the 8″ mark. Back-stitch at the end.


Now, fold pleats 1&2 together and 3&4 together as shown and stitch in place at the 1/2″ mark.

Next, open the pleats in the opposite direction and pin and stitch at the 3″ mark.
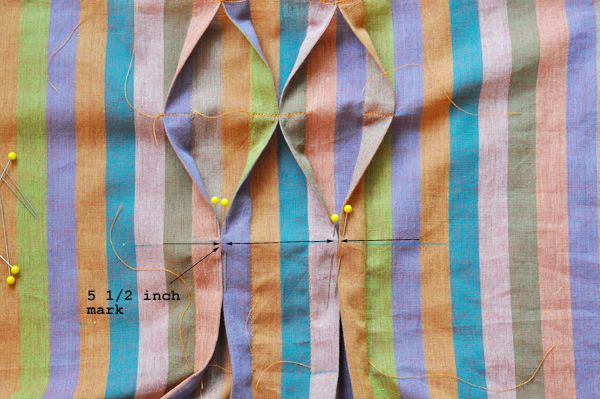
Now bring the pleats back together and pin and stitch in place at the 5 1/2 inch mark.

And then open them up again and pin and stitch in place at the 8″ mark.

Press the pleats flat if you want to give them a rounder neater look.

Repeat the process on the back pleats as well.
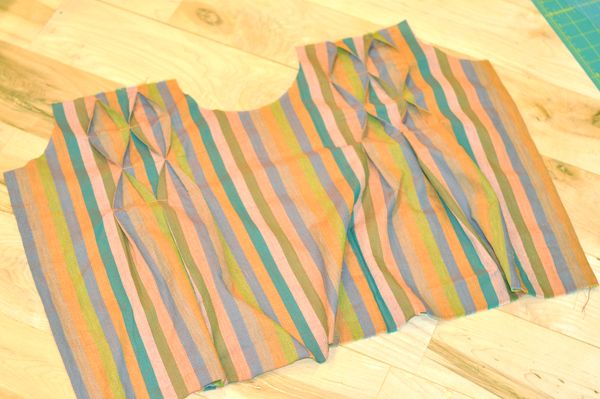
Use a shirt that fits as a guide, or just eye-ball the curves for the arm openings and cut them so they are the same on both sides.

Then I folded under and sewed my side seams, added buttons and button holes, finished the neck and arms with self-made bias tape, and hammed the bottom.

Done! And as a side note…I love making this style of top because it fits forever (as long as you make the arm holes generous enough)! It’s kind of a dress at first and then gradually becomes more of a shirt. Plus its super versatile. And if I am going to spend time sewing something…I want it to last a while and work in lots of ways.
Happy pleating!

………….
Thanks Danielle!! So cute! Also check out Danielle’s ruffled corsage shirt, quilted bib, and her etsy shop.


SO darn cute, Danielle! Love the side buttons and of course the pleats are amazing!!
Absolutely darling. This is one of the cutest things I’ve seen on blogs!
Adorable! I may have to try this for momma. Does the mock-smocking give it any stretch?
It doesn’t have any stretch at all like real smocking would hence the “mock” but you could just do a princess seamed shirt (where the bust seams go from the neck to the waist) and insert a panel of this into the center panel of the shirt since its generally a rectangle. Good luck!
Oh my gosh this is amazingly adorable!!! I’ve GOT to make one for my little girl.
Gorgeous! I’ve been wanting to try my hand at some sewn down pleats like this….thanks for the inspiration!
Oh I love this.
Love! I usually don’t look at pleat posts cause I’m not a big fan but now that I’ve seen this I must make it!
Love! I usually don’t look at pleat posts cause I’m not a big fan but now that I’ve seen this I must make it!
I love this! I think though I want to try to make this as an apron for myself!
Woah. So very very cool. I have some striped fabric that would be perfect for this!! Thanks for sharing! PS love the braids too.
LOVELY!!!!
LOVELY!!!!
I am in love with everything about this! I love the mock smock and the buttons! I think I need to make one ASAP!
This is stunning and so simple – i’ll be trying this one. Thanks for sharing.
Wow, that’s adorable. I definitely have to make one.
LOVE IT.
Why just for kids? I want some smocking too!
oh my goodness. what creative ability you have. i must try this one in the future :)
Beautiful! Thanks for the how-to!
amazing work. Kudos! Pinning and stumbling it…this thing needs to be seen by everyone!
Great! I have some very springy striped fabric laying here waiting for an idea an great as this is! Eyeing things isn’t my strength and my niece (3) lives about 15 hours by plane from me. Perhaps you could give me a clue on how old your beautiful model is!
I have just the right fabric for this amazing piece of art. My niece (3) lives
approx. 15 plane hours from me, so I can’t just eye it or try. Could you help with sizing? How old is you beautiful little model? Or how tall is she? Thanks!
She is 4 but wears more like a 5t. You could use any bodice pattern in her size as a guide for the yoke proportions. Good luck!
Thanks!
How unique – the stripe is a stunning choice and adds a great deal to the design. I can think of many applications for this. I’d type more but I feel a sudden urge to play with pleats!
so, so cool! Love this top, and the buttons along the side are such a cool feature. Must get my hands on some of the shot cotton . . . I’m seeing such cool garments made from it! Thanks for sharing your creativity!
This is so cool! It looks like little fish! What a clever lady that Danielle is ;-)
Your tutorial is fabulous!! I will be making a couple of outfits for my 2 1/2 year old granddaughter using this technique!! And maybe one of the new pillows for her big girl room… I love that you got the idea from your shower curtain… I’ve gotten the strangest looks from people when I said similar things… “Oh, I got the idea for that detail on her wedding gown when I was looking at her curtains…”
One for my daughter and three for my nieces to make! Tnx,I’m pinning it!
Wouaw!!! Very Nice!!! Thank you
This is too cute to be true! I need one for my daughter and for muself, thanks for sharing.
What width of bias tape did you use?
Bonjour, quelle jolie petite robe, ces petits plis sont très bien avec cet espacement.Félicitations
A bientôt
VIANETTE.