• Skip to main content
  • Skip to primary sidebar
  • Skip to footer
  • Blog
  • About
  • Contact
  • FAQ
  • Sponsor

see kate sew

sewing, crafts, tutorials, DIY

  • Patterns
    • Free Patterns
    • Pattern of the Month
  • Tutorials
    • Accessories
    • Bags and Pouches
    • Clothing
    • Costumes
    • Crafts
    • Cricut Projects
    • Holiday
    • Household
    • Kids
    • Maternity
    • Quilting
  • Topics
    • Baby
    • Boy
    • Christmas
    • dog
    • Dolls
    • Easter
    • Girl
    • Halloween
    • Lookbook
    • Party
    • pet
    • Printables
    • Training
    • women
  • No Sew
  • Sewing 101
  • Sew4Good
  • Pet
  • Sewing Room
    • DreamBox
  • Reviews
Home
  • Patterns
    • Free Patterns
    • Pattern of the Month
  • Tutorials
    • Accessories
    • Bags and Pouches
    • Clothing
    • Costumes
    • Crafts
    • Cricut Projects
    • Holiday
    • Household
    • Kids
    • Maternity
    • Quilting
  • Topics
    • Baby
    • Boy
    • Christmas
    • dog
    • Dolls
    • Easter
    • Girl
    • Halloween
    • Lookbook
    • Party
    • pet
    • Printables
    • Training
    • women
  • No Sew
  • Sewing 101
  • Sew4Good
  • Pet
  • Sewing Room
    • DreamBox
  • Reviews

12.17

pom pom necklace tutorial

Welcome to See Kate Sew! If you’re new here, sign up for my email newsletter for access to free patterns, tutorials and all the latest sewing news! Tour my sewing room HERE!

Written by Jessica of The Ladyette.

Jessica is one of my new DIY contributors! I’m thrilled to have her because she is full of fun ideas! You can follow her blog pom necklace 16 pom necklace 12 pom necklace 11 DIY pom pom necklace tutorial

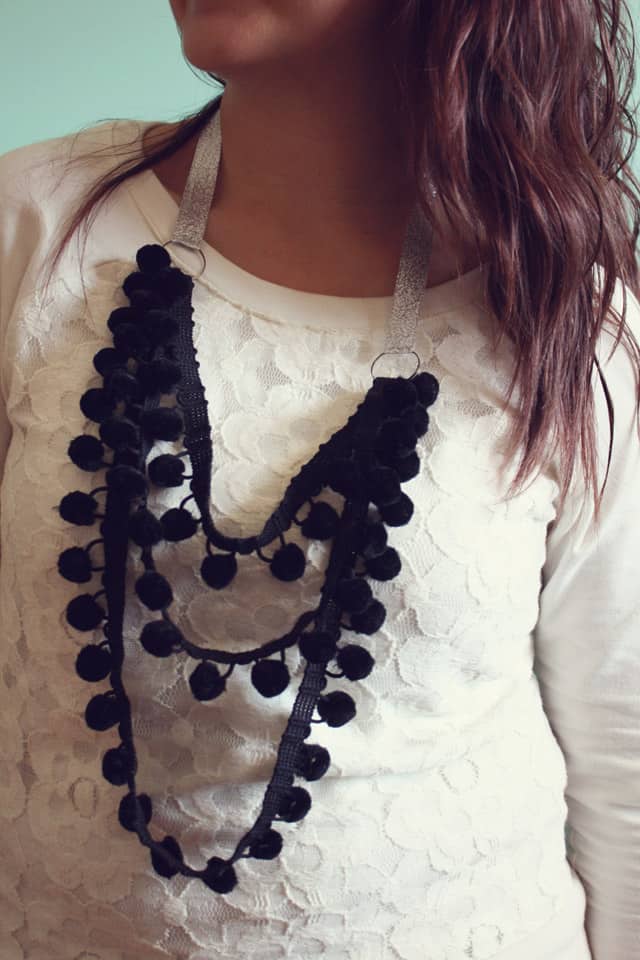
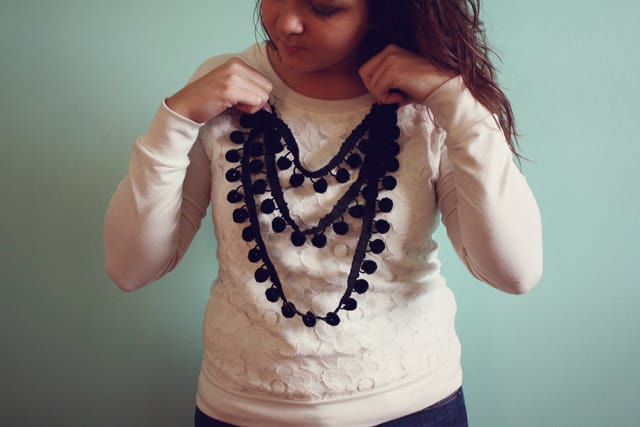
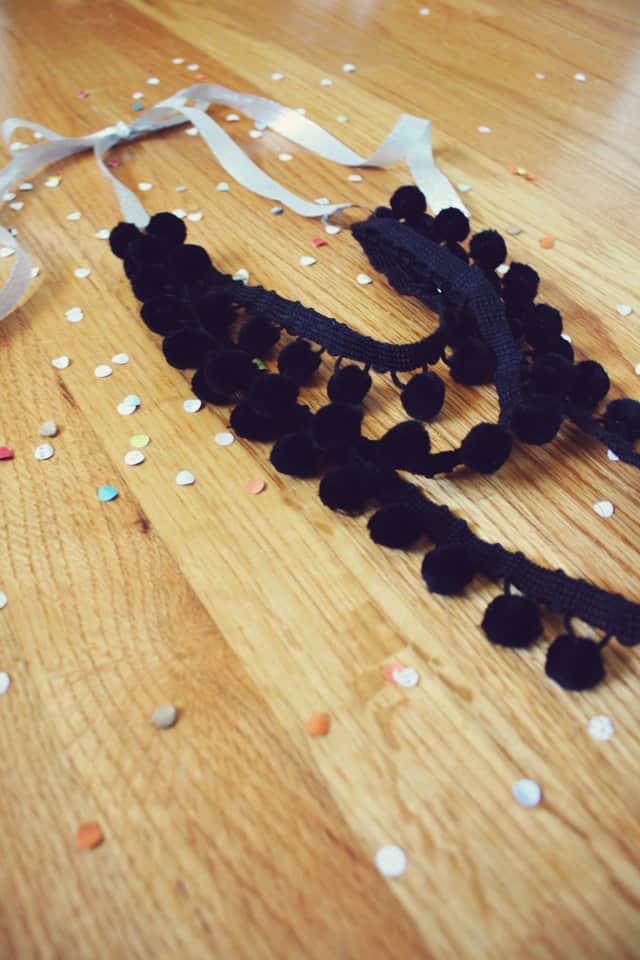
Hi, Jessica, here to share with you a DIY Pom Pom Necklace that is my newest favorite accessory.  It’s great for adding on layers and textures, and the tie back straps make it easy to adjust to any desired length.  This would make the perfect gift because the colors of the pom poms and the ribbon are completely customizable.

pom necklace 01

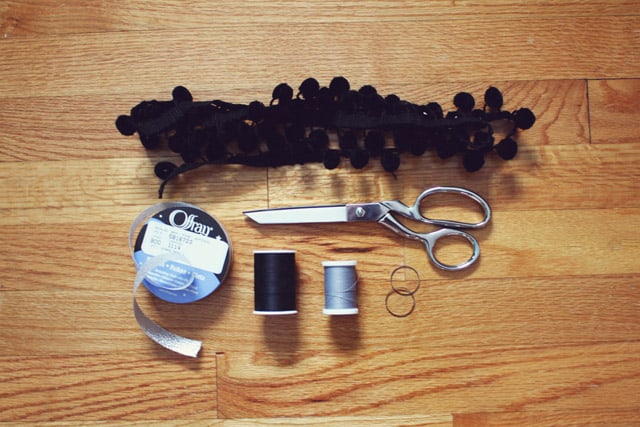
Supplies: 1.5 yards of pom trim, ribbon (about 5/8″ or 15mm wide), 2 jumprings (25mm wide, which can be found in the jewelry making section of most craft stores), thread to match the pom trim and ribbon, a needle for sewing, scissors, and either a lighter or a sealers such as Aleene’s Stop Fraying to prevent the ends from unraveling.

pom necklace 02 pom necklace 03

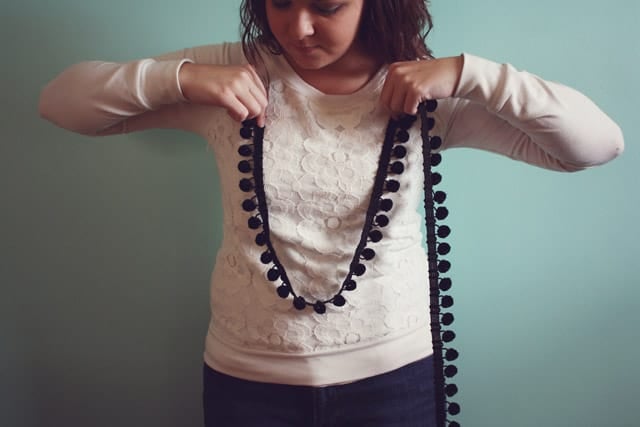
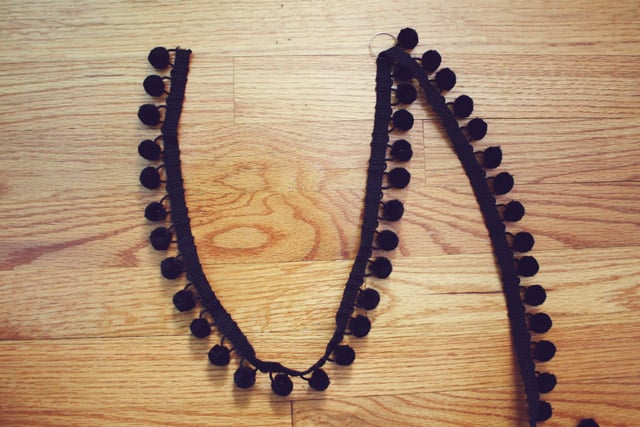
Step 1: Use mirror figure out about how long you want the bottom layer of the pom trim to be.  Play around with each of the layers until you find what works for you.

pom necklace 04 pom necklace 05 pom necklace 06

Step 2: Lay the necklace out in this pattern on your workspace.  Slide the jumprings into the folds.  Make sure the the pom trim is coming from behind the jumpring to the front and that none of the layers are twisted.  It’s easiest to work with everything laying in place first.  If there is an any excess pom trim, cut it off at the jumpring.  I had about two extra inches cut from 1.5 yards of trim, but it was a generous 1.5 yards.

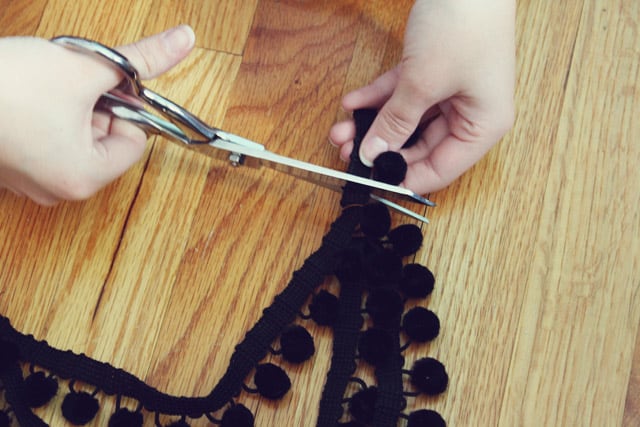
Step 3: Now that the ends are cut to the appropriate lengths, they need to be sealed so they do not unravel.  You can paste on Aleene’s Stop Fraying glue, or use a lighter to melt the ends (take all precautions if you choose the latter option).

pom necklace 07

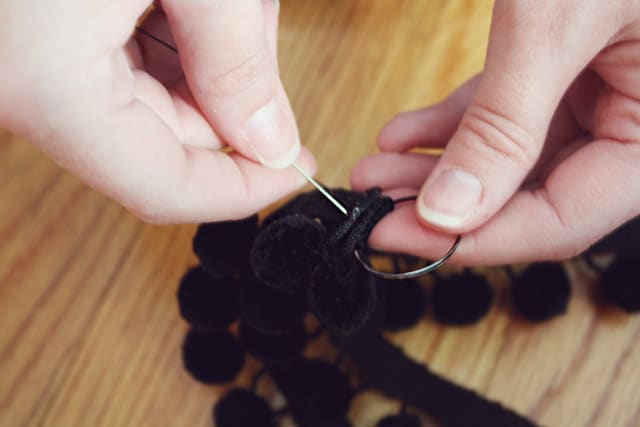
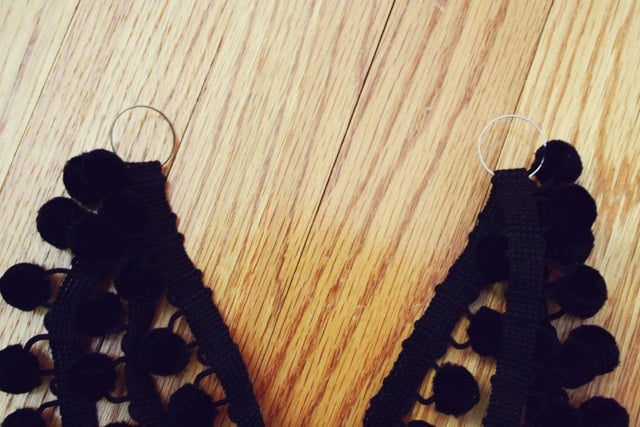
Step 4: Now that the ends are in place, it’s time to sew everything together.  Start with the left side, sew together the pom trim on each side of the jumpring so that it won’t slide down.  Then sew on the sealed end behind the other layers of trim and just under the jumpring so it will stay hidden.  Repeat these steps on the right side.

pom necklace 08 pom necklace 09

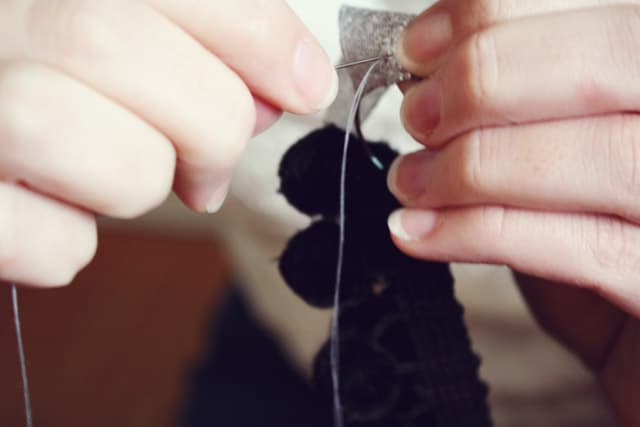
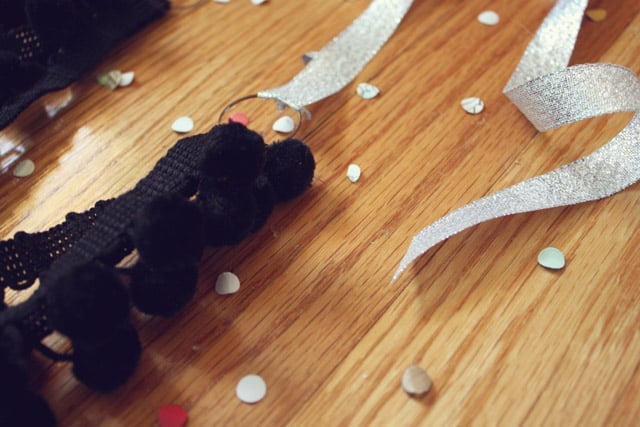
Step 5: To add the ribbon, cut two pieces, each about 15 inches long.  On each piece, cut one end at an angle and seal the other end the same as you sealed the pom trim.  Sew the ribbon on by threading it from the front of the jumpring to the back and overlapping the back by about half an inch.  Repeat this on the other side.

Step 6:  To finish it off, trim all the threads.  Check each of the poms for a couple extra long strands, trim those as well.

pom necklace 13

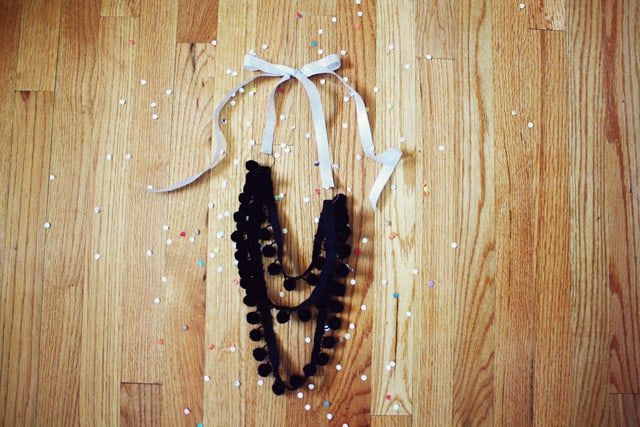
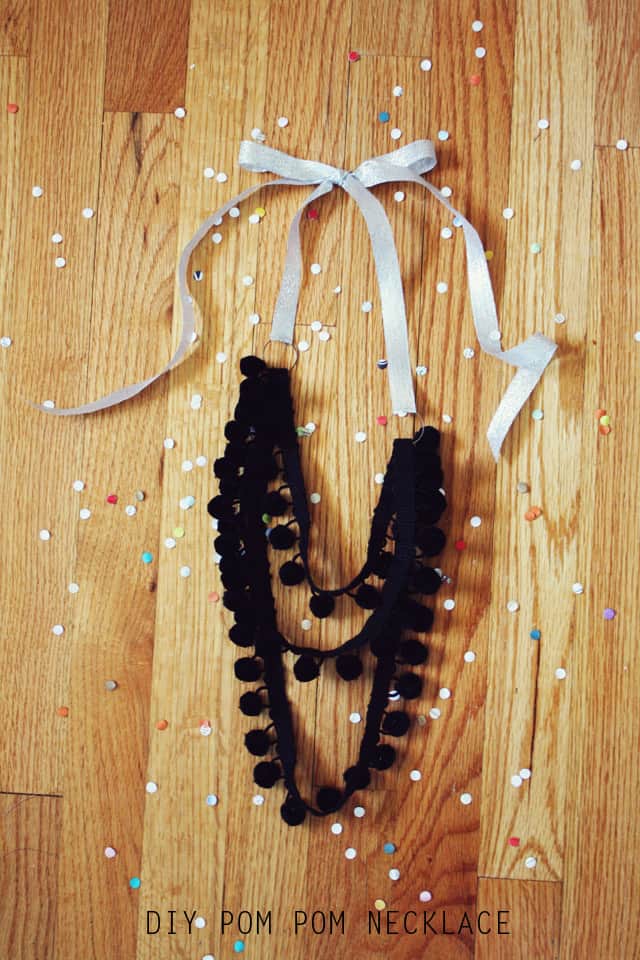
Ta-da! Now tie a little bow behind your neck and wear your new pretty little layered pom pom necklace!pom necklace 15pom necklace 14

1 Comment | Accessories

Exclusive Free PatternRuffled Apron

Sign up for my email newsletter and receive my ruffled apron pattern totally FREE!

We take your privacy seriously. See our privacy policy here. Unsubscribe at any time.

You may also like these posts...

Cat Sewing Patternsflowerburst banglehandmade pleated trim + pleating with a ruffler footPincushion Ideaspom pom pincushions

Reader Interactions

1 Comment

  1. MYSTYLEDIARYY

    12/17 at 6:31 AM

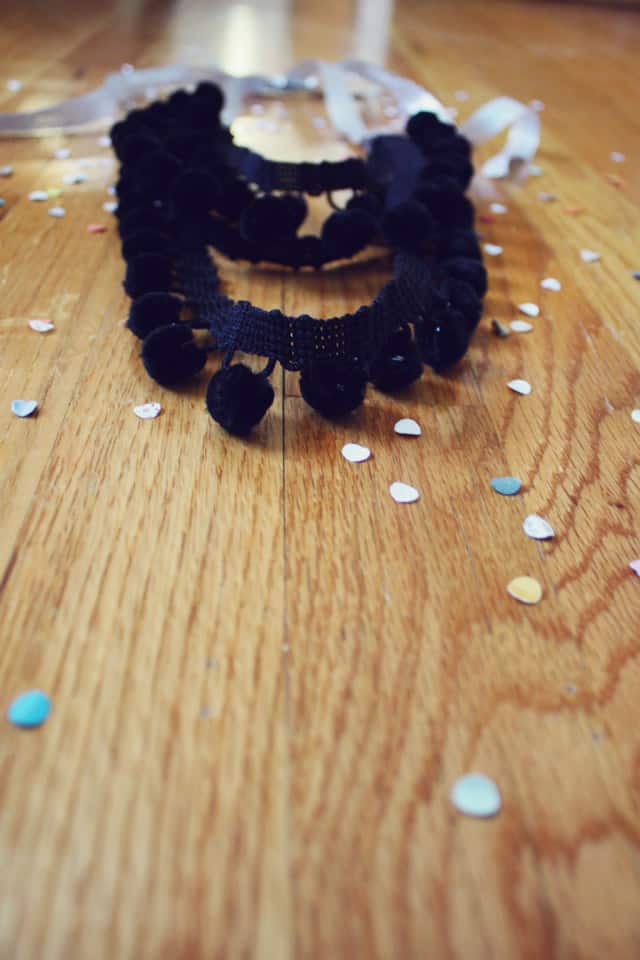
    It looks really great

Primary Sidebar

  • Facebook
  • Twitter
  • Instagram
  • Pinterest
  • Email

Exclusive Free PatternRuffled Apron

Sign up for my email newsletter and receive my ruffled apron pattern totally FREE!

We take your privacy seriously. See our privacy policy here. You can unsubscribe at any time.

Don’t miss these popular posts!

easy baby dress pattern for the summertime

easy baby dress pattern for the summertime

modern ombre + b/w triangle quilt tutorial + pattern

modern ombre + b/w triangle quilt tutorial + pattern

Fabric

Quilted Cosmetic Case Kiss Me KateKiss Me, Kate FabricOne Hour Granny Square Quilt Tutorial | See Kate SewModern Granny Square Quilt Whole Cloth

Pattern Hacks

Easy Baby Summer Dressthe EMMA pattern | See Kate SewThe EMMA Dress

Footer

Hello friends!

My name is Kate, a twenty something fashion lover and mother of two. When I’m not chasing kids you can find me at my sewing table or daydreaming up new designs. You can read more about me here. Thank you for visiting!

8a918f8da8e0e69102dc0f33a718de85a99c31a57283e0e3e2

FOLLOW ME HERE

  • Facebook
  • Twitter
  • Instagram
  • Pinterest
  • Email
  • Blog
  • About
  • Contact
  • FAQ
  • Sponsor

Copyright © 2025 See Kate Sew  •  All Rights Reserved  •  Privacy Policy  •  Site Design by Emily White Designs