With all this rufflyness I haven’t mentioned what I’m up to at SYTYC much, but I’m still in! We’re in round 5 now, upcycle. Voting starts today so GO VOTE!
Last week, my project was this scrap map:
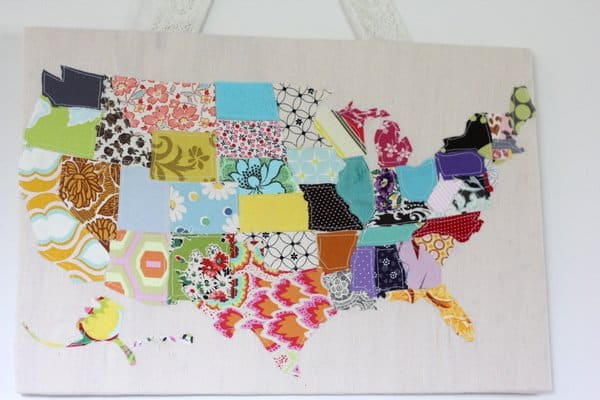
This project even rhymes, a scrap map! I used 50 different little scraps to make this map of America wall hanging. It’s bright and colorful and each state is packed with personality.
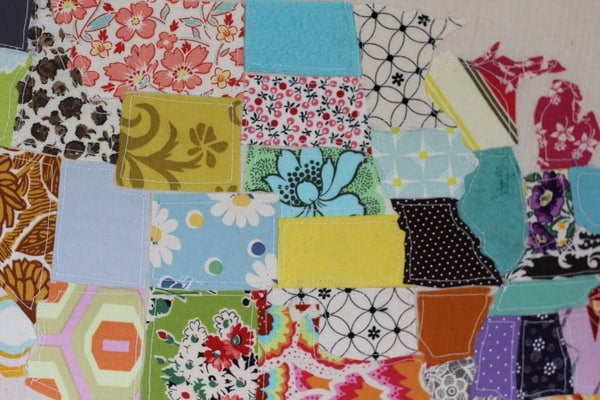
It was really fun to choose a specific fabric print or solid for each different state. And I have a new found appreciation for each state’s curves and lines. This project is a great geography refresher! Each state has been delicately topstitched.
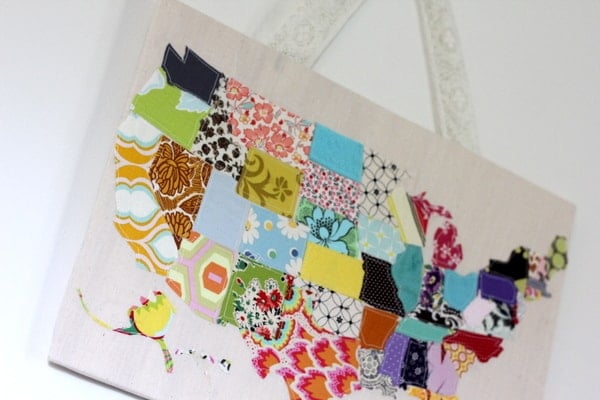
I always have a large supply of muslin scraps, so I found one just big enough for the map. Once the map was done I wrapped it around a scrap of plywood I had from another project and hung it up with a piece of lace that was hiding in the scrap pile. The lace reminds me of colonial outfits, so I thought it was the perfect fit. This would be a fun project for a kids room or a classroom.
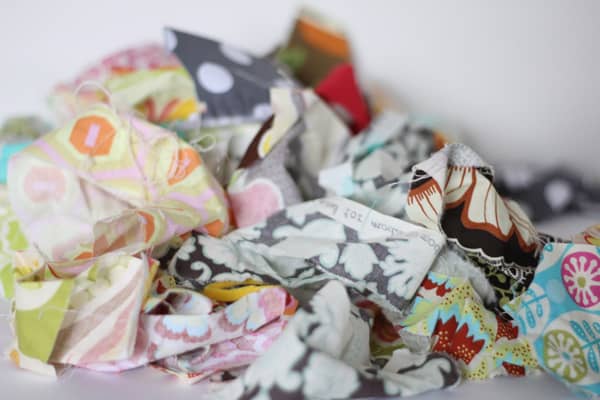
For this project, you’re going to need a lot of different scraps, 50 of them. So just go over and PULL your scrap draw out. You can just throw them all over the floor for this one. And don’t weed out fabrics if they are unique. I used a fleece for North Dakota (because I think I’d want one there!), a knit for Kansas and a silk in Illinois. It adds some neat dimension to use different fabrics.
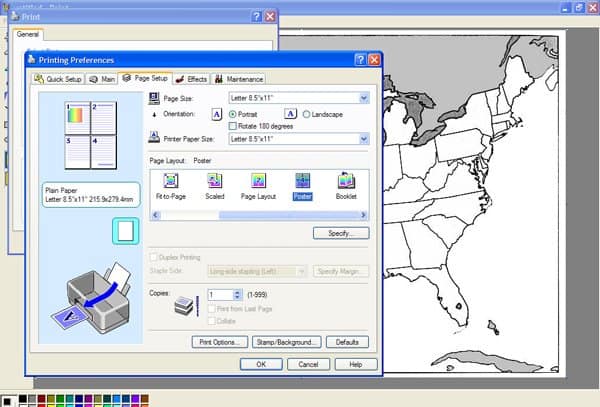
Next, go over here and print off this map, in poster size. I copied the image to Paint(high tech, I know.) and then printed it. To print in poster, go to your printing preferences > Page setup. In the screen shot below you’ll see the Poster option highlighted.
You’ll have a bunch of sheets like this:
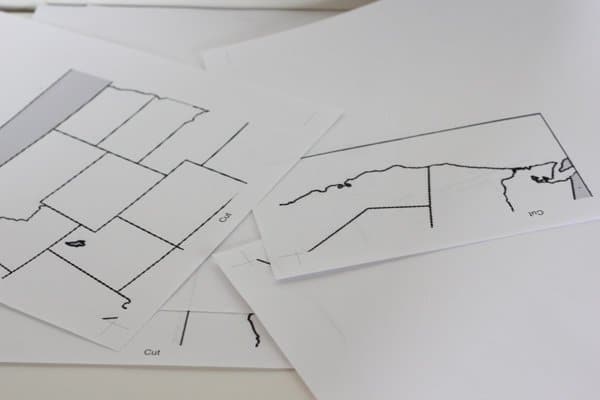
Tape it together, overlapping and trimming as needed. Then cut out California. California is a good state to start with because it comprises most of the west coast and gives you a base to build from. Now find a piece of fabric that you think represents the state in some way. Here’s an example with North Dakota.
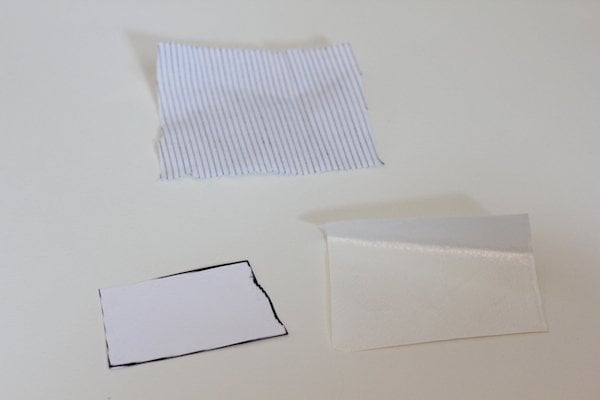
Cut out a piece of heat n bond, large enough for the state and iron it to the back of your fabric.
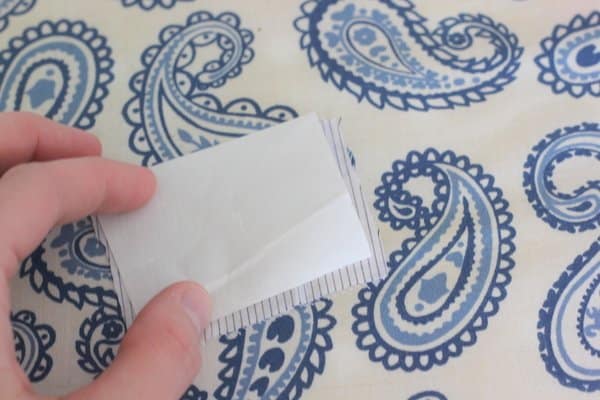
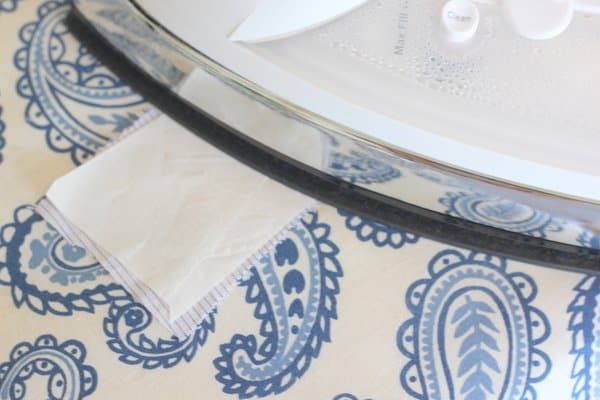
Let it cool and peel off the backing.

Pin the state to your backed fabric.
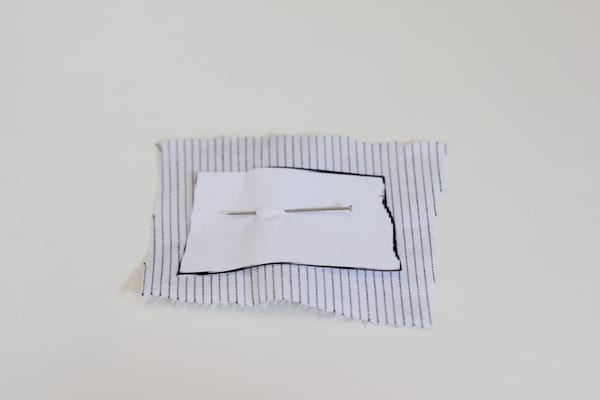
And cut it out.
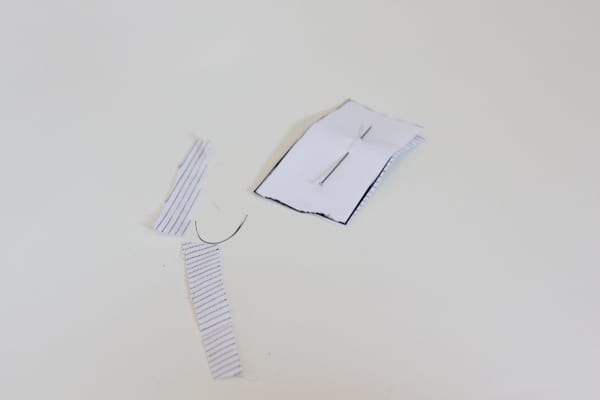
Repeat 50 times.
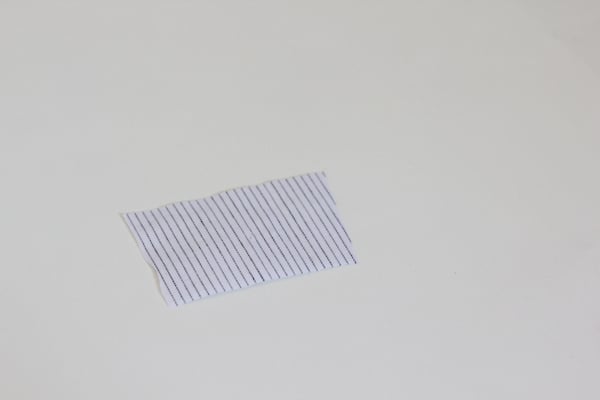
Then iron to a piece of muslin in it’s spot. I made sure to cut out one state at a time so I didn’t get any mixed up. Keep going until you have all the states on there! Just keep going, working your way from the west coast to the east coast. Those northeastern states are little and tricky, but you can do it! When you’re finished, Colorado will be your new favorite state. Perfectly rectangular.
When they are all ironed on, topstitch around each state. This is the most time consuming part, but the most important. It will give each state the definition you want! Before topstitiching, you won’t like your map as much as you thought you would. But, when you topstitch, you’ll love it! Just remember that because this tedious. Backstitch where necessary to keep your stitches sturdy.
Next, I stretched it around a piece of plywood and glued the back. I just used a glue gun for this step. Then glue on a piece of lace on the back and you’re ready to hang it!
*Since you’ll be sewing through this, the best heat-n-bond to get is the purple one. I used red, since that is what I had on hand. But purple is more lightweight and won’t make your needle sticky.


This is seriously fantastic…I voted for it last week…;) Just perfect…
I can’t tell you how much I love that map … I voted for it and I’m so glad you won! It’s truly amazing. Thanks for sharing the tutorial.
This is AH-MA-ZING!! Congrats on all the hard work. I know how it goes!
I love the map! Such a great way to use up scraps!
Really neat! Just one glance and I can appreciate the effort I know this took. Great job!
so cool, i think i need one stat. but much bigger. yeah, we’ll see if it ever happens but i have every intention … :)
I have used a similar method to turn my children’s artwork into a fabric wall hanging. I traced the artwork directly onto the Wonder Under and then cut that rather than cut the artwork, though. I love this map idea and may have to do something like it. It would look beautiful in any room! What a great gift for a geography teacher too.
Oh my gosh, Kate. This is SO FREAKING AWESOME. I am in love with it!
oh wow! this is really fun! I love it!!
love this….need to make this…
and hey, we have the same ironing board cover!
great great job!!
This is amazing. Seriously! I love it! My favorite part: “repeat 50 times.”
hee hee
what a cute idea! great job!
love this!
Oh my gosh, I can’t believe you made that!! Holy cow, it’s wonderful!!
This is adorable! I love it.
I LOVE this! I have been thinking about attempting a license plate map, but this is even better.
Okay, now I can’t remember which blog I saw it on, but there was this idea where she took freezer paper and cut her pattern pieces out of that and then ironed it onto the fabric…. making it super easy to cut out each piece.
That would be great for this project.
Oh my gosh, that’s so fab! Little geek and I are smitten! As Yanks living in England, it’s particularly cool! Might have to make it for one of those pressies that take a bit of time and get made in secret… thanks for sharing!
this is amazing! ahhh I just looove it! brilliant.
Kate. Are you KIDDING me! This is DEFINITELY my favorite project of yours. I don’t know what that says about me. But I am SO doing this one!
Great project! I can’t wait to have kids and make one of these for them!!
I adore this! It’s definitely going on my project list! Thanks so much for sharing this! :)
That’s awesome! I want to do this project, but a world map instead of the US. Thanks for the idea!
http://www.katieandgabe.blogspot.com/
You did a beautiful job on this! I especially like the fabric you chose for Oregon :)
“colorado will be your new favorite state”…
hahahahhahaha
color me amused. (which state is that?)
good job kate! good win!
i want to buy this from you
:)
I love it!!!!!!!
greetz from Germany!!
I think this is one of my favorite projects I have EVER seen on a blog EVER!! Thank you for sharing the tutorial!
good job! just saw you featured on “Be Different, Act Normal, by Lorie” I’d love to try this, but instead of using fabric, I’d do a patterned paper and mod podge version. (I’m not a sewer, but I am a mixed media artist!) -jill
http://thingswithwingsartjournal.blogspot.com
I LOVE it!! I have a thing for maps…I have the whole world painted in my entry and a map covered foot locker and map coasters AND I even wrapped all my gifts in maps….
Thanks for sharing this…I’m pinning it!
Have a great night!
btw, couldn’t help myself, I shared your map on our fb page! http://facebook.com/thingswithwings
we’re also having a giveaway right now on our blog, would love if you’d stop by and throw your name in the hat! http://thingswithwingsartjournal.blogspot.com/2011/04/new-giveaway-today-make-wish.html
This is incredible. I stumbled it!!!
I think my husband would even like this! He loves maps! Ohhh, I just read the above comment and a world map would be awesome too!
Thanks for sharing your great idea. I voted for you last week too.
Wow- Amazing!! I’m adding this on my list of projects to do one day!
I’m loving this map and I’m loving this whole ruffle series! Thanks for featuring my scarf from the flickr pool!
Seriously AWESOME! What is the dimensions of the total project…just so I can get a feel for how big you did everything. I would love to do this in LARGE for my kids playroom. You know…3′ x 4′ or so! Great blog…newest follower
Absolutely love this (and shared it to my FB page) I found you via Be Different Act Normal.
Great idea! So cute!
Oh My! I LOVE THIS!
OMG i love this! So creative and great for a classroom or a playroom or a library. Fabulous!
I absolutely love this us states idea! What an awesome way to use up scraps!
I’ve seen this image floating around Pinterest, and I’m so excited to see a tutorial for it. My son would LOVE this. He’s a little map-obsessed at the moment. :)
I’ve seen this EVERYWHERE because it is So amazing! You totally rock!!!!
So THIS is where that Pinterest picture game from! It’s fabulous! I am starting to save a couple scraps from projects now just for this!
This will be one of my projects for the summer. I love it!
Darling! I love it!
So Cute!!! Great job!!
Cara
http://miscellaneousme.wordpress.com
This is such a clever design. I love the mix of fabrics…and that you were able to do it so inexpensively too!
This is absolutely incredible! What a terrific job you did!
this is incredibly awesome! I am so inspired.
I’m a new follower!
kathryn @
thedragonsfairytail.blogspot.com
Ummmm…. LOVE THIS! You better believe a I making one.
Amazing! Thanks so much for the tutorial – I can’t wait to do this for my son’s room!
Oh, my gosh. This is fantastic! It’s going in my “to-do” pile. :)
You never cease to amaze us Kate! LOOOOVE this! Great tute :)
We would ♥ for you to show this off at our link party!
Lolly Jane
lollyjaneboutique.blogspot.com
This is a truly unique and amazing project, Kate. I’m blown away.
Wow! This is gorgeous! I wish I had the talent to make one.
The “printing preference” options I think will vary depending on your printer. Mine doesn’t have a poster setting. :( It would be great if it did. Instead I use Publisher, which does have a poster/multi page printout option.
An alternative to those who don’t have a poster setting on their printer (or Publisher) is to, after pasting the picture into Paint, go to Paint’s Page Setup and change the Scaling to “Fit to: 2×3 pages” or 3×4 pages or however large you would like your map to be. (Page Setup is found in Windows 7’s paint near the print and print preview options).
I love this so much! Stopping by from TT and J!
Talk about super creative! Love it!!!
WOW! That is so fabulous looking. I can’t wait to do this!! I just came across your how-to via the kojodesigns pinterest board. I would love to link to this if you didn’t ming.
Oh my gosh! This is SO ADORABLE!
Holy cow, I’m so in love with this project!! It is pinned and at the top of my to-make list.
Totally brilliant!!! I so love it! I want to put it in my bedroom, is that weird?? I love it!
Wow wow WOW, how FANTASTIC!!!
I LOVE, LOVE this!!! What fun, and so creative! Have to make one for our home school classroom!
Thanks for sharing!
WOW! This is amazing. I think this may be THE summer project for my kids and I this year! Thanks for sharing!!!
Wow, what a neat idea!
This is amazing. Thank you for the tutorial. I hope you don;t mind that I posted a link to it. I love your blog – I’m your newest follower!
Cool idea for our grandson. Thanks so much! I’m your newest follower – love your ideas!
XoXoXo
Joy
This is one of the coolest things I’ve ever seen. I want to make it!
Yikes. This looks so time consuming, but I’m falling hard in love for it. Love hurts sometimes, I suppose. And I really love the fabric you chose for my state (NC).
I’ve just seen this on Angela James’ blog – it’s incredible, and inspiring. I wish I could produce the equivalent map of my own country, England. Though I suspect my nimble fingered sister would have to have a LOT of input in that project.
Thanks so much for sharing!
This is unbelievable woman! Youre a total fabric genious!
Just became your newest follower:)
xo,
Sarah
I shared this today on my blog. :) http://www.positivelysplendid.com/2011/05/saturday-seven-no-11.html
This project is AWESOME!!!
Congrats on a great job!
Cara
http://miscellaneousme.wordpress.com
Thanks for the Tutorial !!
think i might tape the map together then iron it on a piece of muslin. yes it would be backwards but you can do the placement on the other side(sorta like paper-pieceing) and it should come out fine!?yes?? that way i know where each state goes on the piece of muslin.
thanks!!!
This is such an incredible project! How talented! This must have taken quite a bit of time. What a great way to reuse old scrap fabric! =D
Thank you for this tutorial! I stumbled across it and fell in love with the map. I decided to make it for myself, and had a great time doing so. I just posted it on my blog if you want to take a look! You’re inspirational!
Wemake125.blogspot.com
I made this! I looooove it!!! Thanks for the idea :)
Hi! Could you please give me the final dimensions of your map ASAP. I’ve printed it but it still feels too small. I like the size you made. Wonderful!
17.5″ by 12″ is the size of the finished product! Good luck!
Hi Kate,
Thank you so much for your quick response with the map dimensions. I’m so glad I found your blog. You sew such beautiful things. Very inspirational!
Getting my scraps out so I can make this. I can’t wait to see how it turns out. You really are an amazing sewer with beautiful ideas.
I love this idea! I made it and posted it to my blog with a link to the original source. Thanks for the fun idea!
Hi, Kate.
When I saw your map, I fell in love. I unfortunately put aside needs to do this want, but it’s finished and I love it. I added “In God We Trust” in a zig zag stitch above the map, and my sash was made from more scraps that I’d used for the states. What a great idea, thanks. I’d send you a pic, but I can’t see how to do that. Thanks again.
Jennifer
I love this so much!! But I can’t sew :-( Is there somewhere i could buy it?!
What a unique and beautiful map wall hanging. hope you’ll come link it up to my Travel challenge here to inspire us all http://angsandy.blogspot.com/2011/06/sandys-challenge-4.html
Beautiful map! I homeschool up in Canada. Must find a map and do one for my boys! Glad I found your blog – awesome!
This project is SO cool! I have been wanting to make something like this for awhile now, but couldn’t figure it out in my head, so I am very appreciative that you put this together and shared it with the rest of us. I am so excited to make this – thank you thank you!!
That is one of the coolest things I’ve ever seen!!!
Hi Kate, I love this map,and am going to make it for my niece’s baby shower. I just wanted to ask you,
you didn’t use any seam allowance for the pieces, did you? You just ironed them on with the raw edges? and then sewed around them, right?
just wanted to make sure.
Thanks for this excellent idea!
Jani
So, I guess you haven’t had time to read my question, but I guess that means that the states just butt up against each other, and you stitch about 1/4″ inside the raw edge.
It didn’t say in the directions, I just wasn’t sure if the raw edges would lay flat, or stick up or anything after you topstitch them.
thanks,
Jani
This comment has been removed by the author.
Hi Jani!
yes, put the states really close to each other. Their edges should match up. I used heat n’ bond on my scraps before sewing them to the background. The heat n bond sticks them on when you iron it. So the edges will lay flat. I sewed 1/4″ away from the edge.
Have fun!
Kate
Hi Kate,
Thanks so much for the reply! I am so excited to make my map for my niece. I’ve enlarged it to about 14 x22 and have all my scraps out! I’ll post a photo when it’s finished. Hope it turns out as great as yours!
thanks again,
Jani
those square states must have been a welcome sight! nicely done!
I loved your map so much and made my own version inspired 100% by yours. Thought you might like to see: http://kirstenscreations.blogspot.com/2011/09/map.html
Awesome! If you are also a scrapper type & have a Cricut, you can use the 50 States cartridge to cut out each state…. was thinking that’s what you did until I read it.
Thanks for the inspiration, Kate! I made a patterned paper version of this and I. Love. IT! https://lh5.googleusercontent.com/-8OfDhinV5ts/Tm0scMmXWZI/AAAAAAAAAD4/SasupG6IKFk/w402/IMG_4757.JPG
Read comment 117 and thought it would help with Mac users but it doesn’t. Any ideas on how to do this “poster print” on a Mac with just word or Publisher?
I made 2 of these for friends with new babies for their nurseries. So in love with this project. I have been encouraged to make more & even sell them. While I know that the USA is not an original shape & applique techniques have been around for a while, but I wanted to check with you since I learned about this on your site.
Just made a couple of these. Thanks again for the tutorial! And the person who posted how to print the map as a poster using “Paint”. Thank you!!
http://senditsoaring.blogspot.com/2011/10/my-scrap-map.html
Jenny– My tutorials are for personal use only. Thank you for respecting that!
I want to buy this, too!
Great to find your blog through Pinterest!!
All the best,
Mary
Mixed-Media Map Art
This is probably the most spectacular thing I’ve seen lately!! Wow!!!
What are the finished dimensions on your map? Would it fit into one of those giant embroidery hoops instead of stretching over board?
What are the finished dimensions of your map? Would it work to put it in one of those giant embroidery hoops instead of stretching over a board?
This is amazing! I was just talking about getting a map so that I could pin all the places I have shipped different orders, but this is so much better than a paper map. I’ll make it and wrap it around a cork board rather than plywood so the pins will stick.
What an amazing project, thanks for sharing!
this is one of the cutest sewing projects i have ever seen!!!
Brilliant! Love it!
Your Scrap Map is amazing. I have always loved the map that was made out of license plates, but now I can make one of my own out of scraps. Love it!
Love this project!
OK… I’m goin’ in… ;-)
I totally made this! http://www.thereadingtailor.com/
Thanks for the idea.
Aimee
Thanks for the idea! I may need to make a traveling bag with this pretty map on it! Then plan a road trip!!!
OH MY GOODNESS!!!!! I just saw this over at Positively Splendid… This is BEYOND adorable!!! I am on my way out the door SERIOUSLY to get some Muslin I am Making this Pretty thing.. :) So it is… “SEE Kate Sew and SEE Angelina RUN!!! ” :) to the store that is..
This is absolutely amazing, lady! I mean, really!
I would love for you to pop over and link up at my party this weekend!
http://kim-toomuchtimeonmyhands.blogspot.com/2011/12/get-schooled-saturday-4.html
so cute! i made a version, but just of my home state of NJ…check it out here:
http://donnadiy.blogspot.com/2012/01/nj-scrap-map.html
I linked you up a bunch of times to make sure everyone knows where the idea came from :-)
Exactly what I’ve been looking for! This is great. ill b making one for a Barn Quilt display at our county fair. Thanks for the tut!
I’m trying to print out the pdf as I write but I have a Mac & have no idea how to go about getting it to print poster size I have tried a lot. Any ideas!?!
I’m trying to print out the pdf as I write but I have a Mac & have no idea how to go about getting it to print poster size I have tried a lot. Any ideas!?!
I liked this project so much that I made one of my own. Check it out: http://cranesinca.blogspot.com/2012/02/keeping-occupied.html
Hi, great project, thanks for the inspiration. One important note though…the author suggests to use purple heat and bond instead of red because it will be easier to topstitch. Except that purple is not double sided and you won’t be able to iron it onto the backing. So, USE THE RED!
Hi Kate! Thanks for the inspiration. you are the first blog I started following and this map is the first project I did. Love the tutorial! Your map is going to raise money for our school. I had 48 1st grade students cut a state out and I did the rest. I hoping to see some of the parents of these students bid on this item. it came out so beautiful! Thank you again
You did an AMAZING job! What can I say that hasn’t been said. I LOVE IT!!! found you on pinterest. I’m going to repin it and try it later!!! Again, great job. I’m following now.
SUPER cute!
WOW! LOVE it!! what is the website for the map and what size does this end up being? thanks so much!
LOVE this! Just a couple questions! what is the website for the map and what is the size of the finished piece! thanks so much!
BRAVO!!! Love this project. What a FABULOUS way to use scraps. I’m your newest follower! {Found you via Today’s Creative Blog.}
<3 Christina
Hey Kate, quick question on this. How big is the finished piece?
Hi Kate, I stumbled across this USA patchwork via Pinterest. I googled Australian map outline and printed it off to make this cushion.
http://onedenimbird.blogspot.com.au/search/label/Australia
Give it a go!
Beautiful. What a great idea.
Wonderful! Now setting off to do try this on world scale, or one for each of the continents… Long-term project anyone? :)
Wow! Love it! What a great idea. I think I’m going to do a large one for our homeschool room. Thanks!
I can’t wait to make this and add tiny buttons for places I have lived or visited. May take the pattern to copy shop and let print 2 poster size sheets.
I can’t wait to make this and add tiny buttons for places I have lived or visited. May take the pattern to copy shop and let print 2 poster size sheets.