• Skip to main content
  • Skip to primary sidebar
  • Skip to footer
  • Blog
  • About
  • Contact
  • FAQ
  • Sponsor

see kate sew

sewing, crafts, tutorials, DIY

  • Patterns
    • Free Patterns
    • Pattern of the Month
  • Tutorials
    • Accessories
    • Bags and Pouches
    • Clothing
    • Costumes
    • Crafts
    • Cricut Projects
    • Holiday
    • Household
    • Kids
    • Maternity
    • Quilting
  • Topics
    • Baby
    • Boy
    • Christmas
    • dog
    • Dolls
    • Easter
    • Girl
    • Halloween
    • Lookbook
    • Party
    • pet
    • Printables
    • Training
    • women
  • No Sew
  • Sewing 101
  • Sew4Good
  • Pet
  • Sewing Room
    • DreamBox
  • Reviews
Home
  • Patterns
    • Free Patterns
    • Pattern of the Month
  • Tutorials
    • Accessories
    • Bags and Pouches
    • Clothing
    • Costumes
    • Crafts
    • Cricut Projects
    • Holiday
    • Household
    • Kids
    • Maternity
    • Quilting
  • Topics
    • Baby
    • Boy
    • Christmas
    • dog
    • Dolls
    • Easter
    • Girl
    • Halloween
    • Lookbook
    • Party
    • pet
    • Printables
    • Training
    • women
  • No Sew
  • Sewing 101
  • Sew4Good
  • Pet
  • Sewing Room
    • DreamBox
  • Reviews

10.17

sewing 101: how to use the binding foot

Welcome to See Kate Sew! If you’re new here, sign up for my email newsletter for access to free patterns, tutorials and all the latest sewing news! Tour my sewing room HERE!

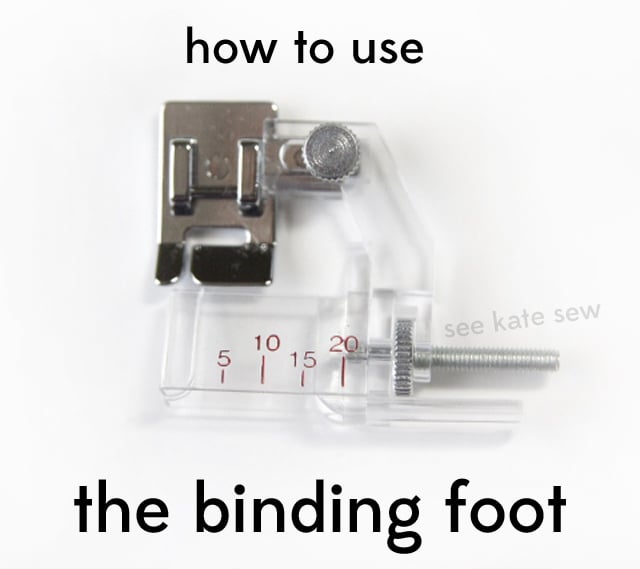
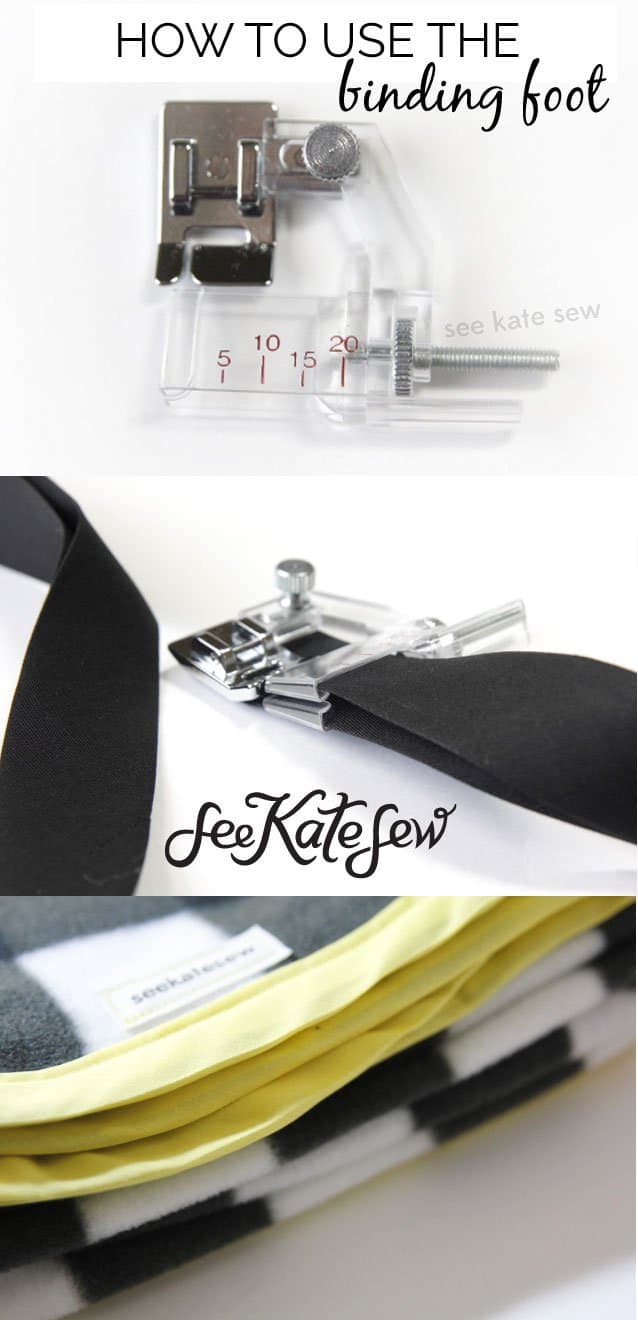
I have a foot fetish apparently. Not the weird kind, the sewing machine foot kind. This is my recent addition: the binding foot! It is amazing.

You can use this foot to attach bias tape and quilt binding. It’s pretty useful because it lines up the needle right where you want it and you get a straight, perfect stitch! My favorite part is you don’t have to pin the binding all the way around whatever you’re sewing before you attach it. You just feed it into the binding foot as you feed the fabric in and voila!

You can use it for binding up to an inch wide. The measurements are in mm. Just adjust the screw on the right side for smaller tape.

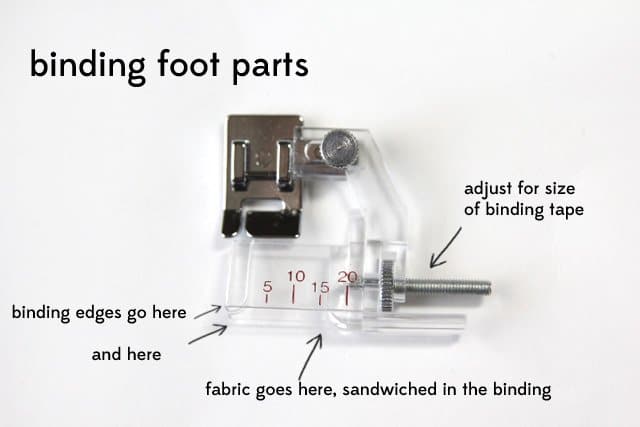
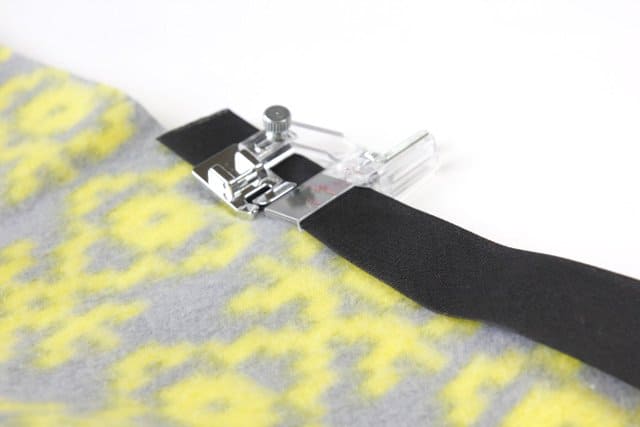
First, feed your bias tape into the mechanism. There are two little plastic tabs, noted above, to hold the binding tape edges.

The plastic pieces are pliable, so you can slip your fabric in between them. That will make a bias tape sandwich, with fabric in the middle. Mmm..

I think it is easier to insert everything when the foot is not attached to the machine yet. So, slip in your fabric.

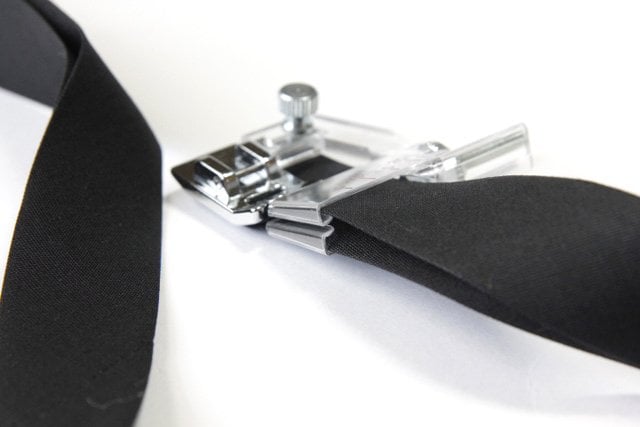
Then attach the foot to your machine and align the needle where you want it. You can place it really close to the edge of the binding foot or in a little bit.

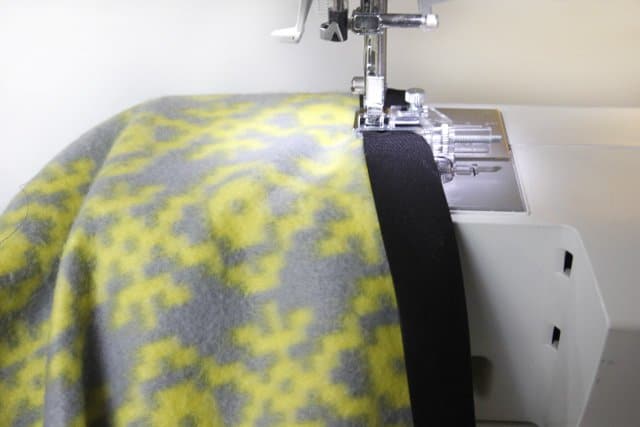
Start sewing! As you sew, you’ll just keep feeding the fabric into the bias tape as you go. The presser foot will make sure it stays there as you sew.

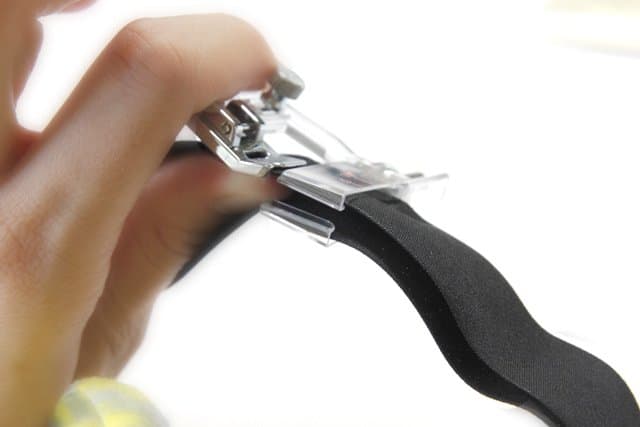
If you look closely you can see how nice and even the stitch it, with no effort!

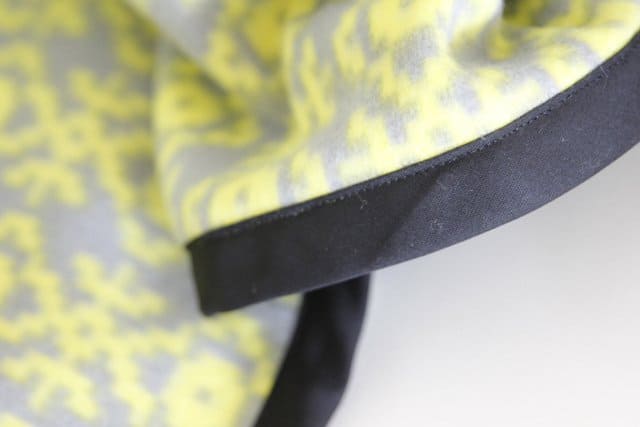
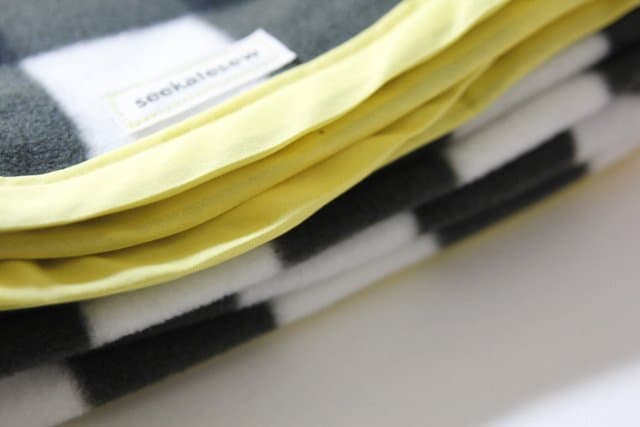
Binding just got a whole lot easier! It even takes curves really well. Thank you binding foot.

What’s your favorite thing to put binding on? I love the extra pop of color or pattern it can add to well, anything!

How to Use The Binding Foot | See Kate Sew

24 Comments | Sewing 101

Exclusive Free PatternRuffled Apron

Sign up for my email newsletter and receive my ruffled apron pattern totally FREE!

We take your privacy seriously. See our privacy policy here. Unsubscribe at any time.

You may also like these posts...

Recess Raglan Front Pocket Add-on | See Kate SewSewing 101: Simple Front Pocket Tutorialbabylock melody!meet Melody! Baby Lock Melody Sewing Machine Reviewhow to use a ruffler footfree skirt patternZIPPERS + a free simple skirt pattern

Reader Interactions

24 Comments

  1. CaroleM

    10/17 at 3:03 PM

    This looks pretty nifty. Two questions- how do you find it handles the back side – do you ever find out it missed the back side of the binding? And also how do you handle corners? can you still mitre them? Thank you!

  2. Anna

    10/17 at 3:15 PM

    cool! I didn’t know they made such a thing for home machines. I’ll have to see if I can buy one. :)

  3. RaspberrySunshine

    10/17 at 3:37 PM

    Have Mercy. I’m Googling it right now :) What kind of machine do you have? I have an industrial for most of my sewing, but I recently got a Janome DC2012. It came with a lot of feet, but not this one!! Thanks for sharing :)

    Cindy

  4. Shauna@shwinandshwin

    10/17 at 3:51 PM

    You are a sewing foot genius! I am getting the binding foot asap! How did I ever live without it?

  5. Elise Lin

    10/17 at 4:45 PM

    That looks so neat! I didn’t even know those existed, thank you for the post.

  6. Saskia

    10/17 at 5:01 PM

    Wow this is really amazing!!! So cool! Doing this by hand always rotates it or messes it up, this looks so easy…

  7. Mandy

    10/17 at 5:44 PM

    How cool is that?!

  8. Stef

    10/17 at 6:04 PM

    WHAT?!!?!? I am heading in RIGHT NOW to scrounge through my box of attachments to see if I have one of those! I had no idea! You have changed binding for me today, Kate!! Can you get it to work around teeny little armholes and such??

  9. Emily

    10/17 at 6:13 PM

    Um what?! I need that foot too!!

  10. jacquickelly

    10/17 at 7:34 PM

    Completely brilliant!! I need one!

  11. Taylor Made

    10/17 at 7:51 PM

    This is life changing haha, I never knew if that hint worked! Christmas list!

  12. paula

    10/17 at 8:45 PM

    I am using the Bernina Binder Attachment right now! I LOVE it!!!

  13. marysza

    10/17 at 8:57 PM

    i havent seen this foot earlier :O omg but it is a really great thing, so much usefull and you spend less time on sewing..!!

  14. sewVery

    10/17 at 9:32 PM

    I have an old Bernina. This type of foot will probably cost me the rest of the leg and an arm! But I am definitely impressed with your knowledge of sewing machine feet! Thanks!

  15. Heather Racansky

    10/18 at 2:47 AM

    holy heck, thats awesome!

  16. Simple Simon & Co

    10/18 at 2:15 PM

    I totally have that foot…and have never used it. (Shame, shame)

    Thanks for sharing how easy it is!

  17. allierae

    10/18 at 10:34 PM

    I clearly need one of these.

  18. cdabis

    10/22 at 3:00 PM

    THANK YOU! You’ve opened a whole new arena of sewing for me!!

  19. cdabis

    10/22 at 3:01 PM

    Thank you! I never ever imagined such a tool existed. You’ve opened a door to wonderful things yet to come! THANK YOU AGAIN..

  20. Kak Lin

    10/30 at 11:42 PM

    Thanks to this post, I just bought one! Can’t wait to use it. TQ

  21. Anneliese

    11/01 at 1:07 AM

    Can’t believe I didn’t know about this! Hoorary! Now I have to add this to my Amazon cart, along with an invisible zipper foot!

  22. Mrs. Smith

    11/01 at 8:03 AM

    Thank you thankyou!!

  23. Nuttyginger

    01/21 at 2:34 AM

    Your tutorial was excellent. I am really struggling with corners though, especially when i have two pieces of fabric, even if i baste them together first. The fabric and bias tape will not turn the corner without the fabric coming out or the neddle running off the tape!

    Is there any tutorials you know of, for this particular foot or do you have any tips.

    I really want to make a blanket with curved corners!

    • kate

      01/21 at 5:19 PM

      Oh no! The only thing I can think of is to move the needle in a bit so it doesn’t run off. Or maybe zigzag or serge the two layers together before you put the binding on? I didn’t have this problem, but good luck!

Primary Sidebar

  • Facebook
  • Twitter
  • Instagram
  • Pinterest
  • Email

Exclusive Free PatternRuffled Apron

Sign up for my email newsletter and receive my ruffled apron pattern totally FREE!

We take your privacy seriously. See our privacy policy here. You can unsubscribe at any time.

Don’t miss these popular posts!

easy baby dress pattern for the summertime

easy baby dress pattern for the summertime

modern ombre + b/w triangle quilt tutorial + pattern

modern ombre + b/w triangle quilt tutorial + pattern

Fabric

Quilted Cosmetic Case Kiss Me KateKiss Me, Kate FabricOne Hour Granny Square Quilt Tutorial | See Kate SewModern Granny Square Quilt Whole Cloth

Pattern Hacks

Easy Baby Summer Dressthe EMMA pattern | See Kate SewThe EMMA Dress

Footer

Hello friends!

My name is Kate, a twenty something fashion lover and mother of two. When I’m not chasing kids you can find me at my sewing table or daydreaming up new designs. You can read more about me here. Thank you for visiting!

8a918f8da8e0e69102dc0f33a718de85a99c31a57283e0e3e2

FOLLOW ME HERE

  • Facebook
  • Twitter
  • Instagram
  • Pinterest
  • Email
  • Blog
  • About
  • Contact
  • FAQ
  • Sponsor

Copyright © 2025 See Kate Sew  •  All Rights Reserved  •  Privacy Policy  •  Site Design by Emily White Designs