• Skip to main content
  • Skip to primary sidebar
  • Skip to footer
  • Blog
  • About
  • Contact
  • FAQ
  • Sponsor

see kate sew

sewing, crafts, tutorials, DIY

  • Patterns
    • Free Patterns
    • Pattern of the Month
  • Tutorials
    • Accessories
    • Bags and Pouches
    • Clothing
    • Costumes
    • Crafts
    • Cricut Projects
    • Holiday
    • Household
    • Kids
    • Maternity
    • Quilting
  • Topics
    • Baby
    • Boy
    • Christmas
    • dog
    • Dolls
    • Easter
    • Girl
    • Halloween
    • Lookbook
    • Party
    • pet
    • Printables
    • Training
    • women
  • No Sew
  • Sewing 101
  • Sew4Good
  • Pet
  • Sewing Room
    • DreamBox
  • Reviews
Home
  • Patterns
    • Free Patterns
    • Pattern of the Month
  • Tutorials
    • Accessories
    • Bags and Pouches
    • Clothing
    • Costumes
    • Crafts
    • Cricut Projects
    • Holiday
    • Household
    • Kids
    • Maternity
    • Quilting
  • Topics
    • Baby
    • Boy
    • Christmas
    • dog
    • Dolls
    • Easter
    • Girl
    • Halloween
    • Lookbook
    • Party
    • pet
    • Printables
    • Training
    • women
  • No Sew
  • Sewing 101
  • Sew4Good
  • Pet
  • Sewing Room
    • DreamBox
  • Reviews

02.15

sewing101: facings

Welcome to See Kate Sew! If you’re new here, sign up for my email newsletter for access to free patterns, tutorials and all the latest sewing news! Tour my sewing room HERE!

For this week’s sewing 101, let’s talk about facing. Facings are so easy to make and give your garment a professional finish, without a full lining. Of course you can face and line a garment, which makes it so nice and fancy on the inside. But facings on their own are more economical and great for keeping clothing lightweight. 
I use facings the most in necklines. There are lots of ways to finish garment necklines, but facings are my favorite, so nice and clean! You can also face the fronts of blouses or coats with button plackets, waistbands and sleeves.
This tutorial is for a neckline facing, but you can apply the same principles to facing any part of your garment.
Sewing 101: Facings || How to apply a facing | Sewing 101 | Sewing Tutorials | Facings || See Kate Sew #facings #sewing101 #sewingtutorials #seekatesew
Lay the scrap over the top of the bodice piece and trace the neckline. Then draw the shoulder and center seams down about 2″. You may have to adjust that measurement depending on the size of clothing you are making. If you’re making a baby dress 2″ might be way too much facing.
Sewing 101: Facings || How to apply a facing | Sewing 101 | Sewing Tutorials | Facings || See Kate Sew #facings #sewing101 #sewingtutorials #seekatesew

Now, use the same measurement (2″ for this example) and draw dots to mark two inches from the neckline. Since it is curved, this will help us draw an even line for the bottom edge of the facing.

Sewing 101: Facings || How to apply a facing | Sewing 101 | Sewing Tutorials | Facings || See Kate Sew #facings #sewing101 #sewingtutorials #seekatesew

Lots of dots will make it easier!

Sewing 101: Facings || How to apply a facing | Sewing 101 | Sewing Tutorials | Facings || See Kate Sew #facings #sewing101 #sewingtutorials #seekatesew

Connect all the dots to complete your pattern piece.

Sewing 101: Facings || How to apply a facing | Sewing 101 | Sewing Tutorials | Facings || See Kate Sew #facings #sewing101 #sewingtutorials #seekatesew

Repeat for the front neckline and cut out your pieces. I like to interface the facings for a little more stability. So do that if you want also. Lay out the pieces how you will sew them together.

Sewing 101: Facings || How to apply a facing | Sewing 101 | Sewing Tutorials | Facings || See Kate Sew #facings #sewing101 #sewingtutorials #seekatesew

Then pin and sew.

Sewing 101: Facings || How to apply a facing | Sewing 101 | Sewing Tutorials | Facings || See Kate Sew #facings #sewing101 #sewingtutorials #seekatesew

Press the seams open.

Sewing 101: Facings || How to apply a facing | Sewing 101 | Sewing Tutorials | Facings || See Kate Sew #facings #sewing101 #sewingtutorials #seekatesew

And serge (or zig-zag) the bottom edge.

Sewing 101: Facings || How to apply a facing | Sewing 101 | Sewing Tutorials | Facings || See Kate Sew #facings #sewing101 #sewingtutorials #seekatesew

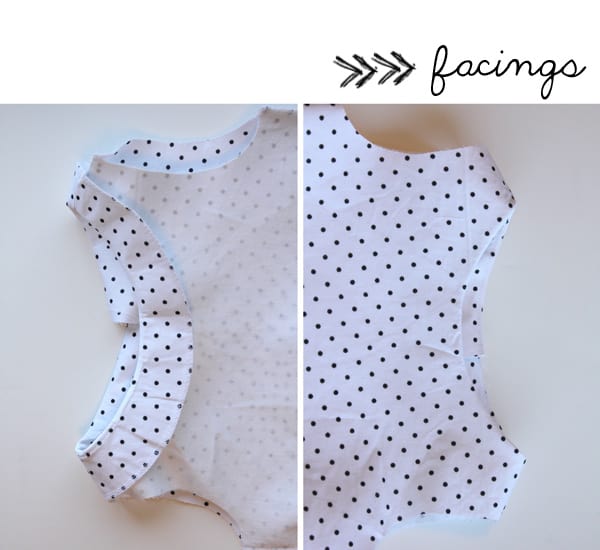
Now pin your facing to the bodice neckline with right sides together and sew it on.

Sewing 101: Facings || How to apply a facing | Sewing 101 | Sewing Tutorials | Facings || See Kate Sew #facings #sewing101 #sewingtutorials #seekatesew

Sew it on.

Sewing 101: Facings || How to apply a facing | Sewing 101 | Sewing Tutorials | Facings || See Kate Sew #facings #sewing101 #sewingtutorials #seekatesew

Then clip the seam allowance or use pinking shears (I recommend ginghers). Clipping the seam will allow your neckline to curve without seam allowance pulling it weird ways.

Sewing 101: Facings || How to apply a facing | Sewing 101 | Sewing Tutorials | Facings || See Kate Sew #facings #sewing101 #sewingtutorials #seekatesew
Press the seam allowance toward the facing and stitch it to the facing. You’ll run a line of stitching about 1/8″ away from the seam. The stitching should be on the facing piece. This is called understitching and will help pull your facing to the inside of the garment so you don’t see it.
Sewing 101: Facings || How to apply a facing | Sewing 101 | Sewing Tutorials | Facings || See Kate Sew #facings #sewing101 #sewingtutorials #seekatesew

That’s it! You’re done! Doesn’t it look nice?

Also check out my interfacing guide, where to get pattern paper and more sewing 101 lessons!

Facings | See Kate Sew

13 Comments | Sewing 101

Exclusive Free PatternRuffled Apron

Sign up for my email newsletter and receive my ruffled apron pattern totally FREE!

We take your privacy seriously. See our privacy policy here. Unsubscribe at any time.

You may also like these posts...

Half Square Triangles Instructions for Magic Eight Methodhalf square triangles 8 at a time chart5 Things I Love about my Cricut Explore Air 2 for sewingsewing 101: how to use the binding footHalf Square Triangle Quilt Pattern + HST Tutorial

Reader Interactions

13 Comments

  1. Rona

    02/15 at 2:54 PM

    Great tutorial! I will have to keep this in mind when making my daughters spring/summer clothes. I actually just got a pattern that I order in and it calls for a full lining, something I’m not crazy about for hot southern summers! And pinking shears, yes I have some, but never thought to use them for “clipping”, oh what a time/sanity saver that will be! :)

    Keep up the great work!

  2. Rona

    02/15 at 2:54 PM

    Great tutorial! I will have to keep this in mind when making my daughters spring/summer clothes. I actually just got a pattern that I order in and it calls for a full lining, something I’m not crazy about for hot southern summers! And pinking shears, yes I have some, but never thought to use them for “clipping”, oh what a time/sanity saver that will be! :)

    Keep up the great work!

  3. Nikell

    02/15 at 3:59 PM

    This post was really helpful! I’m always looking to learn new techniques. Thanks for sharing this…can’t wait to try it on my next project (^_^)

  4. Hayley

    02/15 at 5:18 PM

    Thank you so much for this tutorial. I generally just skip over sewing 101 posts because it’s all stuff I know how to do, or I’ve seen tutorials everywhere else for it. But this is a first, and this is definitely something I’ve been wanting to learn. Thank you!!

  5. Harpa Jónsdóttir

    02/15 at 5:37 PM

    Great idea to use the pinking shears. I need to get me a pair!

  6. AKK

    02/15 at 6:37 PM

    Definitely saving on my Tutorial board on pinterest! Thanks Kate!

  7. CreationsbyJune

    02/15 at 8:06 PM

    oh my. you made this seem so easy and doable!!! definitely going to remember the pinking shears next time!

  8. Bettina

    02/15 at 9:09 PM

    Thank you! I’ve had a few patterns now that have described this process in the most confusing way. I’m ignoring them now and going with this!

  9. Grizz 'n' Dove

    02/16 at 12:29 AM

    Thanks for the tutorial – it was a great review from my 4-H days when my mom was right next to me, helping me with the interfacing and the understitching :)

  10. Este

    02/17 at 6:15 PM

    Thanks for posting the tutorial, it´s really a great help!

  11. Emily

    06/01 at 9:20 PM

    Thank you! I’ve been wondering what understitching is. :)

  12. Slavica Vucinic

    07/02 at 6:53 AM

    Great tutorial!Thanks!

  13. Natasha Rodricks-Naidu

    04/24 at 1:54 AM

    Excellent tutorial. Does the interfacing need to be cut along the bias?

Primary Sidebar

  • Facebook
  • Twitter
  • Instagram
  • Pinterest
  • Email

Exclusive Free PatternRuffled Apron

Sign up for my email newsletter and receive my ruffled apron pattern totally FREE!

We take your privacy seriously. See our privacy policy here. You can unsubscribe at any time.

Don’t miss these popular posts!

easy baby dress pattern for the summertime

easy baby dress pattern for the summertime

modern ombre + b/w triangle quilt tutorial + pattern

modern ombre + b/w triangle quilt tutorial + pattern

Fabric

Quilted Cosmetic Case Kiss Me KateKiss Me, Kate FabricOne Hour Granny Square Quilt Tutorial | See Kate SewModern Granny Square Quilt Whole Cloth

Pattern Hacks

Easy Baby Summer Dressthe EMMA pattern | See Kate SewThe EMMA Dress

Footer

Hello friends!

My name is Kate, a twenty something fashion lover and mother of two. When I’m not chasing kids you can find me at my sewing table or daydreaming up new designs. You can read more about me here. Thank you for visiting!

8a918f8da8e0e69102dc0f33a718de85a99c31a57283e0e3e2

FOLLOW ME HERE

  • Facebook
  • Twitter
  • Instagram
  • Pinterest
  • Email
  • Blog
  • About
  • Contact
  • FAQ
  • Sponsor

Copyright © 2025 See Kate Sew  •  All Rights Reserved  •  Privacy Policy  •  Site Design by Emily White Designs