That’s really the only way to describe it.
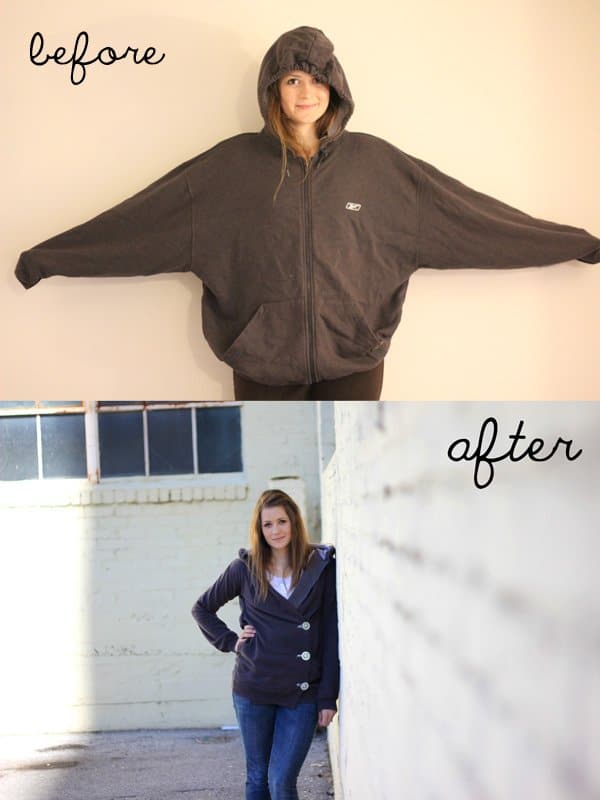
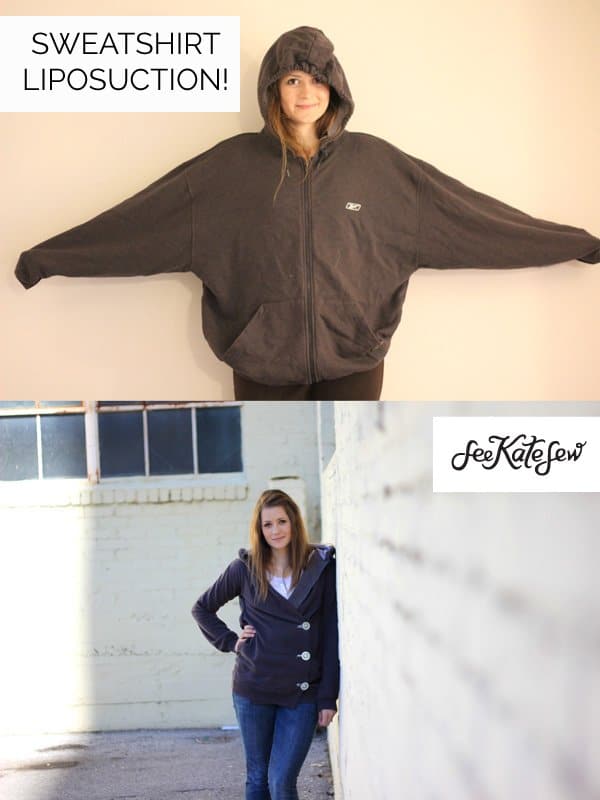
I’ve seen too many cute little hoodie refashions around to not make one myself. This old sweatshirt used to be one of my brother-in-laws. Not sure which one. But don’t worry, I washed it on HOT! (jk, thanks for the sweatshirt!)
This hoodie was an XL before I started. I trimmed it down, took in sides, added darts and pleats and now it’s probably a billowy medium. I didn’t fit it too much, because it’s still a sweatshirt, and I like them cozy!
Materials:
1 zip-up oversized hoodie
3 buttons
fabric for buttonhole stabilizer
Here’s what I did:
I’m pretty sure these pictures are hideous. Like my pj pants? I know. These totally look like a “before” dieting picture, right!
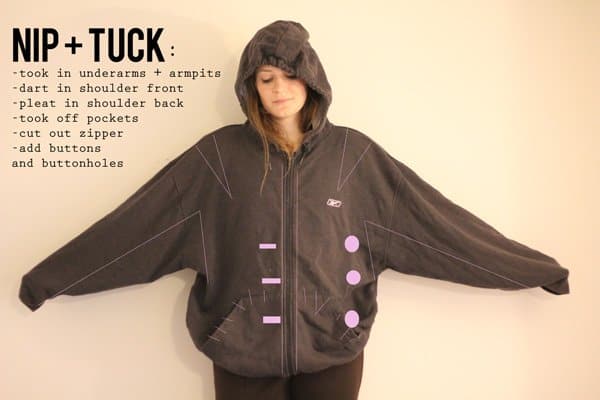
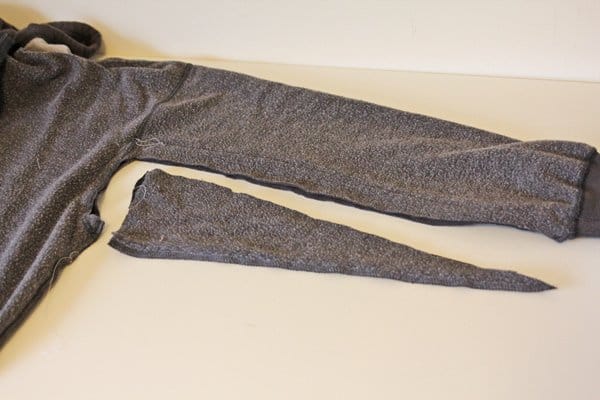
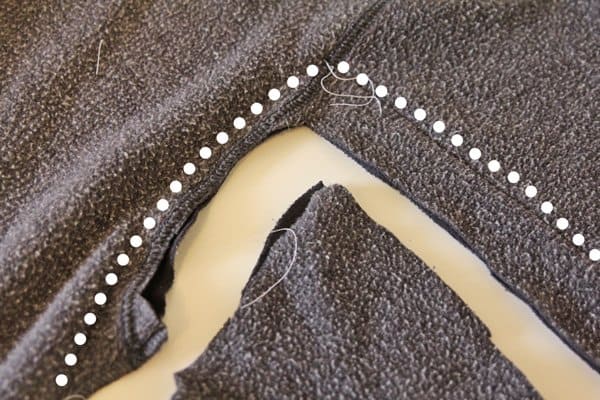
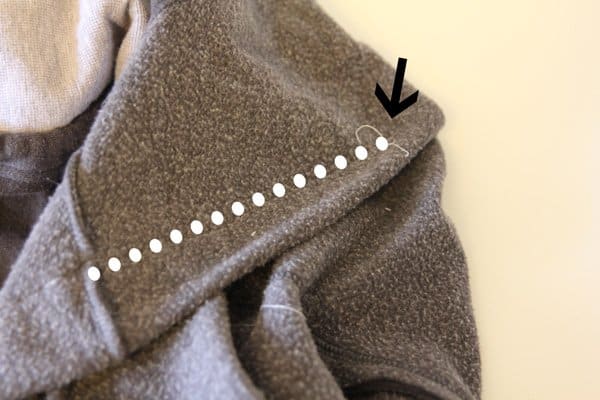
Step 1: Sew up underarm and cut out extra fabric. I tried on my big sweatshirt and eyeballed how much I wanted to take it. I didn’t want to take it in too much to make it skin-tight but I definitely wanted it to be a lot more feminine.
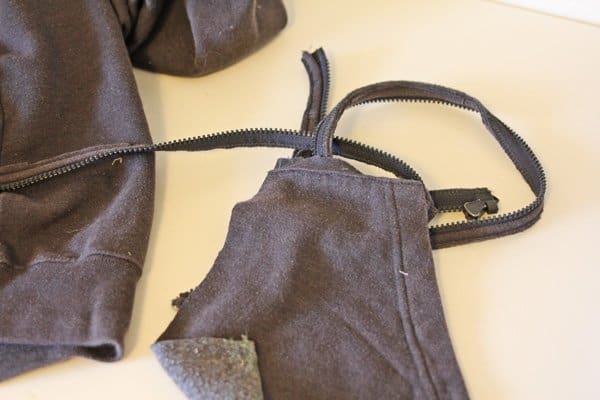
Step 2: cut out zipper and unpick pockets. I had to cut the bottom of the pocket off since it was sewn into the ribbing.
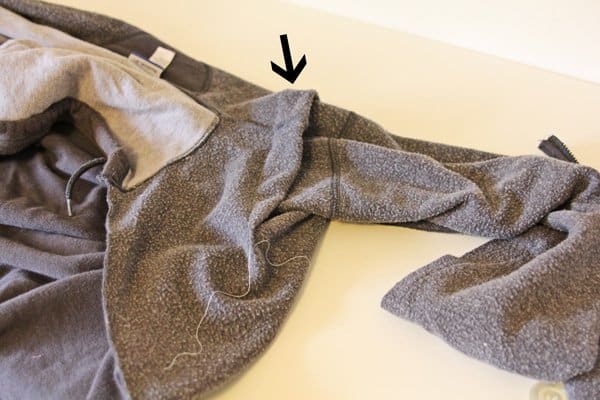
Step 3: Shoulders. My sweatshirt’s shoulder seams were sagging off my arms, so I made a dart in the front, about 6″ long and a similar pleat in the back. Use the nip/tuck guide above to see a better illustration of the dart.
This is the front, the dart comes to a point.
back: Instead of ending this pleat in a point, just backstitch at the end instead. This will give the back of your hoodie a cute little pucker.
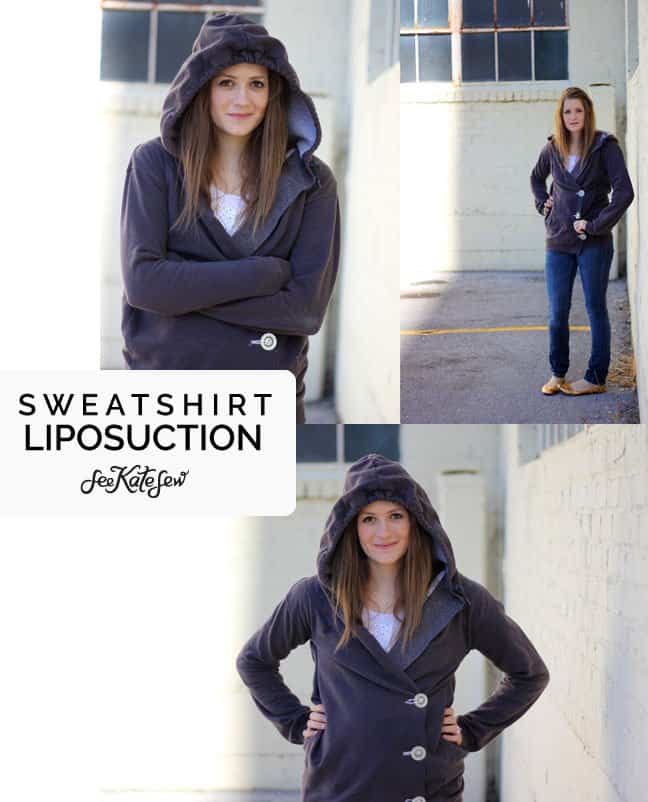
Step 4: Bring one side of your sweatshirt over across your body and decide where you want the buttons and buttonholes to go. Use a little bit of fabric underneath your buttonholes as a stabilizer for the knit.

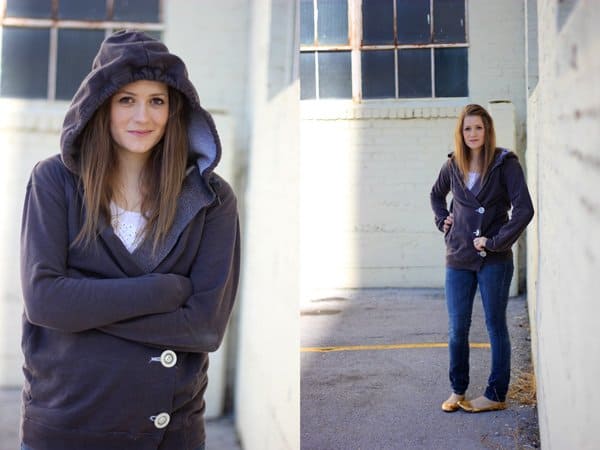
Done! Hoodie magic!


How adorable! I love the look. The buttons dress it up a bit. I may have to give this a try myself. Thanks for sharing it.
very nice :)
Great job! I might have to give this a try on a an XL sweatshirt I got for free the other day. :) Thanks for sharing your how-to!
You seriously amaze me…you are my sewing idol
LOVE this! Seriously, I think I now know what I’m doing this afternoon…forget all those house chores that need to get done :) I’m sure my husband has a sweatshirt he doesn’t ‘need’ anymore!
Thank you!
Great Job! And you look great in your PJ pants!!! I love the sweatshirt, I have a yellow one calling for the same liposuction technique :)
that looks so good, you are amazing!
Yup… I’ll be stealing one from my husband :)
Hooray! I’m so excited about this–I’ve seen a similar hoodie picture floating around pinterest forever and was hoping someone would eventually make a tutorial for a similar look (so I wouldn’t have to try and inevitably botch it on my own)! It’s so cute, and looks like it’s not too difficult (hopefully)–I’ll be giving it a try! Thanks!
I’ll take that over Bo-tox any day! I was seriously thinking of stealing a zippy sweater from my husband last night. I thought he was totally over it. I even had a stinkin dream about how I’d need to stitch it before I cut into it to prevent fraying… but what did he wear outta the house this morning?? yup… guess it’ll have to wait…sigh…
very interesting idea and excellent tutorial!
So clever! Excellent idea and really clear tutorial.
Thanks, Kate.
This is amazing!! Thanks for sharing it!
It’s funny you posted this. I saw a refashioned sweatshirt on Pinterest a couple weeks ago and made one myself last week. Haven’t gotten around to blogging about it yet but I totally love yours!
So cute! You are amazing!
Kate,
You’re seriously a crafty genius. Love this!
Love this transformation and your descriptions/pictures. :)
i love it! i wish i could see the back, though
Love it! It looks fantastic.
Wow, you’re so talented! Love the big white buttons! Thanx for sharing!
Natalie
http://www.projectdowhatyoulove.wordpress.com
It’s fabulous. Great idea. I must check if my brother got large jacket that he doesn’t use anymore. :)
This is super cute, Kate! And can I just say…you look very pretty in these pics! (as usual!)
i lovelovelovelovelove this. oh how i want to try. you are so unbelievably creative.
Do you have a pic of the back?
This is awesome. I saw something like this on etsy for $80. Ridiculous! I wish I was more of an accomplished sewer to take this one on!
Thank you for posting this!!!!!
Love it Kate, thanks for posting!
You did such a good job! I’m so excited to try this! Thanks for sharing!
Very cute! I hope to be confident enough in my sewing one day to do something like this!
This is so awesome… I have some big clothes that need a nip/tuck like this!
That is soo cute!
OMG is really clever, I have to try one!!!
you give me a nice idea, thanks:-D
This is amazing! It still looks so comfy. Next XL sweatshirt I come upon will experience a similar transformation!
This is such a cute fitted hoodie! I don’t think I am to that level of altering yet (you lost me at the dart for the shoulder), but maybe someday!
I’ve been wanting to do one of these as well. Yours turned out great!
Melissa
http://www.lovebugliving.com
What in the crap? This is the same sweatshirt. You are seriously amazing. It is times like this that I really wish I knew how to sew. I am seriously loving this! Will you make me one? I stumbled this!
Brilliant! Love this refashion. Visiting from TT&J :) I would love for you to link this up to my fashion party! It’s called DIY Diva Thursdays and we party Th-M every week. Hope to see you!
Kara
http://www.mineforthemaking.com
You look so pretty in your new jacket Kate!
Cute liposuction. Might have to give this one a try.
Hey there Amber again I posted once before on this but I wanted to let you know that your sweatshirt liposuction made my Green Craft Round up for this month and will be posted at http://www.lifelovegreen.com on Wed Nov 30th!
This is AMAZING!! love this! Great job! :)
There’s a very similary jacket on Etsy that sells for >$100 bucks. Thank you–now I can make my own!! Yay!
This so soooooo cute!!!
I just tried this tutorial. THANK YOU SO MUCH! Not only was it easy, but the end result is ADORABLE!
I just tried this tutorial! THANK YOU! Not only is the tutorial easy, but the end result is SO CUTE!! :)
OH MY GOD. Im here for the first time but I’ve just fell madly in love with your ideas! The hoodie and everything’s great, since now I’m going just to the charity shops and remake these things your way!!:)
This is awesome. So cute and pretty simple. Thanks for sharing.
I love this…I can not get enough sweatshirts. You have so many fun ideas…and I am slowly learning to sew…:)
Is there a place to see close up pictures of the cuts and the after? I love it, but am nervous about cutting…I would love to see more details of cutting out the pocket/zipper and what it looks like after there are buttons :) Thank you for such a great project!! It’s beautiful!
I just finished this redo of an old red hoodie that I had. Thanks for the inspiration and directions. I too would like to see a photo of how the pleat looks in the back. I ended up sewing about 3 inches down the back and then tacked the pleats so that they folded the same, both towards the center.
Absolutely awesome! :) Make me one please!! X
This is so cute! I wish I had a massively oversized hoodie to try it on. Maybe I will steal one of hubbies ;)
Thanks for sharing
~ Zoe
Okay, this is adorable. I am going to make it this weekend.
THXS.
XOX
Diane
So Adorable! I am totally going to do this. Your are so creative!!!
Brilliant – what a great transformation!
I wish I could sew… Can anyone make one for me please? :)
Super cute!! Thank you for sharing!
What a clever lady you are. This is really cute, you went from frumpy to stylish! Congratulations!
It looks great, but I don’t understand how to remove the pockets.
What does the back look like? Could you maybe post a picture of it?
Very Clever! Thanks!
Nice!
I wish I knew how to sew!!! No sewing machine and no sewing skills! LMAO! Maybe I can ship one to ya, you fix it and ship back!? HEHEHE!! ;)
Thank you for posting this!! I’ve seen this style posted on Pinterest and have been wanting to try it! I have no sewing knowledge so thank you for spelling it out for me! :)
I absolutely love it! It’s so cozy and makes me excited for Winter!!
thanks for the inspiration! i made one of these this weekend. check it out:
http://sarahandkris.blogspot.com/2012/09/sweatshirt-makeover.html
Way too cute!!!
Very cool project. We are going to make one this weekend :)
If I send you a sweatshirt could you make me one and I’ll pay you!! This is my all-time favorite thing in the world! dawnmaahs@gmail.com
a hint that i figured out is that if you have a hoodie you already like with the arm width use that as a template.
https://sites.google.com/site/5hemsandmore/home/samples
Thank you for this tutorial. ! just finished mine. check it out. I used a hooded sweatshirt then added the contrasting trim around the inside of the hood and front for color and to give the button holes some body. Cheers to you and thank you.
Exelent tut! Wery well explained:) I will rave my husbands closet and see what I can find:) Feel free to check my blog as well:)
Ok, I can’t sew, but I would pay to get my hands on one of these – anyone want to make one for me? :)
Fabulous! I need one too now :)
My husband is convinced that the before and after pictures are not the same hoodie. On the lookout for a ginormous hoodie now!
Thanks for the tutorial!! I actually finished this a week ago. Loved your explanation! I did have some problems with the sweatshirt just still looking big and ended up have to take it in quite a bit at the waist as well. Mines not quite as cute as yours, especially because I’m a bit bigger than you, but was a fun up cycle!