• Skip to main content
  • Skip to primary sidebar
  • Skip to footer
  • Blog
  • About
  • Contact
  • FAQ
  • Sponsor

see kate sew

sewing, crafts, tutorials, DIY

  • Patterns
    • Free Patterns
    • Pattern of the Month
  • Tutorials
    • Accessories
    • Bags and Pouches
    • Clothing
    • Costumes
    • Crafts
    • Cricut Projects
    • Holiday
    • Household
    • Kids
    • Maternity
    • Quilting
  • Topics
    • Baby
    • Boy
    • Christmas
    • dog
    • Dolls
    • Easter
    • Girl
    • Halloween
    • Lookbook
    • Party
    • pet
    • Printables
    • Training
    • women
  • No Sew
  • Sewing 101
  • Sew4Good
  • Pet
  • Sewing Room
    • DreamBox
  • Reviews
Home
  • Patterns
    • Free Patterns
    • Pattern of the Month
  • Tutorials
    • Accessories
    • Bags and Pouches
    • Clothing
    • Costumes
    • Crafts
    • Cricut Projects
    • Holiday
    • Household
    • Kids
    • Maternity
    • Quilting
  • Topics
    • Baby
    • Boy
    • Christmas
    • dog
    • Dolls
    • Easter
    • Girl
    • Halloween
    • Lookbook
    • Party
    • pet
    • Printables
    • Training
    • women
  • No Sew
  • Sewing 101
  • Sew4Good
  • Pet
  • Sewing Room
    • DreamBox
  • Reviews

04.20

pinwheel pleated pillow tutorial

Welcome to See Kate Sew! If you’re new here, sign up for my email newsletter for access to free patterns, tutorials and all the latest sewing news! Tour my sewing room HERE!

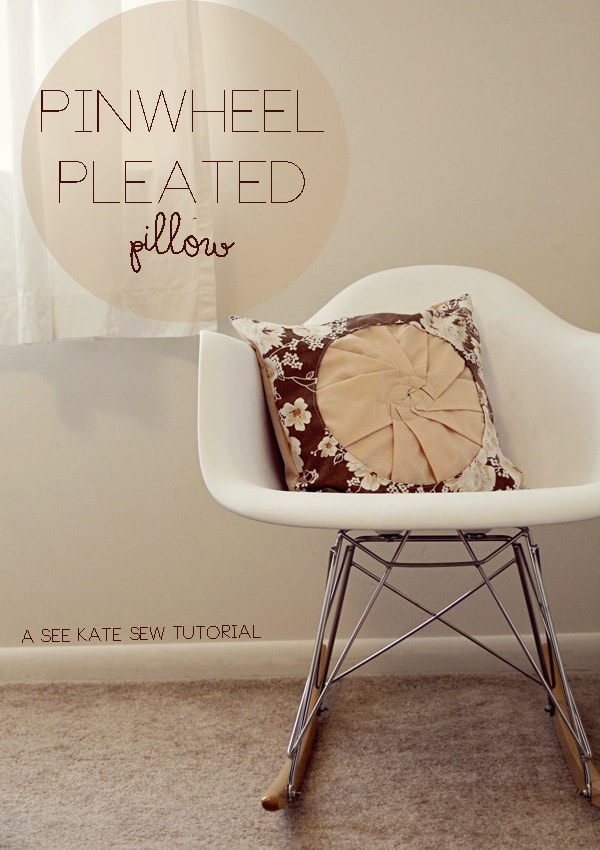
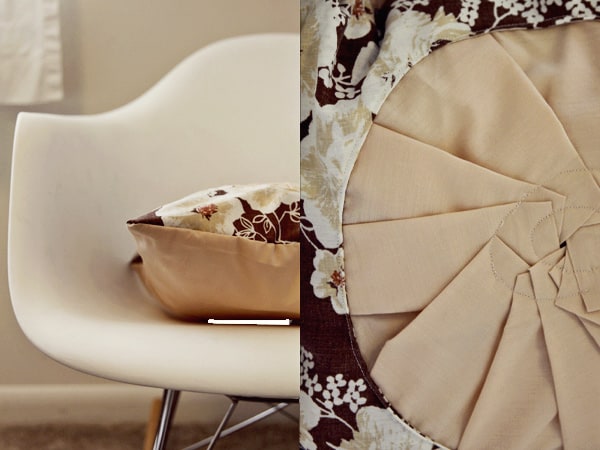
Yesterday I shared my pinwheel pleats dress that I made about 3 years ago. Today I’m sharing the technique to make circular pleated insets. You can do this on anything, I’ll show you how to make it into retro pillow.

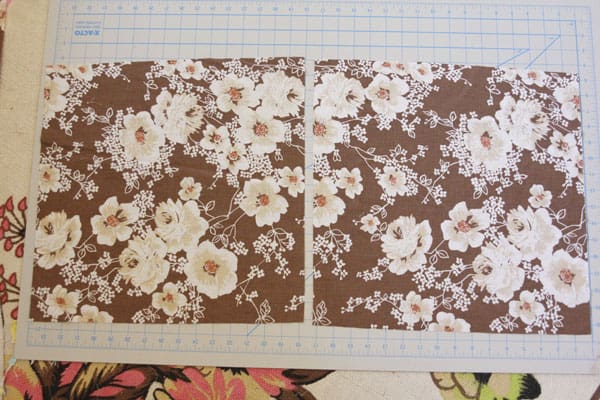
You’ll need two colors or prints of fabric. I used a vintage sheet and a solid peach color for the backing and pleats. Cut out 16″ squares. You’ll need two of the front color and one for the back. 

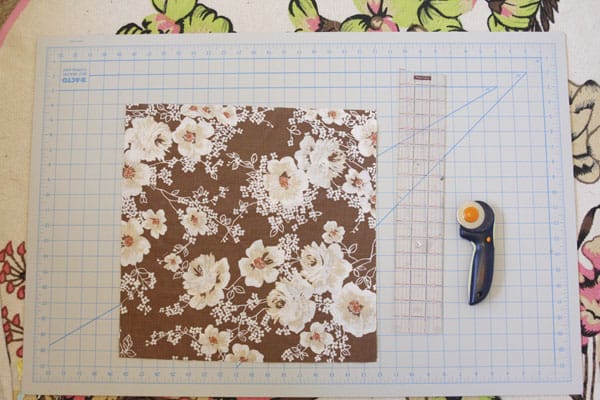
 Stack the two layers right sides together.Using a big bowl, trace a circle smack dab in the middle of both pieces of fabric. 

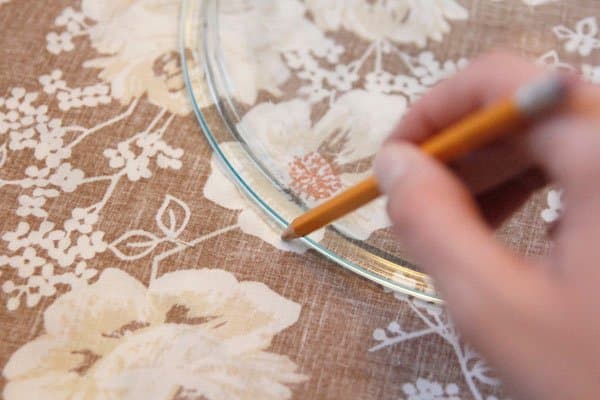
Pin around the edges and sew along the circle. Then cut into the middle of the circle and cut out the extra fabric.

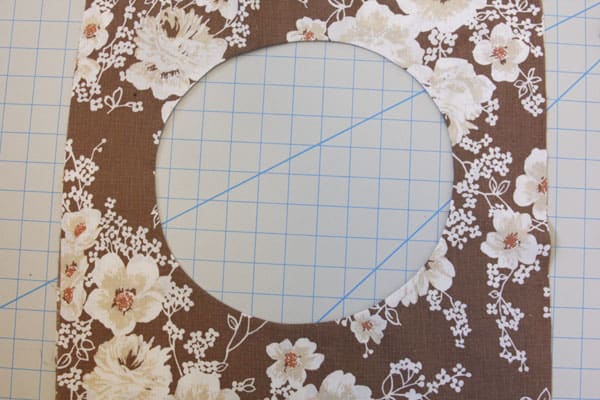
 Use pinking shears to trim the seam allowance.

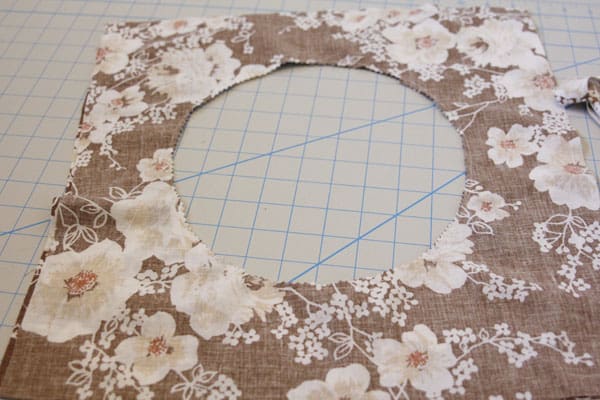
 Then flip one layer into the center of the circle and match the corners. 

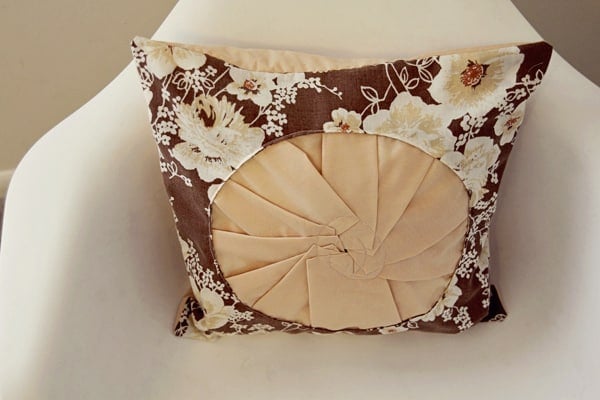
 Press it. You should have a square that looks like this:

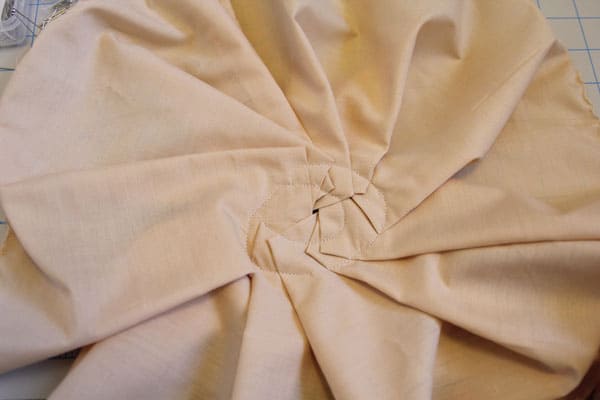
For the circle pleat inset, you’ll need a long strip of fabric about 6″ by 60″ The strip I used was 8.5″ wide, but I had too much. 

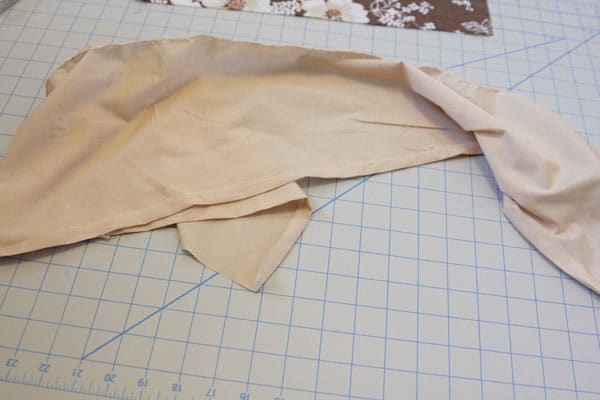
 Pleat it around in a circle. The inside pleats should be tight and should lessen as they reach the outside of the circle. 

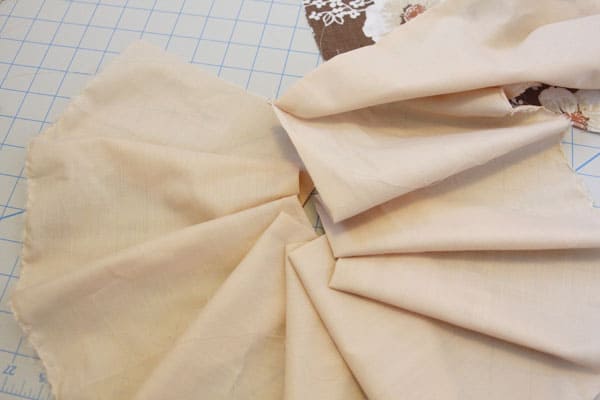
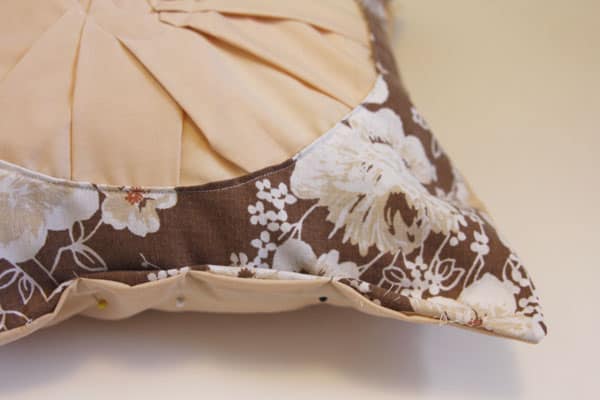
When you get to where you started, just fold under both edges so now raw edges are showing.

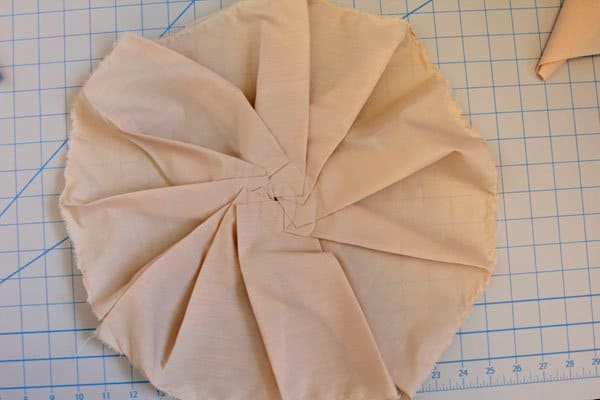
 Pin the pleats together.

Topstitch in a swirl to keep the pleats in place using matching thread. Press.

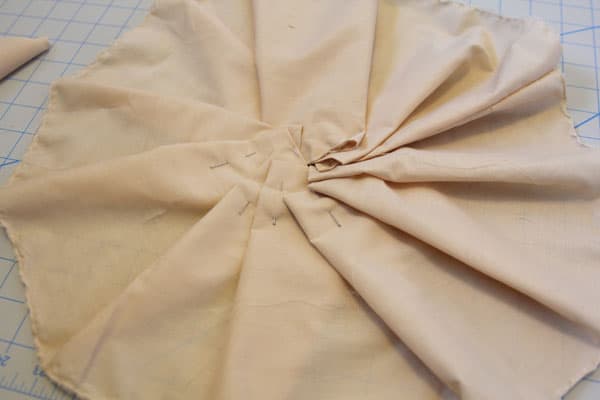
 Now, place your circle in the opening and pin it down.

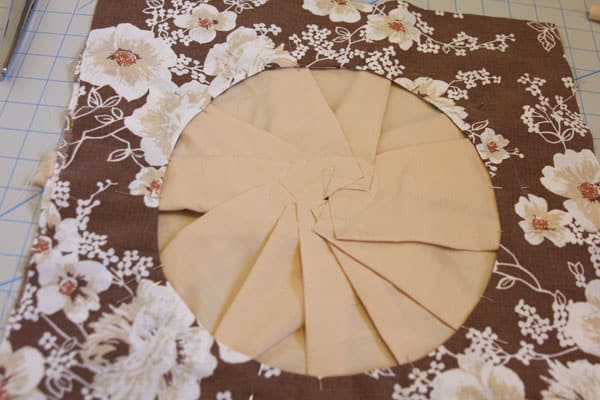
 Topstitch around the edge on the front fabric.

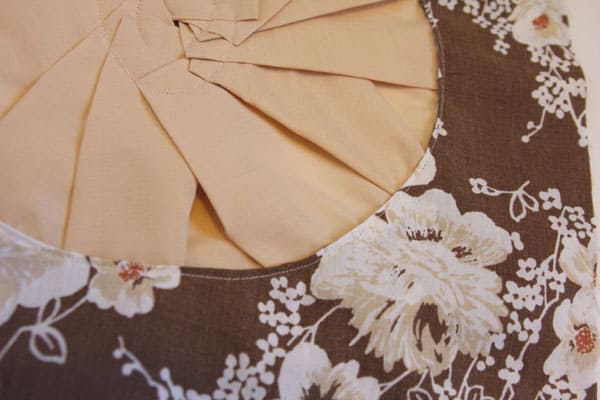
 Now lay your back piece on top of your front piece, right sides together and sew it up, leaving a hole to insert your pillow.

 Push your pillow form inside and pin the opening closed. 

 Stitch it up with a slip stitch.

 Done!

7 Comments | Household

Exclusive Free PatternRuffled Apron

Sign up for my email newsletter and receive my ruffled apron pattern totally FREE!

We take your privacy seriously. See our privacy policy here. Unsubscribe at any time.

You may also like these posts...

One Hour Granny Square Quilt Tutorial | See Kate SewOne Hour Modern Granny Square Quilt with quilt cloth!DIY Circle Playmat with Fringe!Spider-Man: No Way HomeInterchangeable Quote Wall Decor with Spider-Man: No Way HomeSewing Machine Cover PatternSewing Machine Cover Pattern – Jelly Roll Project!

Reader Interactions

7 Comments

  1. Tara @ Tales of a Trophy Wife

    04/20 at 10:24 PM

    I pinned it-thanks!

  2. Madalynne

    04/21 at 12:17 AM

    What a great tutorial! Isn’t it amazing how a design detail on a dress can also be used on a pillow. It just goes to show that interior design and fashion definitely overlap

  3. marysza

    04/21 at 7:08 AM

    nice one!! i would use different colours – more ‘full of life’ but the idea is really great!! :)

  4. Skin and Blister

    04/21 at 8:25 AM

    This is really lovely… you could do so many fabric variations too. Thank you for sharing. Anna x

  5. Just this... Alice

    04/21 at 4:13 PM

    WOW! You make it look so easy to do with this tutorial that I know I can do it now. Thanks for sharing.

  6. Anna

    04/22 at 7:08 PM

    How nice! and that idea so original.
    A hug.
    Anna

  7. Constantine La

    05/17 at 11:40 PM

    Wow, this is a great tutorial. I was searching for donut pillows and ran into this site, but these pinwheel pillows are beautiful!

Primary Sidebar

  • Facebook
  • Twitter
  • Instagram
  • Pinterest
  • Email

Exclusive Free PatternRuffled Apron

Sign up for my email newsletter and receive my ruffled apron pattern totally FREE!

We take your privacy seriously. See our privacy policy here. You can unsubscribe at any time.

Don’t miss these popular posts!

easy baby dress pattern for the summertime

easy baby dress pattern for the summertime

modern ombre + b/w triangle quilt tutorial + pattern

modern ombre + b/w triangle quilt tutorial + pattern

Fabric

Quilted Cosmetic Case Kiss Me KateKiss Me, Kate FabricOne Hour Granny Square Quilt Tutorial | See Kate SewModern Granny Square Quilt Whole Cloth

Pattern Hacks

Easy Baby Summer Dressthe EMMA pattern | See Kate SewThe EMMA Dress

Footer

Hello friends!

My name is Kate, a twenty something fashion lover and mother of two. When I’m not chasing kids you can find me at my sewing table or daydreaming up new designs. You can read more about me here. Thank you for visiting!

8a918f8da8e0e69102dc0f33a718de85a99c31a57283e0e3e2

FOLLOW ME HERE

  • Facebook
  • Twitter
  • Instagram
  • Pinterest
  • Email
  • Blog
  • About
  • Contact
  • FAQ
  • Sponsor

Copyright © 2023 See Kate Sew  •  All Rights Reserved  •  Privacy Policy  •  Site Design by Emily White Designs