Today’s guest is Jess from Running with Scissors! Jess was one of the competitor’s during my Project Run and Play Season. She has some serious skills, did you see the baby TOMS she made? Jess also has a pattern shop and just released a cute Euro boy swim suit pattern with James Bond Variation! She also sews for herself a lot, which is so inspiring!

…………..

I’m excited to join the Ruffles 2012 with a pleat idea! When Kate invited me to participate I immediately wanted to be in on the pleat week!
I love using pleats to add texture, and prefer the geometric shape they create.
This technique uses contrasting fabric strips to create a pleated ombre texture, that is sewn down for added patterning in a zig-zag. I selected different shades of blue to create an ombre pattern in the pleats.

Ombre Pleated Pillow Cover

SUPPLIES:
-pillow form (16″)
-pillow form (16″)
-backing fabric (1 yard)
-scraps for colored strips
-invisible thread
1. Cut Strips:
For a 16″ pillow, you’ll cut strips for the pillow front:
Colors: 11 strips 2.5″ wide and 17″ long (for my ombre: 1 white, 2 of each transition color, then 4 of darkest)
Backing: 12 strips 2″ wide and 17″ long
I usually prefer envelope pillow covers, so for the back of the pillow you’ll need rectangles:
17″x 12″ and 17″ x 10″

2. Sew Strips Together
Using a 1/4″ seam allowance, alternate between a backing strip and your contrasting colored strips to chain sew them into a panel, making sure to sew your ombre pattern as you go.
3. Create Pleats
You’ll next fold the panel right sides togther for each pleat you’ll make. This will bring the seams on either side of a contrasting colored strip together, making the pleat fold on itself. Sew along the seams, conecting the two backing strips together and causing each colored strips to stand up off the backing layers.
Repeat across your panel, creating the pleats.

Her’s a view of how the colored strips are sewn in a standing pleat while the backing strips become a base.

4. Create Zig-Zag Texture
Placing panel with strips horizontally, chalk in two lines, the first 3″ from raw edge, the second 6″ from first line or 9″ from raw edge.
Using invisible thread, sew down these lines, holding all the pleats in the same direction.

Next, you’ll chalk in two more lines, this time going the opposite direction from your first set. These lines will be 3″ from the original lines.

It’s a little tricky sewing against the pleats for the second set, you just pull each pleat right as you sew across it, keeping the panel as flat as you can as it will have a tendency to pull and twist.

So at this point you’ll have the center zig-zagged and need to take the ends and sew them down in the opposite directions to finish off the ends of the zig-zag texture.


5. Press Pillow Front
I use my iron and press the pillow front along the length (up and down) of the pleats rather than across.

6. Complete Back to Pillow Cover
left: Take the long ends (17″ long) of your envelope backing pieces and use 1/2″ hem to one of the long sides on each rectangle.
center: Place right side of pillow front to right sides of envelope back pieces, overlapping them to create envelope opening.
right: Sew with 1/2″ seam allowance around perimeter of pillow, curving at the corners.
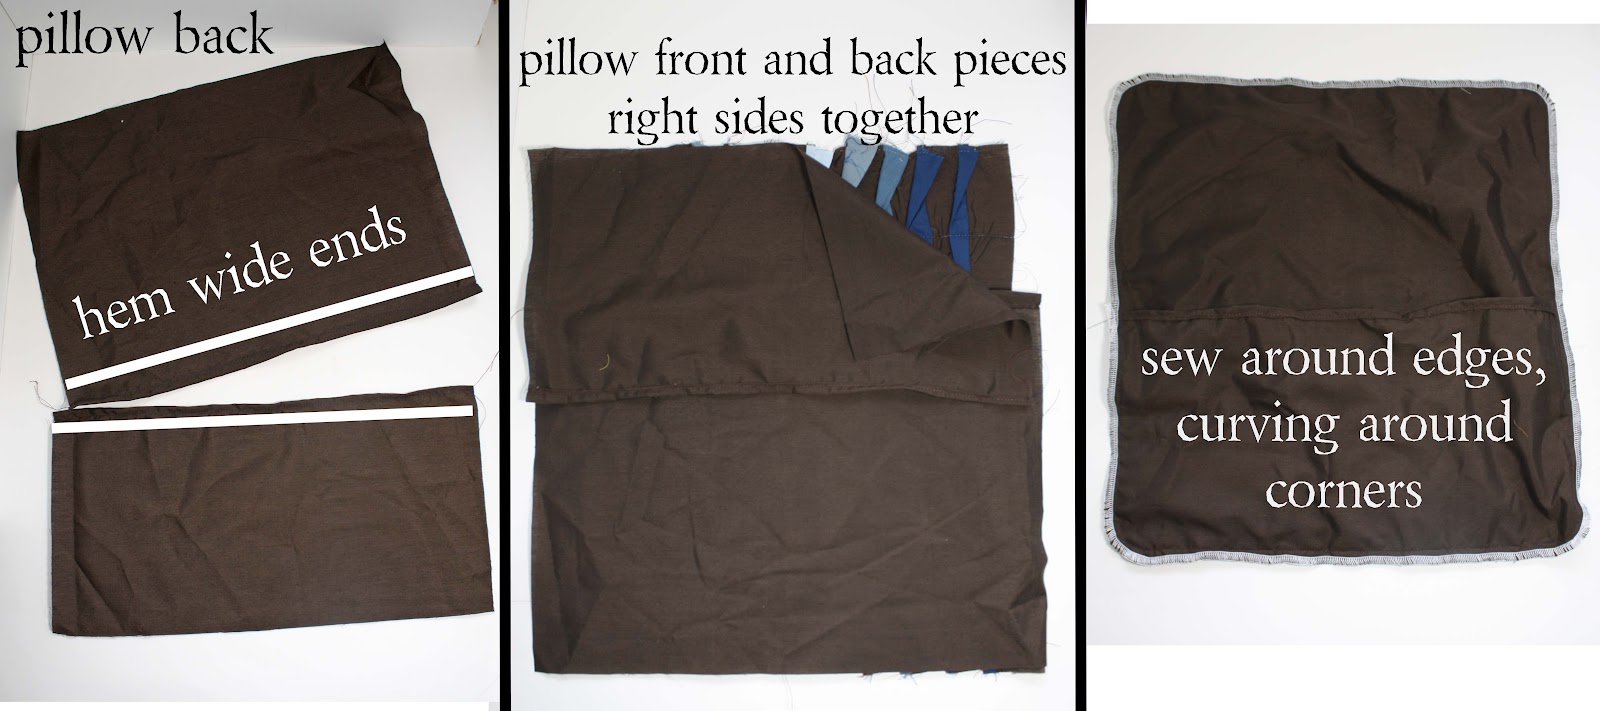
You’re finished!
You could use all one color on the pleats, mix prints, or play with different fabrics textures like sheer organza or lace. This pleated zig-zag technique could also be used on tote bags, backpacks, clutches and more!

………….
Thanks Jess! It’s awesome! Also check out Jess’s pleated champagne party dress, ruffle cardigan, and red ruffle dress. You can also find Running with Scissors on facebook.


There is actually a name for that technique… they’re called “Mexican tucks” and are seen in both heirloom sewing and on traditional Mexican wedding dresses.
I LOVE IT i want some now :)
great tutorial, jess! you’ve got my wheels turning…my couches need pillows! :)
Ooh, I have been trying to figure out where I want to use this exact same technique. Love the pillow!
Love it! Original idea!
This is great! I just found a pillow using the same technique at Target, and I need 4 of them, but for $24.99 each, I have to pass… this tutorial is wonderful, now I can have them!