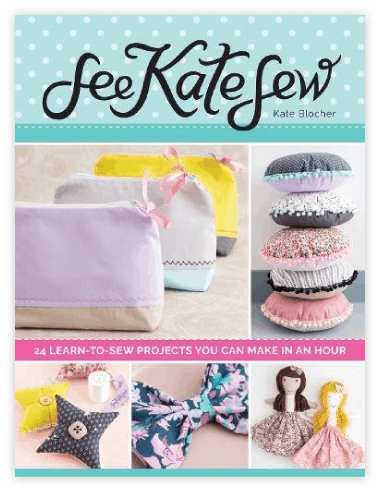
To celebrate the first day of Spring (tomorrow!), how about a free skinny tie pattern? Okay! Most of the time when we're tie shopping, I say NO NO NO to just about every tie. Their patterns are so boring (more diagonal stripes? or weird computer generated shiny patterns?) and their shapes are so huge and sometimes clown-like. I like minimalism for menswear. Bold and clean cut lines. And I'm really digging square ties right now! I bought my husband a few for Christmas, but decided to make some so I can choose exactly what I want them to ...Continue Reading
27 drawers
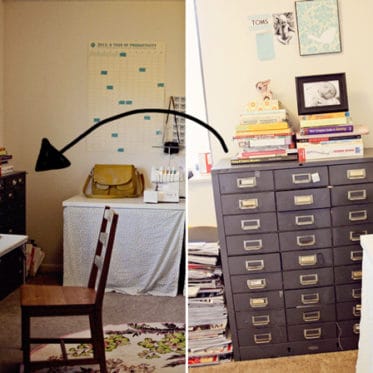
Sentimentality can be heavy sometimes. Literally. This big metal chest of 27 metal drawers is the perfect example. It was my grandfather's. His name was Julius. He was awesome, supportive and the happy-go-luckiest person I'd ever met. I used to go over to his house where he paid me to do chores, an excuse to see us weekly. He had polio and couldn't so simple chores like weed or water the plants. He handed me a blow torch and showed me how to burn the weeds in between the bricks so they wouldn't come back. That was my favorite chore. I told you ...Continue Reading
book shelf
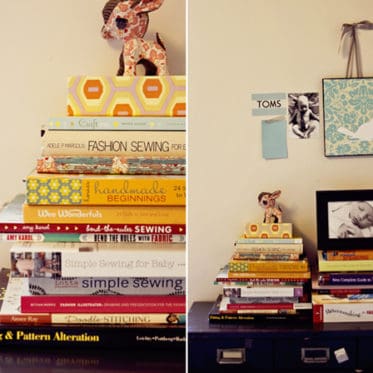
Here's a close up of my book shelf from my sewing room tour. I have a little collection growing. The only thing better than a crisp new book is a crisp new sewing book!The books on the shelf:Left side, top to bottom:1 handmade book2 Craft, Inc.3 Fashion Sewing For Everyone4 Handmade Beginnings5 Wee Wonderfuls6 Bend-the-Rules Sewing7 Bend the Rules with Fabric8 Lotta Jansdotter's Simple Sewing for Baby9 Lotta Jansdotter's Simple Sewing10 Fashion Illustrator11 Doodle Stitching12 Fitting and Pattern Alterationright side, top to ...Continue Reading
sewing room tour!
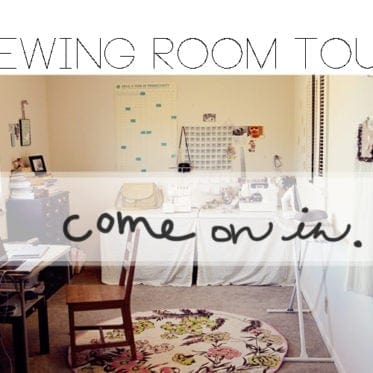
I feel like I've been trying to clean up my sewing room enough to share pictures of it for about a year! But as soon as I get close to having it all clean, I start sewing again. And then...stuff is everywhere! I'm not a tidy sewer. Those people with pristine sewing rooms make me wonder. Crafting is messy, right? I love surrounding myself with supplies, things I love and..well stuff! So, it's a clean space, but it's usually full of crafty clutter. My sewing room is our dining room. When we moved, we knew we needed a separate space for my ...Continue Reading
thrifted blouse refashion
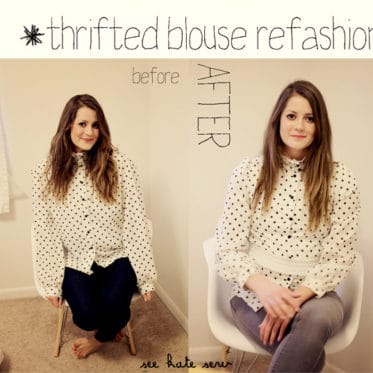
One of my "resewlutions" this year is to fix a half-rack of thrifted blouses and dresses I have hanging in my closet, just waiting for a new life. I love polka dots so this huge polka dot blouse was hard to not pass up. I love the high neck with buttons, the billowy sleeves and the sleeve cuffs on this blouse. But it didn't quite fit right. It was a few sizes too big and makes me look a little bit like Veruca Salt. Also, the shoulders were way too big, which is a problem with lots of blouses from the shoulder pad era. Today I'll show you how I ...Continue Reading
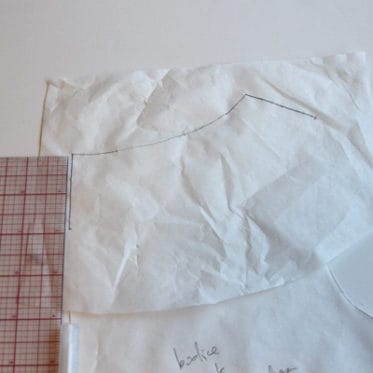
the "color pop" seam technique
I couldn't for the life of me remember what this technique is called, so I made up a new name for it: The color pop seam. Catchy, eh? Anyways, it's so cool, right! Like a tiny color explosion right in the middle of your jumper. The fun thing is you can put these seams ANYWHERE! All you have to do is make a new seam in your pattern piece and pop in some color. I'll show you how to do this. I'm using a sleeve pattern for my example. But like you can see, these can go wherever there is a seam, and you can add a seam anywhere there is ...Continue Reading
sewing101: add a seam to any pattern piece
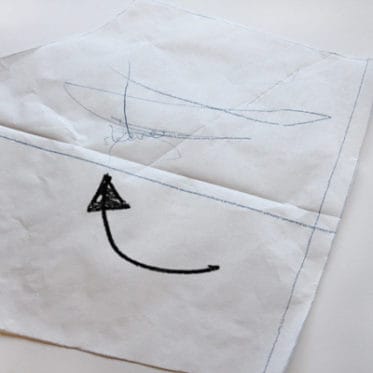
First get your pattern piece and draw a line where you want the new seam to go. I marked the line with an arrow. As you can see, I had a little fine motor skills helper decorate my pattern. Then cut down the line. Add 1/2" of pattern paper to each side of the new seam for new seam allowance. Tape it on. That is all you have to do to add a new seam! ...Continue Reading
color block party

My rejected pr+p lookThis picture says it all: I was pretty sure of myself for most of my looks, but the party dress theme had me all over the place! I made these two dresses first. The took forever, and I eventually hated them. Seeing as I got kicked out for the alternate dress I made later, maybe I should have sent these in. Hah! But I hate them and I wouldn't have felt comfortable sending it in. I like them a little more now that the heat of the competition is over, but it's definitely not my best work. This crazy blue dress was inspired by ...Continue Reading
sewing101: exposed zippers
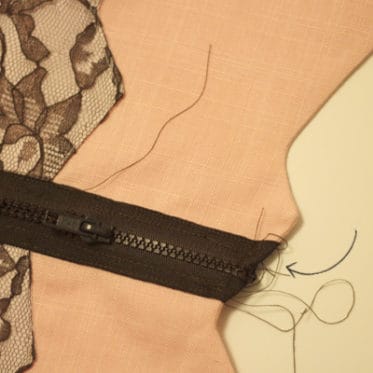
We've already talked about sewing zippers in a regular seam and sewing invisible zippers so today let's talk about exposed zippers! These are really easy and can add a fun decorative (and functional) element to any garment! Exposed zippers are zippers that sit right on top of your garment, for a deconstructed look. An exposed zipper can add an element of interest to an otherwise plain garment. Sometimes I use them to add a pop of unexpected color. If you are going for an industrial look, this is your zipper! They can be really fun! I ...Continue Reading
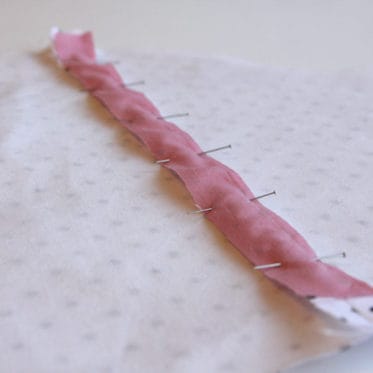
bias tape bow neckline tutorial

If you haven't noticed already, I love bows. It's an obsession going on year two. Yikes. I like to make bows when I am not sure what else to make. I think they look super cute on the tops of little heads, on pillows, doubled up, and on blouses! This project is a simple way to finish a neckline and add a little femininity while you're at it! All you need for this project is a nearly completed blouse and some bias tape! You can make your own to match your blouse perfectly, or just use store bought. I made myself some brown bias tape to match ...Continue Reading
sewing101: facings
For this week's sewing 101, let's talk about facing. Facings are so easy to make and give your garment a professional finish, without a full lining. Of course you can face and line a garment, which makes it so nice and fancy on the inside. But facings on their own are more economical and great for keeping clothing lightweight. I use facings the most in necklines. There are lots of ways to finish garment necklines, but facings are my favorite, so nice and clean! You can also face the fronts of blouses or coats with button plackets, ...Continue Reading